• Home
  • Java
    • Core Java
  • Liferay
    • Liferay 6.0
  • Miscellaneous
  • Updates
  • Useful Links

Wednesday, 6 March 2013

call service from one portlet to another portlet in liferay

In my last article how to create service builder in liferay, we have seen how we can create service and persistence layer in liferay with the help of Service builder.

You might have observed that after running the service builder (by ant build-service command), liferay will generate the service jar under /WEB-INF/lib folder.

Many cases we come to situation in which one portlet should have access to service layer which is located in another portlet.

If both of these portlets are in same liferay plugin project then the service classes (created by service builder) defined in one portlet are directly available and accessible to all other plugins(portlets,hooks etc) in same plugin project. Please refer my blog on How to create two portlets in single liferay plugin project.

Some times its not possible to have all portlets in same plugin project which wants to share the service builder class.

In this case, the generated service JAR needs to place at common place from where all the plugins (portlet, hooks etc) can access it. The common place for liferay server is 

<<Tomcat-Liferay-Bundle>>\tomcat-x.x.x\lib 

So we need to place the generated service JAR under above location. For example, we have created following two portlet


  • student-portlet.
  • fee-portlet.


We have created the service in student-portlet. So that all the generated classes and JAR files  reside inside student-portlet. We want to access student service class inside fee-portlet. So we need to

  • Move the generated JAR (student-portlet-service.jar) from /WEB-INF/lib (of student-portlet) to <<Tomcat-Liferay-Bundle>>\tomcat-x.x.x\lib  
  • Restart the tomcat server. After restart, we can able to access service classes inside fee-portlet.
Note:- I have used Move word so we must have to remove the service JAR at /WEB-INF/lib after its shifted to  <<Tomcat-Liferay-Bundle>>\tomcat-x.x.x\lib  

And its done. Try to create more than 2 portlet and create the service layer in one portlet and move the service JAR at <<Tomcat-Liferay-Bundle>>\tomcat-x.x.x\lib  folder and check if its accessible to all plugins (Portlets, hooks etc).

Feel free to ask questions / give suggestion.

Monday, 4 March 2013

Create Finder method for Service builder in liferay

In my last article on Creating Service layer with Service builder in Liferay we have seen how  to create service layer for each entity in liferay through service builder. We took Student entity to understand it.

In this article we will see some useful trick to add custom method in service layer. We will go ahead with the same example that we took in Creating Service layer with Service builder in Liferay article, So I strongly recommend to go through it before starting this article.

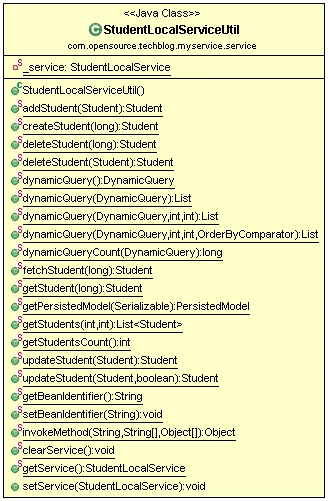
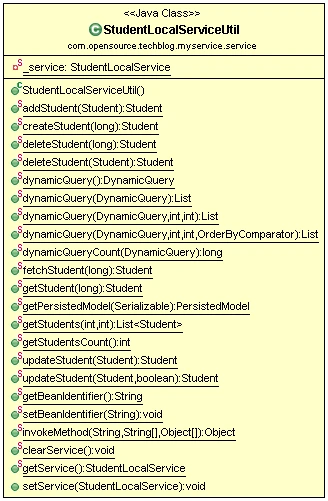
Follow all the steps in last article (Creating Service layer with Service builder in Liferay) and create the student entity. After service build, it will create the StudentLocalSerciceUtil class with following methods.


If you observe, this class contains basic CRUD methods. Many business scenarios, we need to get data based on some condition.

For example, If I want to fetch all the students who are in standard 8, there is no direct method available. At max we can call getStudents method (Which will return all students) and then from the list we can take 8th standard student programatically. But this is not efficient way. In case of let say 10000 students, if the total no of 8th standard student is just 30, then there is no meaning to fetch all 10000 students.

Liferay provides finder method technique to achieve this. Let us see how to write finder method.

So far now, we have created the student entity as per below snippet(I am omitting DTD definition).


<entity name="Student" local-service="true" remote-service="false">
  <column name="studentId" type="long" primary="true" />
  <column name="name" type="String" />
  <column name="age" type="int" />
  <column name="fatherName" type="String" />
  <column name="motherName" type="String" />
  <column name="standard" type="int" />
 </entity>


We are going to add finder method in this entity. Generally finder methods are build on columns so first we need to identify on which column(s) we want finder methods. 

In our case we want to search all the students who are from 8th Standard. So we will write finder method on column standard. We will add the finder element for standard column so that finally it will looks like below snippet.


<entity name="Student" local-service="true" remote-service="false">
  <column name="studentId" type="long" primary="true" />
  <column name="name" type="String" />
  <column name="age" type="int" />
  <column name="fatherName" type="String" />
  <column name="motherName" type="String" />
  <column name="standard" type="int" />
  
  <finder return-type="Collection" name="Standard">
   <finder-column name="standard"/>
  </finder>
 </entity>


Explanation:-
  • We have defined one element (finder) inside student entity. This will create finder method for column standard.
  • The value of return-type is Collection which means that the return type of finder method will be List<T>.
  • The value of name attribute will be used to construct finder method name. We gave Standard so the generated finder method name will be findByStandard().
    • Note:- You can give any value in name attribute of <finder> element. The only thing you need to make sure it to give first letter as capital. It will still work if you give first letter small. But then the method name become findBystandard() which should be findByStandard() (Camel Case as Java coding standard).
  • <finder-column> element Inside the <finder> element represents the column name.
  • the name attribute of <finder-column> element represents the name of the column. It should have exact same name as <column>'s name attribute of which we want finder method.
Now run the service builder by ant build-service command and refresh the page. After running it, the finder method won't be directly created inside StudentLocalServiceUtil class. The finder method will be created inside 

  • StudentPersistence.java (under /WEB-INF/service/com/opensource/techblog/myservice/service/persistence/)
  • StudentPersistenceImpl.java (under WEB-INF/src/com/opensource/techblog/myservice/service/persistence).
The first is the interface and the second is it's implementation. You will observe that the method findByStandard(int standard) is created in above interface and class.

The only class accessible outside the service builder is StudentLocalServiceUtil.

This class (StudentLocalServiceUtil) can be used to perform CRUD operation. We need to make sure the finder method is also available in this class. (to access it in our portlet class).

So let us see how to achieve this. Our half work is done (finder method is available in persistence class).

If you remember from previous blog (Creating Service layer with Service builder in Liferay), the only service class that is available to add custom method is StudentLocalServiceImpl.java (available under WEB-INF/src/com/opensource/techblog/myservice/service/impl). Open this class and you will observe that by default there is no method defined.

Add following method in this (StudentLocalServiceImpl) class.

/**
  * 
  * @param standard
  * @return List<Student>
  * @throws SystemException
  */
 public List<Student> getStudentForStandard(int standard) throws SystemException{
  return this.studentPersistence.findByStandard(standard);
 }


Explanation:-

  • We first declare method (getStudentForStandard) which takes standard as input and return the list of the students who are for specific standard.
  • The name of the method can be taken any thing that you feel relevant since its our custom method. The same signature method will be created in StudentLocalServiceUtil  class on next service build. The method inside the StudentLocalServiceUtil will call the corresponding method of StudentLocalServiceImpl  class.
  • Next we are calling this.studentPersistence.findByStandard method.
  • This is because StudentLocalServiceImpl method extends StudentLocalServiceBaseImpl class and this (StudentLocalSeriveBaseImpl) class having reference of persistence (StudentPersistence) class.
  • After the first service run the finder method is created in persistence (StudentPersistence) class which is accessible now in StudentLocalServiceImpl class.
  • So we are simply calling finder method from persistence class and pass the standard which gives the list of student for that particular standard which finally we return of this method (getStudentForStandard).
  • Next, just run the service builder once again and refresh the project structure. This time you will observe that the corresponding method (with same signature of what we defined in StudentLocalServiceImpl class) is created for StudentLocalServiceUtil class as per below screenshot.
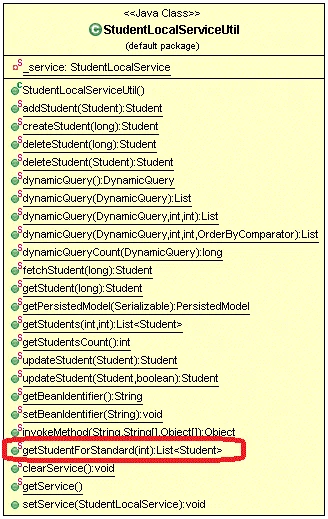

Open StudentLocalServiceUtil class and check the method getStudentForStandard(int standard). The following are the facts about it.
  • It has same method signature that we defined in StudentLocalServiceImpl class.
  • It will internally call the corresponding method of service class.
  • If you do any change in method signature defined in StudentLocalServiceImpl, it will create new method in StudentLocalSericeUtil class. The old method will not be vanished.

In short If we want any custom method (either finder or other), we need to add them into LocalServiceImpl and re-run service builder. After this, it will generate the method with same signature in LocalServiceUtil class.

And that is all done. Try to create more finder method for other columns and check how the code is generated.

Feel free to give suggestion / ask questions.

Friday, 1 March 2013

Creating Service layer in Service Builder in Liferay

 Have you ever imagine any web application without database ? … No . right ? Then how come liferay is exception ?

Liferay provide nice way of creating service and persistence layer. It uses Spring for providing Service layer implementation and Hibernate for persistence layer implementation. Both of these frameworks (Spring & Hibernate) is industry standard and proven to construct scalable web application.

Let us see how to develop service-persistence layer in liferay by simple example.

Refer my previous blog on How to create custom Liferay Portlet and create liferay MVC portlet. Give project name as service-builder-test and eclipse will append -portlet at the end so that final project name will become service-builder-test-portlet.

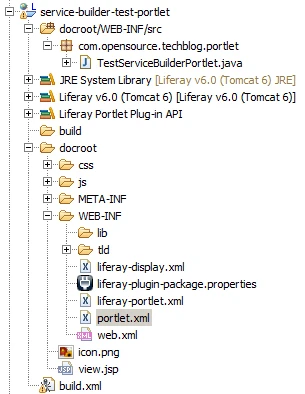
Create portlet class call called  TestServiceBuilderPortlet under package com.opensource.techblog.portlet. Also update portlet class entry in portlet.xml file. After this the project structure will look like below screenshot.


We want to create  service and persistence layer that will actually provide CRUD operations.

In Real life, the business objects are encapsulated by Entity classes. From an object-oriented perspective, an entity object represents an object in the real-world problem domain (Business Object). Each Business object will have attributes and behaviour (instance variable and methods in Object Oriented perspective).

In our case we will take Student as business object. In real world Student will have following attributes

  • Name
  • Age
  • Father Name
  • Mother Name
  • Standard
etc.

The goal of this article is to create CRUD methods to save / update /add /remove Students details into database.


Please following below steps to create service for Student entity.

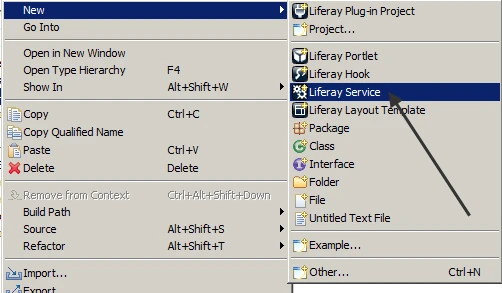
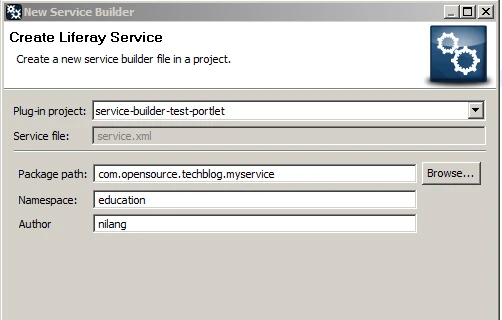
Right click on Project in Eclipse, choose New -->Liferay Service. It will show following window asking to enter Package Path, Name space, and Author name


Explanation:-

Package Path :- the location where the generated service-persistence classes will resides.
Namespace :- Backend side, liferay will create SQL script for each entity. We can group the tables generated for entities by giving Name Space value.


For Example, 


  • If we give Name space as education and if we defined 3 entities (soon we see how to define the entities) then there will be 3 tables created (each for individual entity).
  • Name of these (3) tables will start with education_. 
  • Suppose the entities are Student, Markes and Leave then the tables which are generated will be education_student, education_marks and education_leave respectively

The generated Tables for each entities defined in service.xml file will have common namespace defined in that service.xml file
Author :- Name of the author who is going to create the services.

For simplicity, we will take just one entity. Its time now to give the value for Package Name, Namespace and Author name in above screen.
give the name as below

Package path:- com.opensource.techblog.myservice
Namespace:- education
Author:- <<Your Name>> (I gave mine)

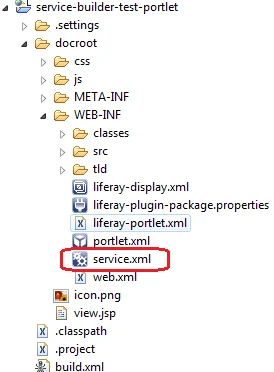
Click on Finish button. You will observe that a new file called service.xml will be created under \WEB-INF folder as shown in below screenshot.


You can observe that the package-path, author and namespace will be defined as elements in service.xml. Now we will start defining our entity - Student. Add the following snippet (for Student entity) in service.xml file.


<?xml version="1.0" encoding="UTF-8"?>
<!DOCTYPE service-builder PUBLIC "-//Liferay//DTD Service Builder 6.0.0//EN" "http://www.liferay.com/dtd/liferay-service-builder_6_0_0.dtd">
<service-builder package-path="com.opensource.techblog.myservice">
 <author>nilang</author>
 <namespace>education</namespace>

 <entity name="Student">
  <column name="studentId" type="long" primary="true"/>
  <column name="name" type="String"/>
  <column name="age" type="int"/>
  <column name="fatherName" type="String"/>
  <column name="motherName" type="String"/>
  <column name="standard" type="int"/>
 </entity>
</service-builder>


Explanation:-

  • We have created Student entity by defining local-service as true and remote-service as false. This is because the generated service will be resides within the portlet and this portlet reside in liferay server. So for liferay server this service is local. Most of the cases we are setting local-service true and remote-service as false.
  • Child elements of Student element’s are columns which exactly reflect the column in the DB table.
  • Each column will have name and type. We can declare the primary key by giving primary=”true”. If more than one column defined as primary=”true” then compound key will be generated.
  • The available column types are
    • long
    • int
    • String
    • boolean
    • Date
    • Blob etc.

We have done our homework. Now its lifera’y tern. We only have to declare the entities in service.xml file and rest all will be handled by liferay. Let’s see how the magic is happening behind the scene.

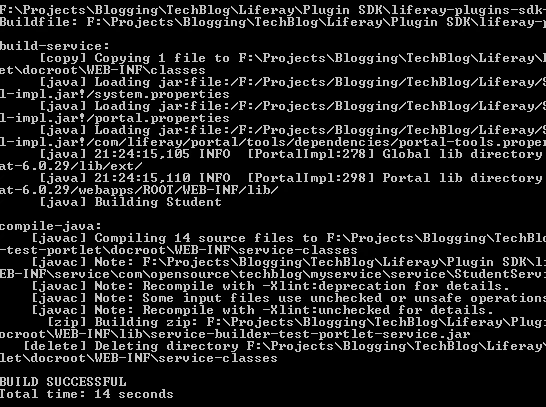
go to command prompt upto service-builder-test-portlet and give command ant build-service. It should show the below text in console and at the end it will show the message “Build Successful”.


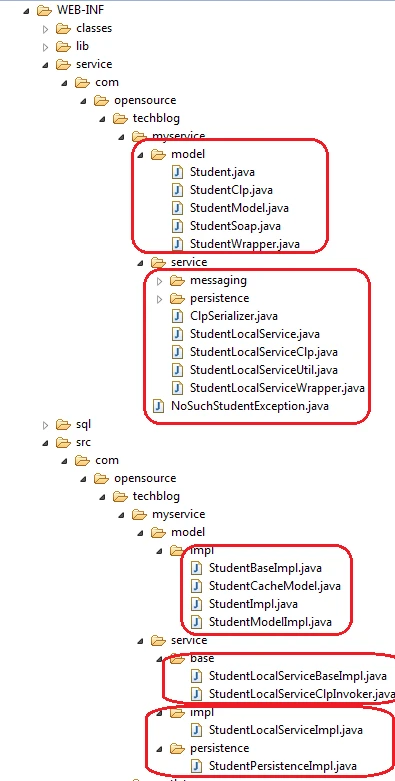
Now come back to portlet in eclipse and right click on project service-builder-test-portlet and click on Refresh. At this stage, the project structure looks like below screenshot.


You will observe that few classes / files are added in project as shown in below screenshot. They all are related to service-persistence layer. Let’s see all them in details. 

As shown in the screenshot, the generated service classes are located at following two places

  • /WEB/INF/service/com/opensource/techblog/myservice
    • Which contains util classes and interface.
    • All the interface / classes resides under this location will be packed in JAR file. This jar file will be generated after each service build (through ant build-service command).
    • So the interfaces and util classes can be available directly to outer words.

  • /WEB-INF/src/com/opensource/techblog/myservice
    • which contains the implementation of interfaces defined under folder /WEB-INF/service/com/opensource/techblog/myservice.
    •  It will be part of class path (under src folder) and will not be directly available to outer word.


Classes and interfaces which are generated at service , persistence and model layer.

Persistence Layer:-


  • StudentPersistence.java (under /WEB/INF/service/com/opensource/techblog/myservice)
    • Student persistence interface which defines CRUD methods related to Student entity like create, remove, countAll, find, findAll etc
  • StudentPersistenceImpl.java (under /WEB-INF/src/com/opensource/techblog/myservice)
    • This is the implementation class, which implements StudentPersistence.
  • StudentUtil.java (under /WEB/INF/service/com/opensource/techblog/myservice)
    • This util class, which having the instance of StudentPersistenceImpl class


Service Classes:-


  • StudentLocalService.java
    • local service interface for Student entity.
  • StudentLocalServiceImpl.java
    • local service implementation which implements StudentLocalService interface.
  • StudentLocalServiceBaseImpl.java
    • Base local service interface
  • StudentLocalServiceUtil.java
    • local service util class which having instance of StudentLocalServiceImpl. Out of above classes, only this class is accessible to other API (outside of service layer) for CRUD operation.


Model classes:-


Model class Represent a row in education_student table.


  • StudentModel.java
    • Base model (interface) for Student.
    • This interface and its corresponding implementation (StudentModelImpl) exist only as a container for the default property accessors generated by ServiceBuilder. Helper methods and all application logic should be put in (StudentImpl)
  • StudentModelImpl.java
    • Base model impl which implements StudentModel interface
    • This implementation and its corresponding interface (StudentModel) exist only as a container for the default property accessors generated by ServiceBuilder. Helper methods and all application logic should be put in (StudentImpl).
  • Student.java
    • extends studentModel.java
    • By defaul there is not method defined.
    • Whenever any new (custom) method added to StudentImpl, they will be added to this interface on next service build.
  • StudentImpl.java
    • extends StudentBaseImpl.java.
    • implements Student.java interface.
    • Helper methods and all application logic should be put in this class.
    • Whenever custom methods are added in this class, the corresponding methods will be added to Student interface on next service build.


Relations among Model interfaces / classes :-

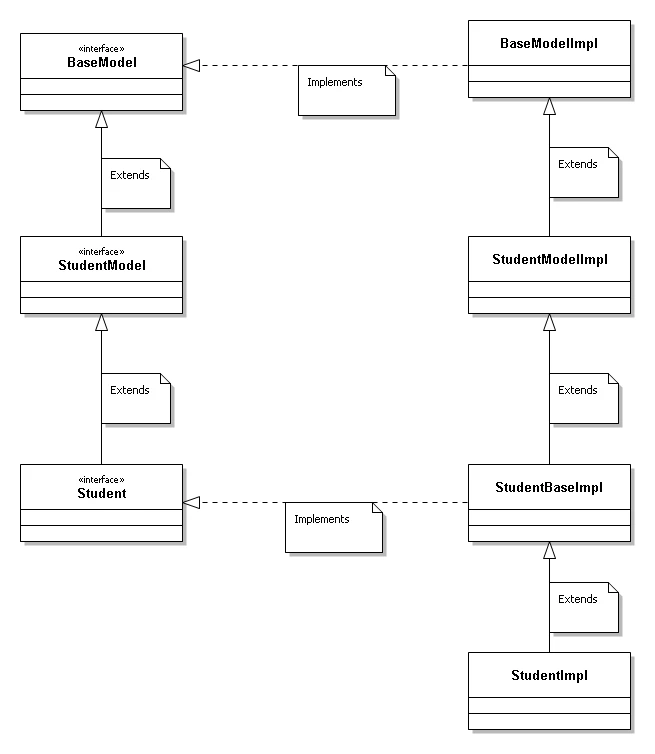
Following diagram shows the relation between  model interface and classes 


Out of these model classes / interfaces, only StudentImpl.java is allowed to add additional (custom) methods at model level to developer.


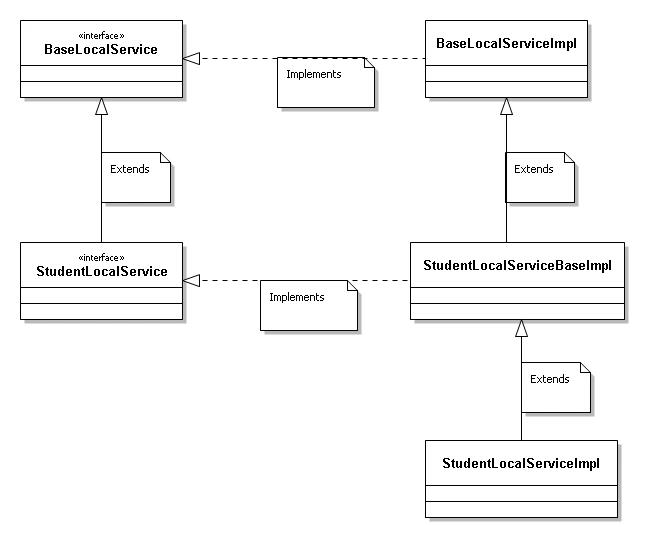
Relations among Service interfaces / classes :-
Following diagram shows the relation between  service interface and classes 


Out of these service classes / interfaces, only StudentLocalServiceImpl is allow to add additional (custom) methods at service level to developer.


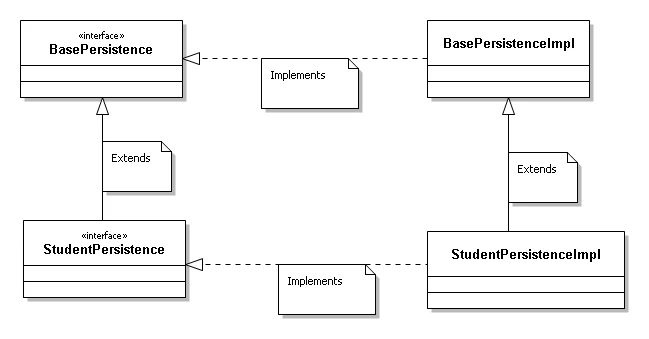
Relations among  Persistence interfaces / classes :-
Following diagram shows the relation between  persistence interface and classes 


None of the class is allow to add customized methods to developer. 

So this is all about service layer generated by liferay for each entity.To perform CRUD operation, we need just one service class is StudentLocalServiceUtil.java. It contains following methods. We can call methods of this call in our portlet to Add / update / delete Students.


You will observe that this class have various CRUD methods like
  • createStudent
  • addStudent
  • deleteStudent
  • updateStudent
  • fetchStudent
  • getStudent.
Note that, this class have instance variable of type StudentLocalService, which will get the instance of StudentLocalServiceImpl at run time. We don't have direct access to StudentLocalServiceImpl method. All methods of this (StudentLocalServiceUtil) class will internally call corresponding method of StudentLocalServiceImpl to perform CRUD operation.

In general, we only have access to LocalServiceUtil class. all method of LocalServiceUtil class will internally call method of LocalServiceImpl class.

And that's all. You can create more than one entity to understand the underlying class structure generated by liferay.

Please read following blogs to get idea of more feature of Service builder in Liferay


Feel free to give feedback / suggestion and ask questions.