
Sunday, 23 December 2012
Multiple render method in Liferay MVC Portlet
Liferay Development
,
Liferay MVC Portlet
,
Liferay Portlet
,
Plugin
7 comments
:
Many times we need different views to display the output after various action performed. In liferay MVC we have one jsp called view.jsp, which is use to render the output of the portlet.
Let us see by example. Suppose, our portlet shows the list of students in tabular format. It shows Student Name, Age and Standard. Name is a clickable and on clicking it, it will show full details about the students (like his/her address, parents name, contact no etc).
In this case, if we only have one jsp (view.jsp), then we have to put both render logic (one is to show list of students and second to display student details) in one jsp with if and else condition.
This will not only mass up view.jsp but create complexity. In this situation, if we display student list in one jsp and student detail in another jsp then it will be best managed.
In this article we will see step by step, how to achieve multiple render (jsp) in Liferay MVC portlet.
STEP-1: CREATION OF LIFERAY PORTLET
Refer my previous blog on How to create custom Liferay Portlet and create liferay MVC portlet. Give project name as multiple-render and eclipse will append -portlet at the end so that final project name will become multiple-render-portlet.
Create portlet class call called MultipleRenderPortlet under package com.opensource.techblog.portlet. Also update portlet class entry in portlet.xml file. After this the project structure will look like below screenshot.
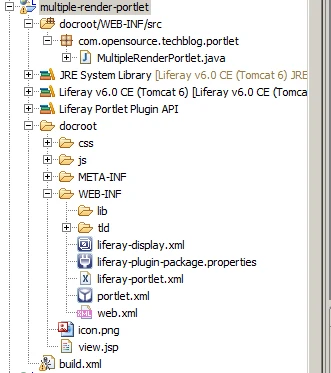
You can observe that by default view.jps has been created at root level under /docroot folder.
I would recommend looking at index page 'A Complete Liferay Guide' to browse all topics about liferay.
STEP-2: ADD LOGIC TO PORTLET CLASS
Add following code to portlet class
STEP-3: ADD TWO JSPS- studentDetail.jsp and studentList.jsp at root level
Add two jsp called studentDetail.jsp and studentList.jsp at root level (under docroot folder). After doing this, the project structure will look like below screenshot.
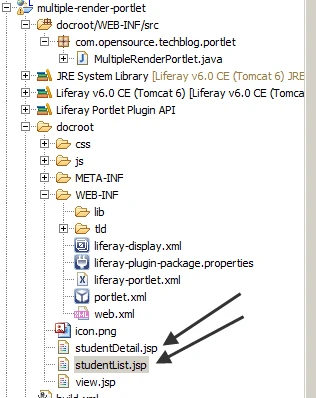
In our this scenario, First, studentList.jsp will be displayed. Clicking on the link in this JSP, studentDetail.jsp should display. To explain, how to have multiple render (jsp) in Liferay MVC, I have put pseudo code.
In studentList.jsp, we will create one link which will simply show output of studentDetail.jsp.
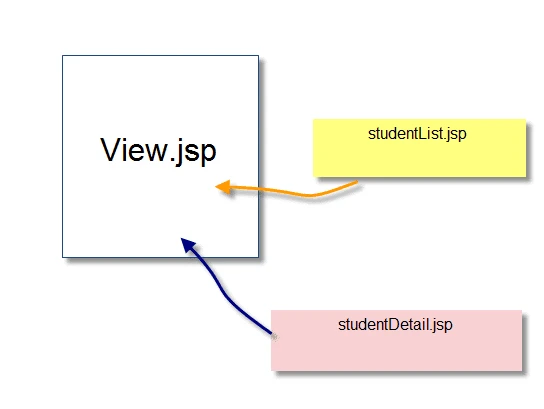
Let me explain, what is the approach to display multiple render(jsp) in Liferay MVC portlet. Following image shows this approach.
 Approach:-
Next, add code to studentList.jsp so that it will look like below snippet
Final Flow:-

Let us see by example. Suppose, our portlet shows the list of students in tabular format. It shows Student Name, Age and Standard. Name is a clickable and on clicking it, it will show full details about the students (like his/her address, parents name, contact no etc).
In this case, if we only have one jsp (view.jsp), then we have to put both render logic (one is to show list of students and second to display student details) in one jsp with if and else condition.
This will not only mass up view.jsp but create complexity. In this situation, if we display student list in one jsp and student detail in another jsp then it will be best managed.
In this article we will see step by step, how to achieve multiple render (jsp) in Liferay MVC portlet.
STEP-1: CREATION OF LIFERAY PORTLET
Refer my previous blog on How to create custom Liferay Portlet and create liferay MVC portlet. Give project name as multiple-render and eclipse will append -portlet at the end so that final project name will become multiple-render-portlet.
Create portlet class call called MultipleRenderPortlet under package com.opensource.techblog.portlet. Also update portlet class entry in portlet.xml file. After this the project structure will look like below screenshot.
You can observe that by default view.jps has been created at root level under /docroot folder.
I would recommend looking at index page 'A Complete Liferay Guide' to browse all topics about liferay.
STEP-2: ADD LOGIC TO PORTLET CLASS
Add following code to portlet class
package com.opensource.techblog.portlet;

import java.io.IOException;

import javax.portlet.ActionRequest;
import javax.portlet.ActionResponse;
import javax.portlet.PortletException;
import javax.portlet.ProcessAction;
import javax.portlet.RenderRequest;
import javax.portlet.RenderResponse;

import com.liferay.portal.kernel.exception.PortalException;
import com.liferay.portal.kernel.exception.SystemException;
import com.liferay.portal.kernel.util.ParamUtil;
import com.liferay.util.bridges.mvc.MVCPortlet;

public class MultipleRenderPortlet extends MVCPortlet{


 @Override
 public void render(RenderRequest request, RenderResponse response)
   throws PortletException, IOException {
  String renderPageName = ParamUtil.get(request, "renderPage", "studentList-jsp");
  String renderPagePath = getInitParameter(renderPageName);
  include(renderPagePath, request, response);
  super.render(request, response);
 }
 @ProcessAction(name="showStudenDetailPage")
 public void showStudenDetailPage(ActionRequest actionRequest, ActionResponse actionResponse)throws IOException, PortletException, PortalException, SystemException{

  String renderPageName = ParamUtil.get(actionRequest, "pageName", "studentList-jsp");
  actionResponse.setRenderParameter("renderPage", renderPageName);
 }
}
More explanation in Final Flow section of this blog.STEP-3: ADD TWO JSPS- studentDetail.jsp and studentList.jsp at root level
Add two jsp called studentDetail.jsp and studentList.jsp at root level (under docroot folder). After doing this, the project structure will look like below screenshot.
In our this scenario, First, studentList.jsp will be displayed. Clicking on the link in this JSP, studentDetail.jsp should display. To explain, how to have multiple render (jsp) in Liferay MVC, I have put pseudo code.
In studentList.jsp, we will create one link which will simply show output of studentDetail.jsp.
Let me explain, what is the approach to display multiple render(jsp) in Liferay MVC portlet. Following image shows this approach.
- We will have view.jps, which we will keep it blank. View.jsp is the default jsp which will show final output.
- First, we have to render studentList.jsp. So in render method of Liferay MVC portlet class, we will include it.
- in studentList.jsp file, we will create link, which simply point to studentDetail.jsp.
- We will point to respective jsp by its path defined in portlet.xml file
Next, add code to studentList.jsp so that it will look like below snippet
<%@ taglib uri="http://java.sun.com/portlet_2_0" prefix="portlet" %>

<portlet:defineObjects />

<portlet:actionURL name="showStudenDetailPage" var="studentDetailUrl">
 <portlet:param name="pageName" value="studentDetail-jsp"></portlet:param>
</portlet:actionURL>

This is student list JSP.

<a href="${studentDetailUrl}">Go To Student Detail JSP</a>
- We have created action url and passing one parameter called pageName, which we will access it in action method in portlet class.
STEP-4: ADD Path of studentDetail.jsp and studentList.jsp in portlet.xml file
Next, we will define path of these jsp as initial parameters of portlet in portlet.xml file, so that it will look like below snippet
<?xml version="1.0"?>

<portlet-app
 version="2.0"
 xmlns="http://java.sun.com/xml/ns/portlet/portlet-app_2_0.xsd"
 xmlns:xsi="http://www.w3.org/2001/XMLSchema-instance"
 xsi:schemaLocation="http://java.sun.com/xml/ns/portlet/portlet-app_2_0.xsd http://java.sun.com/xml/ns/portlet/portlet-app_2_0.xsd"
>
 <portlet>
  <portlet-name>multiple-render</portlet-name>
  <display-name>Multiple Render</display-name>
  <portlet-class>com.opensource.techblog.portlet.MultipleRenderPortlet</portlet-class>
  <init-param>
   <name>view-jsp</name>
   <value>/view.jsp</value>
  </init-param>
  <init-param>
   <name>studentList-jsp</name>
   <value>/studentList.jsp</value>
  </init-param>
  <init-param>
   <name>studentDetail-jsp</name>
   <value>/studentDetail.jsp</value>
  </init-param>
  <expiration-cache>0</expiration-cache>
  <supports>
   <mime-type>text/html</mime-type>
  </supports>
  <portlet-info>
   <title>Multiple Render</title>
   <short-title>Multiple Render</short-title>
   <keywords>Multiple Render</keywords>
  </portlet-info>
  <security-role-ref>
   <role-name>administrator</role-name>
  </security-role-ref>
  <security-role-ref>
   <role-name>guest</role-name>
  </security-role-ref>
  <security-role-ref>
   <role-name>power-user</role-name>
  </security-role-ref>
  <security-role-ref>
   <role-name>user</role-name>
  </security-role-ref>
 </portlet>
</portlet-app>
Explanation:-
- You can observe that we have added two init param and defined the respective jsp path.
- These init param we can access in portlet class to get the jsp path.
Final Flow:-
- When we place the portlet on page, its render method (defined in portlet class in STEP-2 ) will be called.
- In this(render) method, we are getting request parameter by calling get method of Liferay util class ParamUtil.
- get method of ParamUtil will take 3 parameters. First is the PortletRequest from where we will get the parameter, second is the parameter name(renderPage) and third is the default value in case if the parameter will not found in request.
- First time we will not get renderPage parameter. So it will return studentList-jsp.
- Then we are calling getInitParameter method and passing the value of renderPage parameter. So first time it will search for init parameter studentList-jsp.
- We have defined init parameter called studentList-jsp and its value is path of studentList.jsp in portlet.xml file. So first time, it will give path of studentList.jsp
- The next is, calling method include method and passing the path of studentList.jsp,request and response objects.
- include method simply include the output of studentList.jsp file into view.jsp file.
- Since we kept view.jsp as blank, we will get the final output as studentList.jsp file.
- In studentList.jsp , we created one link and passing action url with one parameter called pageName. Value of this parameter is studentDetail-jsp(which is nothing but the init parameter name which we have defined in portlet.xml file.
- When we click the link, the process action method will be called. We have defined the name attribute in action url with matching name value of @processAction annotation in portlet, so it will call process action method called showStudenDetailPage .
- In this action method, we are getting the request parameter pageName, which we have passed in action url in studentList.jsp file.
- soon after we are calling actionResponse.setRenderParameter and passing the value of pageName in it.
- In Portlet, soon after the action method call, portlet container will call render method.That is the reason, we make void return type of process action method.
- actionResponse.setRenderParameter method will set the parameter in request object, so that it will be available in render method. Note that this is not equivalent of request.setAttribute. In render method we can access this request parameter.
- When control goes to render method, we will get this render parameter (pageName which is nothing but the init parameter of studentDetail.jsp file) and passing it to getInitParameter method will give the path of studentDetail.jsp file.
- On clicking include method, the output of studentDetail.jsp will be included in view.jsp file.
- Since view.jsp is blank, the output will be of studentDetail.jsp file.
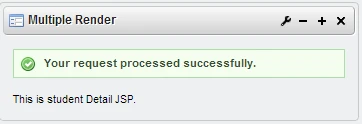
So finally it will looks like below screenshot.
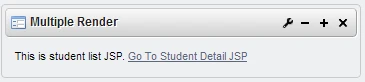
As soon as we place the portlet on page, output of studetnList.jsp as below screenshot
When we click on the link Go To Student Detail JSP, it will show output of studentDetail.jsp. Since we kept only one line in studentDetail.jsp file, it will show final output as below
In short, its only one render method but it will serve multiple JSP files.
and its done. Feel free to ask questions. I will try best to get answer.
I would recommend looking at index page 'A Complete Liferay Guide' to browse all topics about liferay.
Source code (Click on Left image)


Tuesday, 18 December 2012
Playing Audio in Flow Player in Liferay
audio
,
Content
,
flowplayer
,
Liferay Development
,
Structure
,
Template
,
video
,
Web Content
2 comments
:
Liferay is not only a portal but much more. For example Liferay is one of the best CMS (Content Management System) used today. Liferay CMS is comprised of Web content, Structure and template.
Many times, we are in need of incorporating video / audio in the portal. For example, If we build portal for any product based company, then its good to have some video like new products arrival, specification of products any updates etc on home page.
In this article, I will show how to incorporate video /audio in Liferay portal. I will use Flow player to achieve this. Since its very easy and provide convenience way to customize based on requirement. For example
With Flow Player we can show
I would recommend looking at index page 'A Complete Liferay Guide' to browse all topics about liferay.
Many times, we are in need of incorporating video / audio in the portal. For example, If we build portal for any product based company, then its good to have some video like new products arrival, specification of products any updates etc on home page.
In this article, I will show how to incorporate video /audio in Liferay portal. I will use Flow player to achieve this. Since its very easy and provide convenience way to customize based on requirement. For example
With Flow Player we can show
- Video / Audio of any length.
- Manipulate with controls ( like Play,Pause, Slider, Full screen etc)
- Automatic buffer (true / false)
- Auto play (true / false)
- Playing multiple audio / video files by either building playlist or link of url of audio / video file.
- And lot more.....
So let us jump into and see how to achieve this.
There are two approach, either we can play Audio / Video in Liferay plugin portlet or with the help of Liferay Web content. I will show both the ways.
I would recommend looking at index page 'A Complete Liferay Guide' to browse all topics about liferay.
let's first see how to achieve this by Liferay Plugin Portlet. For simplicity, I will use Liferay MVC portlet. Please refer my previous blog on How to create Liferay MVC Portlet and give project name show-video and eclipse will append -portlet so that the final project name will become show-video-portlet
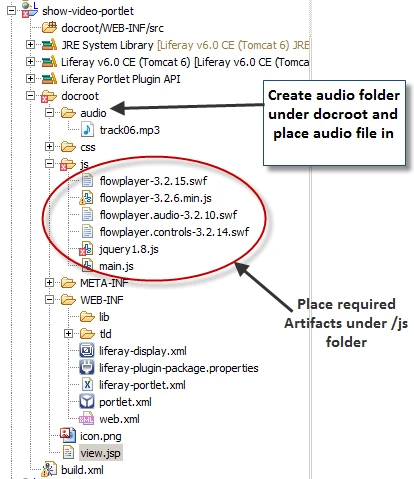
Flow player required following artifacts to be included in project so that it can work properly.

You can observe, very nice player with all controls like play-pause, slider, volume control, time display are displayed. Also as soon as we place the portlet on Liferay page, it will start playing. This is because, we have defined autoPlay:true in clip section. There are many such options available to control the Flow player the way we want.
For more detail about configuration please refer site http://flash.flowplayer.org/plugins/streaming/audio.html
Feel free to ask question. I will try my best to get answer.
Note:- I have removed audio file under /audio folder to avoid large size of source. Please add appropriate mp3 file in /audio folder and give the respective path in view.jsp (in href of anchor link)
I would recommend looking at index page 'A Complete Liferay Guide' to browse all topics about liferay.
 Download Source
Flow player required following artifacts to be included in project so that it can work properly.
- jquery1.8.js (Java script :- JQuery library. Flow player required JQuery library)
- flowplayer-3.2.6.min.js (java script:- JQuery plugin for Flow player)
- flowplayer-3.2.15.swf (Flash file:- Main/Base flash file of Flow player)
- flowplayer.audio-3.2.10.swf (Flash file:- Audio plugin of Flow player, required to play audio file)
- flowplayer.controls-3.2.14.swf (Flash file:- Control plugin of Flow player. This requires to load all controls like play / pause button, slider, volume control etc)
<script language="JavaScript" type="text/JavaScript" src="/abc.js">
<link rel="stylesheet" href="/xyz.css" type="text/css">
Explanation:-
- First line, we are including javascript file (abc.js)
- second line, we are including css file (xyz.css)
- Both of these file (.js and .css) are located within web application context.
In our case, we also need to include few javascript file. In portlet, we still can import required javascript file and css file in jsp. But then we need to import this jsp in all other jsp file. Suppose we defined init.jsp file, where we have included all required javascript and css files. In our portlet, let say we have another file called view.jsp. If we want to refer these javascript files, we need to include init.jsp file to view.jsp file.
But wait..... there is another way to achieve this. We can make entry for all required javascript and css into liferay-portlet.xml file so that it will look like below snippet
<?xml version="1.0"?>
<!DOCTYPE liferay-portlet-app PUBLIC "-//Liferay//DTD Portlet Application 6.0.0//EN" "http://www.liferay.com/dtd/liferay-portlet-app_6_0_0.dtd">

<liferay-portlet-app>
 <portlet>
  <portlet-name>show-video</portlet-name>
  <icon>/icon.png</icon>
  <instanceable>true</instanceable>
  <header-portlet-css>/css/main.css</header-portlet-css>
  <header-portlet-javascript>/js/jquery1.8.js</header-portlet-javascript>
  <header-portlet-javascript>/js/flowplayer-3.2.6.min.js</header-portlet-javascript>
  <footer-portlet-javascript>/js/main.js</footer-portlet-javascript>
  <css-class-wrapper>show-video-portlet</css-class-wrapper>
 </portlet>
 <role-mapper>
  <role-name>administrator</role-name>
  <role-link>Administrator</role-link>
 </role-mapper>
 <role-mapper>
  <role-name>guest</role-name>
  <role-link>Guest</role-link>
 </role-mapper>
 <role-mapper>
  <role-name>power-user</role-name>
  <role-link>Power User</role-link>
 </role-mapper>
 <role-mapper>
  <role-name>user</role-name>
  <role-link>User</role-link>
 </role-mapper>
</liferay-portlet-app>
Explanation:-
- Observe the <header-portlet-javascript> entry I made under <portlet> element.
- I have defined two such entry. One is for JQuery library and second is for JQuery plugin of Flow player.
- Note that the path is relevant to root. So if I put these js file under /js folder, then it path should be /js/XXX.js
- Similarly we can define the required css in <header-portlet-css> element. Since we don't need any css for now, I haven't define any one.
Next, place all the artifacts I mentioned above in the same folder (/js).The only thing, we need to make sure that above 3 swf files should be in same folder.
Also we need to play mp3 file. So let us create folder audio under docroot and place the mp3 file in it.Till now the project structure will be look like below screenshot.
Our setup is done. So let us see how to place the Flow player in jsp. Add the code to view.jsp file so that it should look like below snippet.
<a id="audio" style="display:block;width:648px;height:30px;" href="/show-video-portlet/audio/track06.mp3"></a>

<script type="text/javascript">
    jQuery(document).ready(function(){
    flowplayer("audio","/show-video-portlet/js/flowplayer-3.2.15.swf",
  {
     plugins: {
         controls: {
             fullscreen: false,
             autoHide: false
         },
         audio: {
             url: '/show-video-portlet/js/flowplayer.audio-3.2.10.swf'
         }
     },
  clip:  {
    autoPlay: true,
    autoBuffering: true,
    provider:"audio"
      }
  }
 );
  });
</script>
Explanation:-
- First, we have defined link with id as audio and href is the location where we have kept our mp3 file.
- Next is the flow player configuration in javascript. flowplayer function has been called. The first parameter will be the id of the anchor where we want to place the flow player. So in this case, the first parameter is "audio" (which is the id of anchor link just defined above). Second parameter is the location where we placed the main swf file.
- We have defined controls and audio elements under plugin to inform to Flow player that these are the plugin we have used.
- In audio plugin, we have to give the path of the audio plugin's swf file.
- And at the end we have define various attribute of clip (audio or video) like auto play,auto-buffer and the last option is the provider, which is the same as audio plugin name we defined.
And its done. let us see how it will play it. build the portlet and deploy it over liferay page. It will be look like below screenshot.
For more detail about configuration please refer site http://flash.flowplayer.org/plugins/streaming/audio.html
Feel free to ask question. I will try my best to get answer.
Note:- I have removed audio file under /audio folder to avoid large size of source. Please add appropriate mp3 file in /audio folder and give the respective path in view.jsp (in href of anchor link)
I would recommend looking at index page 'A Complete Liferay Guide' to browse all topics about liferay.
Sunday, 9 December 2012
Call Portlet Action Method From Another Portlet On Different Liferay Page
Action
,
Liferay Development
,
Liferay Portlet
,
Portlet
18 comments
:
Sometimes, we need to call one portlet method (generally action method) from another portlet which is placed on another Liferay page.
In this article, we will see how to achieve this. To understand it properly, let's take a real example.
Assume that we have two portlet
 Download Source
In this article, we will see how to achieve this. To understand it properly, let's take a real example.
Assume that we have two portlet
- One portlet which takes number as input and shows factorial.
- Second portlet which takes two numbers and show multiplication.
These portlets don't any relation with each other. So also assume that they are placed on different Liferay Page.
First Let us design this two portlet independently. I am using Liferay MVC portlet to create it. Please refer my previous blog on How to write custom Liferay MVC Portlet to know details how to create it.
We will give first portlet name as show-factorial and eclipse will append -portlet at the end while creating portlet so the final name will be show-factorial-portlet
We will give first portlet name as show-factorial and eclipse will append -portlet at the end while creating portlet so the final name will be show-factorial-portlet
Similar way we will give second portlet name as show-multiplication and eclipse will append -portlat at the end while creating portlet so the final name will be show-multiplication-portlat
I would recommend looking at index page 'A Complete Liferay Guide' to browse all topics about liferay.
Note:- Download source code of these portlets at the end of this blog.
Explanation:-
1) For show-factorial-portlet.
I would recommend looking at index page 'A Complete Liferay Guide' to browse all topics about liferay.
Note:- Download source code of these portlets at the end of this blog.
Explanation:-
1) For show-factorial-portlet.
- I have created portlet class ShowFactroailPortlet in package com.techblog.opensource.portlet and added following code in it.
package com.techblog.opensource.portlet;

import java.io.IOException;

import javax.portlet.ActionRequest;
import javax.portlet.ActionResponse;
import javax.portlet.PortletException;
import javax.portlet.ProcessAction;
import javax.portlet.RenderRequest;
import javax.portlet.RenderResponse;

import com.liferay.portal.kernel.exception.PortalException;
import com.liferay.portal.kernel.exception.SystemException;
import com.liferay.portal.kernel.log.Log;
import com.liferay.portal.kernel.log.LogFactoryUtil;
import com.liferay.portal.kernel.util.ParamUtil;
import com.liferay.util.bridges.mvc.MVCPortlet;

public class ShowMultiplicationPortlet extends MVCPortlet {

 private static Log log = LogFactoryUtil.getLog(ShowMultiplicationPortlet.class);

 //Default Render Method.
  public void doView(RenderRequest renderRequest,
    RenderResponse renderResponse) throws IOException, PortletException {
   String multiplication = ParamUtil.get(renderRequest, "multiplication", "0");
   renderRequest.setAttribute("multiplication", multiplication);
   super.doView(renderRequest, renderResponse);
  }

  @ProcessAction(name="getMultiplication")
  public void multiply(ActionRequest actionRequest,
    ActionResponse actionResponse) throws IOException, PortletException, PortalException, SystemException{
   String firstInput = ParamUtil.get(actionRequest, "firstInput", "0");
   String secondInput = ParamUtil.get(actionRequest, "secondInput", "0");

   log.info("firstInput"+firstInput+" secondInput"+secondInput);

   int firstNumber = Integer.parseInt(firstInput);
   int secondNumber = Integer.parseInt(secondInput);

   int multiplication = firstNumber * secondNumber;

   actionResponse.setRenderParameter("multiplication", String.valueOf(multiplication));
  }

}
Note:- I have pasted code here for explanation. You can download it from the link at the end of this post. - First I take logger with the help of LogFactoryUtil (Liferay utility class).
- multiply is the processAction method. It will be called when we submit two numbers for multiplication from JSP. It has key (name) and its value is "getMultiplication"
- In this processAction method, I am taking two parameters and converting it into numbers. After that I am multiplying it and setting it in render parameter so that it will be available in render method (This is one of the way to send value from Action method to render method). Note:- setRenderParameter method is available only for object of type ActionResponse.
- doView method is associate with portlet's view mode and will be called whenever portlet get render.
- In this method I am fetching the parameter(multiplication) which I have sent in Action method and storing it to request scope so that it can be available in JSP (via EL)
- Note:- I have used ParamUtil.get method of Liferay utility class ParamUtil to get request parameter. Third argument is the default value which will be send in case the parameter is not exist.
I have added the following code in view.jsp file
<%@ taglib uri="http://java.sun.com/portlet_2_0" prefix="portlet" %>

<portlet:actionURL name="getMultiplication" var="getMultiplicationUrl"></portlet:actionURL>
<portlet:defineObjects />

Multiplication is <b>${multiplication}</b>

<form action="${getMultiplicationUrl}" method="post">
fisrt I/p<input type="text" name="firstInput"><br>
Second I/p<input type="text" name="secondInput"><br>
<input type="submit">
</form>
Explanation:-- The firs line is the Taglib declaration.
- In second line, we have created portlet ActionURL. We gave name ="getMultiplication" which is the same as key value of processAction method in portlet class. So this ActionURL will call portlet's processAction method (multiply).
- This ActionURL will be used in JSP by defining var value. We gave value of var as getMultiplicationUrl so it can be accessed as ${getMultiplicationUrl} (as EL).
- Next to it, I have created form which having two text box, taking two inputs and one submit button which will submit the form.
- action of this form is the ActionURL which we have created. We have set it through ${getMultiplicationUrl}
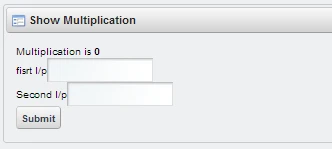
Give two numbers and click on Submit button and you will get multiplication of these two number. You can also observe the log that we have put in render and action method.
2) For show-factorial-portlet. (Note:- Download the code and refer it)
- Very similar way I have create show-factorial-portlet.
- This portlet having class name ShowFactroailPortlet which resides under package com.techblog.opensource.portlet
- In this portlet, we are taking only single number and counting its factorial and showing it to JSP.
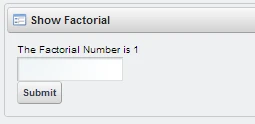
When we deploy and place it to page, it will look like below screenshot.
entry and number(less than 10) and click on submit button, it will show factorial of that number.
These both portlet are working independently. Also let assume that they both are placed on different Liferay page.
What if user wants the factorial of the number which comes after multiplication of two numbers. I mean to say I am using multiplication portlet and I am passing num1 and num2. I want the factorial no of multiplication of num1 and num2.
If I write the code to calculate the factorial in multiplication portlet, then its code redundancy and we haven't re-use the code.
Solution:- Some how If I forward the request after processing multiplication of two numbers to factorial portlet, then It will be best approach. I don't have to write the same logic again. Just have to pass control to another portlet placed on different liferay page.
So let us do this. First create two public liferay pages in guest(Liferay) community.
- Page-1
- Page-2
place multiplication portlet on Page-1 and factorial portlet on Page-2. You can observe that these two portlets are now working independently. Use can click on Page-1 and able to see multiplication portlet and if clicks on Page-2, factorial portlet will be seen.
I would like to recommend to download the source code from the link at the bottom of this blog and refer it side by side to get complete idea
We have to follow certain rules while forwarding control from one portlet to another portlet. Following are the prerequisites.
Next, we have to write certain code to fetch the url of factorial portlet inside multiplication portlet. So I have created util class MultiplicationUtil (in package com.techblog.opensource.util) and create methods that will do all this stuff.
I have added following two methods in this class (MultiplicationUtil)
1) getLayout :-
Eventually it will look like this.
I would like to recommend to download the source code from the link at the bottom of this blog and refer it side by side to get complete idea
We have to follow certain rules while forwarding control from one portlet to another portlet. Following are the prerequisites.
- The portlet to which we are forwarding control should be non-instanceable. in our example we will forward control from multiplication portlet to factorial portlet. So factorial portlet should be non-instanceable.
- The portlet to which we are forwarding control should set authentication token false. Lifeary generate token for each request (POST). So we need to insure that the factorial portlet should not generate this token.
To fulfill these prerequisite, we need to make following changes to factorial portlet (Since we have to forward from multiplication portlet to factorial portlet)
- Make it non-instanceable
For this, open liferay-portlet.xml file for show-factorial-portlet and set <instanceable>false</instanceable> just after <icon> element.
- Turn authentication token off.
For this, open portlet.xml file for show-factorial-portlet and add following init parameters just below <portlet-class> element.
<init-param>
 <name>check-auth-token</name>
 <value>false</value>
</init-param>
You might have observed that even after setting auth token false, liferay does generate the token. But don't worry, if we set this flag as false then even though liferay generate the auth token in url, it will not take it in consideration.
Next, we have to write certain code to fetch the url of factorial portlet inside multiplication portlet. So I have created util class MultiplicationUtil (in package com.techblog.opensource.util) and create methods that will do all this stuff.
I have added following two methods in this class (MultiplicationUtil)
1) getLayout :-
- This method will take PortletRequest, friendly url of page and community name and will return the Layout.
- Layout in liferay represent the structure of Liferay page. Any portlet's url will be decided by layout.
- In this method we are making call LayoutLocalServiceUtil.getFriendlyURLLayout and passing parameter like groupId, boolean isPrivateLayout and friendly url of page.
- first we set the isPrivateLayout to false. So it will search for public pages and if not found (if layout is null) then we do the same thing but just passing isPrivateLayout as true).
- We are getting groupId by calling GroupLocalServiceUtil.getGroup(companyId,communityName).getGroupId().
- pageFriendlyUrl is nothing but the friendly url of liferay page. In our case we are forwarding control to page-2 on which the factorial portlet is placed.
2) getFullPortletURL:-
- This method takes input as PortletRequest, friendly url of liferay page (on which we wanted to go), portlet name, parameters, portlet phase and community name.
- portlet name and phase will be the name and phase of the portlet to which we want to forward control. (factorial portlet in our case)
- Next to it we are tacking HttpRequest from PortletRequest.
- Then we are calling PortletURLFactoryUtil.create(), passing these parameters it is returning final url of the portlet where we wanted to go.
Now open the ShowMultiplicationPortlet.java of multiplication portlet, you will observe the following private method
getFactorail
- This method takes PortletRequest and multiplication Number as input.
- This multiplication Number is nothing but the multiplication of num1 and num2 that we will pass to multiplication portlet.
- Since our goal is to create Link which forward us to Factorial portlet from multiplication portlet. Also it will do the factorial of multiplication number (num1 * num2)
- In this method we took few variable as below
- pageFriendlyUrl:- is the page friendly url. Since factorial porltlet reside on page-2 page, its value will be friendly url of that page (which is "page-2")
- portletName:- which is portlet name of factorial porltet. Don't confuse this porltet name with the one defined in portlet.xml file. This portlet name will be refer in urls. Here is the trick how to get it.
- Go to the page where the portlet is deployed (in our case page-2)
- Click on Configuraiton (Tool like) icon from the portlet header and click on Look and Feel.
- Go to tab Advanced Style. In this tab at very top you will observe something like Portlet ID: #portlet_showfactorial_WAR_showfactorialportlet
- so in this case the portletName will be showfactorial_WAR_showfactorialportlet (Just remove #porltet_ from beginning).
- CommunityName:- will be the name of the community in which the factorial protlet reside. We can forward the porltet which is on different community
- parameters:- These are the parameters which will be added in url.
- Its map taking string as key and string array as value.
- we are passing "number" with the multiplication of num1 and num2.
- The reason we take the parameter name as number because if you observe the action method of factorial portlet's processAction method then its taking value of "numebr" request parameter. Since our goal is to directly call factorial porltet process action method and that is the reason we add one more parameter javax.portlet.action to "getFactorial". Because its matching with the key of that process action method.
- We also added p_p_state parameter to tell liferay that, open the factorial portlet in normal mode.
- And at the end I am calling util's method MultiplicationUtil.getFullPortletURL() and passing all these values. which will return the final url.
Then I made call of getFactorial method in doView() method and storing the return value in request attribute of multiplication portlet so that it will be available in view.jsp.
In view.jsp file (of multiplication portlet), at the end I am showing the link (which is return value of getFactorial method we stored in request attribute in doView method) which will forward me to factorial portlet.
Eventually it will look like this.
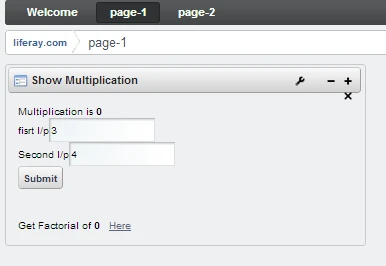
We are on page-1 and it showing multiplication portlet. we will give value 3 and 4
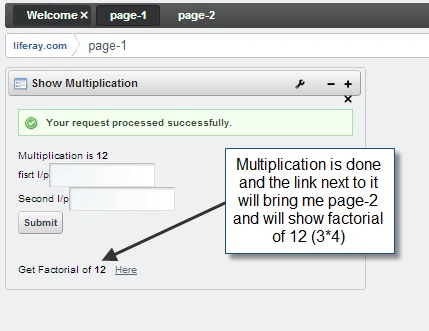
On clicking submit button it will calculate the multiplication and at the bottom of the page, the link will forward me to page-2.
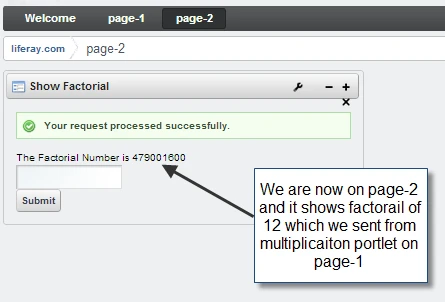
If I click on the link at the bottom, it will forward me to page-2 and will show factorial of 12 (3*4) as below
And its done. You may put some complex logic to forward to other portlet. Also you can place the second portlet in different community and forward the control to it.
Feel free to ask questions. I will try my best to get the answer.
I would recommend looking at index page 'A Complete Liferay Guide' to browse all topics about liferay.
Sunday, 2 December 2012
How to create multiple portlets in single Liferay plugin project
Liferay Development
,
Plugin
,
Plugin Project
31 comments
:
So far we have seen that whenever we need to create a portlet, we are creating one plugin project. Its possible to have multiple plugins (like portlets,hooks, layouts and theme) in single Liferay plugin project.
When we build such plugin project, all plugins will be part of single WAR file. But when it deployed , then each plugins (porltet,hooks,theme and layouts) will be deployed as separate folder under <<Liferay Bundle>>/tomcat/webapps folder.
Let us see how to create multiple plugins ( Portlets, Hooks, Layouts, Theme) in single Liferay plugin project in eclipse.
I have taken an example of creating Liferay MVC portlet. Please refer my previous blog on
How to create Liferay MVC Portlet
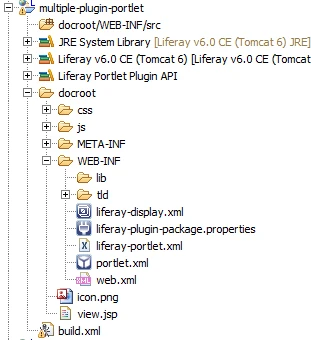
Give project name as multiple-plugin and -portlet will be appended by eclipse IDE so that the final project name will be multiple-plugin-portlet as per below screenshot.
Important Note :- Don't confuse with the Plugin project and portlet. Let me differentiate them.
Explanation:-
When we build such plugin project, all plugins will be part of single WAR file. But when it deployed , then each plugins (porltet,hooks,theme and layouts) will be deployed as separate folder under <<Liferay Bundle>>/tomcat/webapps folder.
Let us see how to create multiple plugins ( Portlets, Hooks, Layouts, Theme) in single Liferay plugin project in eclipse.
I would recommend looking at index page 'A Complete Liferay Guide' to browse all topics about liferay.
I have taken an example of creating Liferay MVC portlet. Please refer my previous blog on
How to create Liferay MVC Portlet
Give project name as multiple-plugin and -portlet will be appended by eclipse IDE so that the final project name will be multiple-plugin-portlet as per below screenshot.
Important Note :- Don't confuse with the Plugin project and portlet. Let me differentiate them.
- When we want to create any Liferay component ( like portlet, hook, theme etc) we need to first create Liferay Plugin project.
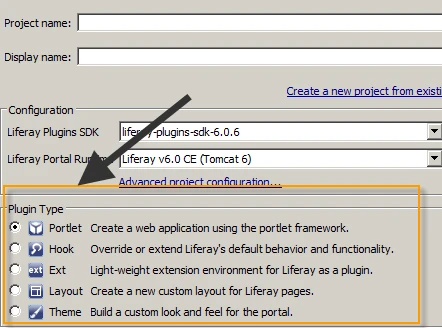
- When we create Liferay plugin project from eclipse,( by clicking on File-->New-->Liferay Project ) it will give option (like portlet, hook, layout, theme or ext) as below screenshot.
- If we choose Portlet then it will create Liferay plugin project with by portlet (which have same name as project we gave in this wizard).
- If we choose different plugin type then it will create Liferay plugin project by that selected component.
- In short, When we create Liferay plugin project, it will create the component of selected plugin type with same name as plugin project.
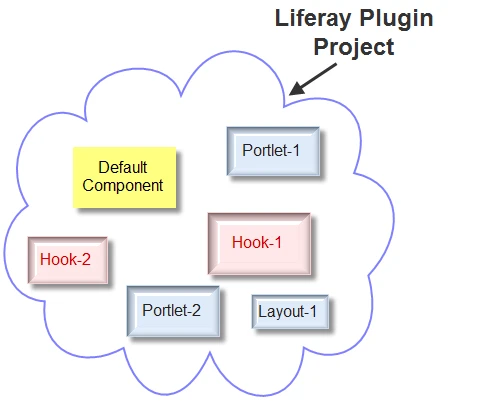
- So you can consider Liferay plugin project as container where all liferay components resides as per below screenshot.
- Outer side section (blue border) with cloud shape is the Liferay Plugin project.
- Each rectangle withing it is showing various components (Liferay Plugins)
- The Yellow rectangle (with named Default Component) shows the default component. This component type will be same as we have selected while creating plugin project.
- In short, the default component will be portlet, if plugin type portlet is selected while creating plugin project. It will be hook it plugin type Hook is selected while creating plugin project etc.
Important Notes:-
- Liferay Plugin project (for plugin type portlet ) will only accommodate plugins of type Portlets, Hooks or Layouts. Theme and ext can't be mix with portlets and Hooks in same plugin project.
- if you want to create Theme or ext plugin, you need to create separate plugin project.
Now I assume that you have clear this concept !!!!! :) Let us experience this with the plugin project(multiple-plugin-portlet) we have just created. If you have selected plugin type as portlet then the default component for this plugin project is portlet.
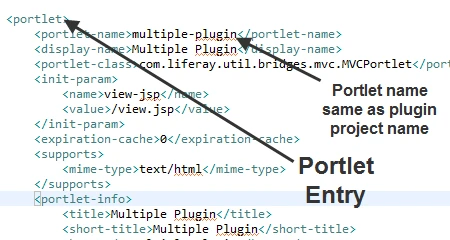
Open portlet.xml file. It will looks like below screenshot.
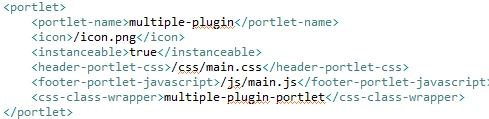
You can observe that it will have one portlet element entry. Also the portlet have the same name as plugin project. If you open liferay-portlet.xml file, then it will looks like below screenshot
You also can observe that, its having one portlet entry, having portlet name same as plugin project name.
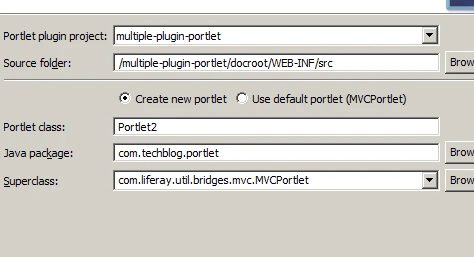
Now let us see how to add more portlet. To add portlet in existing plugin project, click on File-->New-->Liferay Portlet (instead of Liferay Project. Selecting Liferay Project will create new plugin project) If will show below screen
- This time, it will first ask in which plugin project do we want to add new portlet ?
- Its showing drop down and we choose it multiple-plugin-portlet
- Give the appropriate value for Portlet class, Java Package ans super Class.
- I gave the value as shown in above screenshot.
- Now click on Finish button
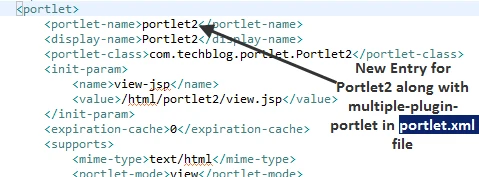
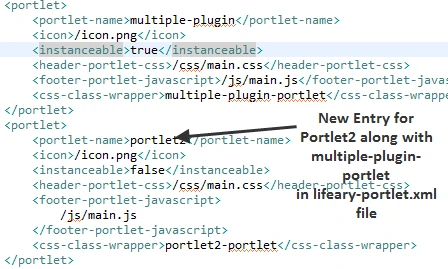
You will observe that in portlet.xml and liferay-portlet.xml file, new entry for portlet 'portlet2' is added as per below screenshot.
For portlet.xml file
For liferay-portlet.xml file
Similarly you can add more type. Only one thing you need to make sure if plugin type is selected as portlet while creating plugin project, then other component of type Hook and Layout template only can be added.
Keep try adding more portlets / Hooks / Layout templates and experience how its works.
You can observe that after building, you will have only one WAR file but when you deploy ti liferay server, there will be separate folder for each component type under webapps folder.
Feel free to ask any question. I will try my best to get the answer.
I would recommend looking at index page 'A Complete Liferay Guide' to browse all topics about liferay.
I would recommend looking at index page 'A Complete Liferay Guide' to browse all topics about liferay.
Saturday, 1 December 2012
Configure Liferay with My SQL or any other Database rather than HSQL DB
Liferay Administration
,
Liferay Development
,
MySQL
2 comments
:
Liferay by default comes with HSQLDB configured. HSQLDB is generally used for development purposes and its not recommended for Production.
If you observed the Liferay server log then you will come to know that Liferay will put log something like "Liferay is configured to use Hypersonic as its database. Do NOT use Hypersonic in production. Hypersonic is an embedded database useful for development and demo'ing purposes. The database settings can be changed in portal.properties." which clearly shows, HSQLDB is not recommended for production.
In Production, generally MySQL or any other DB is used (like MS-SQL or Oracle). So its always better way to have same environment for development as in production. (Like JDK Version, Liferay version, DB and its version etc).
I would recommended to look at index page 'A Complete Liferay Guide' to browse all topics about liferay.
Suppose, in your production environment, you have used MySQL so its advisable to have MySQL for your development environment also.
In this article we will see how to change configuration so that it will point to MySQL rather than HSQLDB.
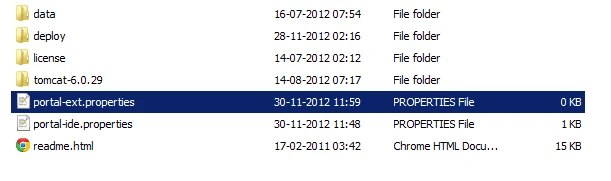
create portal-ext.properties file under your Tomcat bundle(Liferay server) folder as shown in below screenshot.
 Next, add following content in it.
Explanation:-
So let's create blank schema in MySQL. Give its name as techblog.
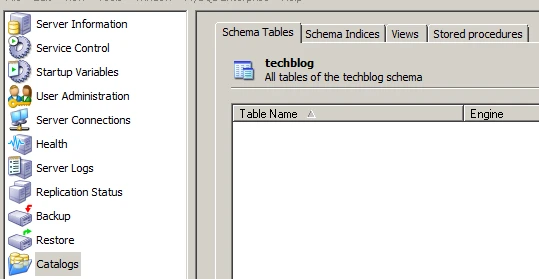
Initially there won't be any tables.
Now start the Liferay server. (If Liferay server is already started,then you need to stop the server and then start)
First time during start up it will take some time ,as it will create all Tables,index and pre-populated values. Once the Liferay server is started, you may revisit the techblog schema and confirm that the tables are created properly.
Also from tomcat log, you can observed that now it will take MySQL dialect rather than HSQLDB.
And its done. Feel free to ask any questions. I will try my best to get the answers.
I would recommended to look at index page 'A Complete Liferay Guide' to browse all topics about liferay.
If you observed the Liferay server log then you will come to know that Liferay will put log something like "Liferay is configured to use Hypersonic as its database. Do NOT use Hypersonic in production. Hypersonic is an embedded database useful for development and demo'ing purposes. The database settings can be changed in portal.properties." which clearly shows, HSQLDB is not recommended for production.
In Production, generally MySQL or any other DB is used (like MS-SQL or Oracle). So its always better way to have same environment for development as in production. (Like JDK Version, Liferay version, DB and its version etc).
I would recommended to look at index page 'A Complete Liferay Guide' to browse all topics about liferay.
Suppose, in your production environment, you have used MySQL so its advisable to have MySQL for your development environment also.
In this article we will see how to change configuration so that it will point to MySQL rather than HSQLDB.
create portal-ext.properties file under your Tomcat bundle(Liferay server) folder as shown in below screenshot.
jdbc.default.driverClassName=com.mysql.jdbc.Driver
jdbc.default.url=jdbc:mysql://localhost/techblog?useUnicode=true&characterEncoding=UTF-8&useFastDateParsing=false
jdbc.default.username=root
jdbc.default.password=root
Explanation:-
- The first line shows the driver name
- The second line form a DB url. localhost is the host name. If your MySQL DB is located on remote machine, you have to give host name(localhost in our case) or IP address of that machine. Next to it is techblog which is nothing but the schema in MySQL which will create shortly. The rest are the parameters like Character encoding and uni-code etc.
- The third and fourth properties shows the username and password of MySQL Db
Next we have to create new schema in MySQL. You no need to create any table. Just create blank schema and Liferay will create all tables,indexes and pre-populated values.
Important Note:- The MySQL schema should be matched with the schema name which we defined in above portal-ext.properties file. (techblog in our case)
Initially there won't be any tables.
Now start the Liferay server. (If Liferay server is already started,then you need to stop the server and then start)
First time during start up it will take some time ,as it will create all Tables,index and pre-populated values. Once the Liferay server is started, you may revisit the techblog schema and confirm that the tables are created properly.
Also from tomcat log, you can observed that now it will take MySQL dialect rather than HSQLDB.
And its done. Feel free to ask any questions. I will try my best to get the answers.
I would recommended to look at index page 'A Complete Liferay Guide' to browse all topics about liferay.
Subscribe to:
Posts
(
Atom
)
