
Saturday, 24 November 2012
How to create Friendly URL for Liferay portlet
Friendly URL
,
FriendlyURL Mapper
,
Liferay Developmen
,
Liferay Portlet
,
Portlet
32 comments
:
You might have seen long urls of links / forms of portlets created by liferay. These urls are called Portlet URLs and they are generated dynamically at run time when we place the portlet on Liferay page.
In this article we will see how to shorten the URL in portlet so that its more user friendly. (That's why we are calling it friendly url). In other word Friendly URL is the process to make shorter Portlet URLs.
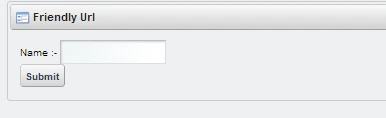
Let's see how this long URLs is created run-time. For easy understanding, I have created Spring MVC portlet. You can refer this blog to create friendly url for Liferay MVC portlet too. This portlet will have one filed called Name and one submit button which will submit this name.
I would recommend looking at index page 'A Complete Liferay Guide' to browse all topics about liferay.
Please refer my previous blog How to create Spring MVC Porltet to create Spring MVC portlet. Give the project name as 'friendly-url' so that eclipse will append -porltet so that it will look like as below screenshot.
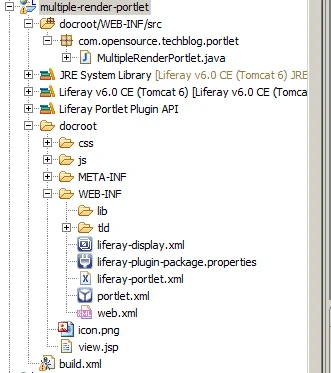
I would like to further recommend to visit by blog on How to create Render and Action methods
I have set the controller class name as FriendlyUrlController and the package name is com.opensource.techblog.controller
open FriendlyUrlController.java class and add following methods so that it will looks like below snippet.
Explanation:-

You might have tired to understand each parameters and its value. Don't you feel that this URL should be small enough to remember easily. Well because of the limitation of the portal context, the URL will be generated run-time only and there is no direct way to make is shorter.
Fortunately Liferay provides a way to achieve this.( to get Smaller - user friendly URL).
Explanation at little later in this blog.
In next step, add entries in liferay-portlet.xml file after <icon> element.
Explanations:- (For liferay-portlet.xml file)
This url will be same as previous one till /web/guest/test
Important Notes:-
I would like to further recommended to visit by blog on How to create Render and Action methods
To explain it better, I am adding 2 render methods in controller class so that it will looks like below snippet.
Explanation:-
Explanation:-
In this article we will see how to shorten the URL in portlet so that its more user friendly. (That's why we are calling it friendly url). In other word Friendly URL is the process to make shorter Portlet URLs.
Let's see how this long URLs is created run-time. For easy understanding, I have created Spring MVC portlet. You can refer this blog to create friendly url for Liferay MVC portlet too. This portlet will have one filed called Name and one submit button which will submit this name.
I would recommend looking at index page 'A Complete Liferay Guide' to browse all topics about liferay.
Please refer my previous blog How to create Spring MVC Porltet to create Spring MVC portlet. Give the project name as 'friendly-url' so that eclipse will append -porltet so that it will look like as below screenshot.
I would like to further recommend to visit by blog on How to create Render and Action methods
I have set the controller class name as FriendlyUrlController and the package name is com.opensource.techblog.controller
open FriendlyUrlController.java class and add following methods so that it will looks like below snippet.
package com.opensource.techblog.controller;

import javax.portlet.ActionRequest;
import javax.portlet.ActionResponse;
import javax.portlet.RenderRequest;
import javax.portlet.RenderResponse;

import org.springframework.stereotype.Controller;
import org.springframework.ui.Model;
import org.springframework.web.bind.annotation.RequestMapping;
import org.springframework.web.portlet.bind.annotation.ActionMapping;
import org.springframework.web.portlet.bind.annotation.RenderMapping;

import com.liferay.portal.kernel.log.Log;
import com.liferay.portal.kernel.log.LogFactoryUtil;
import com.liferay.portal.kernel.util.ParamUtil;

@Controller(value = "FriendlyUrlController")
@RequestMapping("VIEW")
public class FriendlyUrlController {

 private static Log log = LogFactoryUtil.getLog(FriendlyUrlController.class);
 /*
  * Default Render Method
  */
 @RenderMapping
 public String handleRenderRequest(RenderRequest request,RenderResponse response,Model model){

  return "view";
 }

 @ActionMapping(params = "action=addUserName")
 public void addUserName(ActionRequest request, ActionResponse response) {
  String userName=ParamUtil.get(request, "userName", "");
  log.info("userName is==>"+userName);
 }

}
Explanation:-
- We have simply added Default Render(handleRenderRequest) method and action (addUserName) method with key "addUserName".
- In the action method(addUserName) we are getting request parameter userName with the help of Liferay utility class ParamUtil and printing it to console ( by logger) to just make sure whatever we enter username is reaching in controller.
Now, add the code to view.jsp so that it will looks like below snippet.
<%@ taglib uri="http://java.sun.com/portlet_2_0" prefix="portlet" %>

<portlet:defineObjects />

<portlet:actionURL var="userNameUrl">
<portlet:param name="action" value="addUserName"></portlet:param>
</portlet:actionURL>

<form action="${userNameUrl}" method="post">
 Name :- <input type="text" name="userName"><br>
 <input type="submit">
</form>
Explanation:-
- In view.jsp, we have created portlet:actionURL with param action set to addUserName which is having matching key with action method in controller.
- Then we have created form with one text box(name) and submit button.
Once this is done then build and deploy the portlet. When we deploy the portlet, it will be looks like below screenshot.
When we observe the form url in firebug console as per below screenshot, it will be look like
and the url will be
http://localhost:8081/web/guest/test?p_auth=R9q2yoCH&p_p_id=friendlyurl_WAR_friendlyurlportlet_INSTANCE_dkW6&p_p_lifecycle=1&p_p_state=normal&p_p_mode=view&p_p_col_id=column-1&p_p_col_count=1&_friendlyurl_WAR_friendlyurlportlet_INSTANCE_dkW6_action=addUserName
Let us understand what each parameter mean for in this URL.
Note that each parameter in url is separated by &
- http://localhost:8081 :- is the protocol and host address + port
- /web/guest/test :- There are 3 parts. 1) /Web 2) /guest and 3) /test. /test is a friendly url of Liferay public page test. Since its public page, /web is added. While /guest is a friendly url of guest community.
- p_auth=R9q2yoCH:- is the authentication token generated by liferay for security purpose and it will be changed on each submit.
- p_p_id :- is portlet Id (friendlyurl_WAR_friendlyurlportlet_INSTANCE_dkW6 in our case) which will be derived from the name of the portlet (defined in portlet.xml file)
- p_p_lifecycle=1 :- which shows the life cycle phase of current request. Since we are calling action method,'1' denotes that the current request is in action phase. Apart from action phase, portlet have render, resource and even phase.
- p_p_state :- denotes Liferay page's window state. There are 3 possible values 1)Normal 2)Maximize and 3) Minimize. We are currently normal state. You can change the state by clicking Maximize / Minimize button at right side top bar of portlet.
- p_p_mode :- shows the mode of portlet. there are various mode of portlet like view, edit, help etc. Currently we are in view mode.
- p_p_col_id :- This is reference ID of the column in liferay template. there are various out of the box layout template available (like one column, two column(30-70) etc). So this parameter will show the id of the column where our portlet resides.
- p_p_col_pos :- This parameter is not present in the URL because we have used one column layout. If layout having more than one columns then this parameter will be added to URL. Its showing the position of column in which our portlet is placed.
- p_p_col_count:- This parameter shows the no of columns in current layout. Currently we have only one.
- [p_p_id]_action :- Any parameter in this URL which is prefixed with portlet Id ( friendlyurl_WAR_friendlyurlportlet_INSTANCE_dkW6 in our case) is the parameter set by that portlet. In our case we have used action parameter to pick corresponding action method.(we have passed action parameter by <portlet:param name="action" value="userName"></portlet:param> )
You might have tired to understand each parameters and its value. Don't you feel that this URL should be small enough to remember easily. Well because of the limitation of the portal context, the URL will be generated run-time only and there is no direct way to make is shorter.
Fortunately Liferay provides a way to achieve this.( to get Smaller - user friendly URL).
Let us see how to achieve this.
create one xml file called friendly-url-router.xml under the package com.opensource.techblog.controller (Its absolutely not required to have same name and location for this file I have created. You may take any appropriate name and location for that.)and add the following code so that it will looks like below snippet.
<?xml version="1.0"?>
<!DOCTYPE routes PUBLIC "-//Liferay//DTD Friendly URL Routes 6.0.0//EN" "http://www.liferay.com/dtd/liferay-friendly-url-routes_6_0_0.dtd">

<routes>
 <route>
  <pattern>/add</pattern>
  <implicit-parameter name="p_p_id">friendlyurl_WAR_friendlyurlportlet_INSTANCE_dkW6</implicit-parameter>
  <implicit-parameter name="p_p_lifecycle">1</implicit-parameter>
  <implicit-parameter name="p_p_state">normal</implicit-parameter>
  <implicit-parameter name="p_p_mode">view</implicit-parameter>
  <implicit-parameter name="action">addUserName</implicit-parameter>
 </route>
</routes>
Explanation at little later in this blog.
In next step, add entries in liferay-portlet.xml file after <icon> element.
<?xml version="1.0"?>
<!DOCTYPE liferay-portlet-app PUBLIC "-//Liferay//DTD Portlet Application 6.0.0//EN" "http://www.liferay.com/dtd/liferay-portlet-app_6_0_0.dtd">

<liferay-portlet-app>
 <portlet>
  <portlet-name>friendly-url</portlet-name>
  <icon>/icon.png</icon>
  <friendly-url-mapper-class>com.liferay.portal.kernel.portlet.DefaultFriendlyURLMapper</friendly-url-mapper-class>
  <friendly-url-mapping>submit-name</friendly-url-mapping>
  <friendly-url-routes>com/opensource/techblog/controller/friendly-url-router.xml</friendly-url-routes>
  <instanceable>true</instanceable>
  <header-portlet-css>/css/main.css</header-portlet-css>
  <footer-portlet-javascript>/js/main.js</footer-portlet-javascript>
  <css-class-wrapper>friendly-url-portlet</css-class-wrapper>
 </portlet>
 <role-mapper>
  <role-name>administrator</role-name>
  <role-link>Administrator</role-link>
 </role-mapper>
 <role-mapper>
  <role-name>guest</role-name>
  <role-link>Guest</role-link>
 </role-mapper>
 <role-mapper>
  <role-name>power-user</role-name>
  <role-link>Power User</role-link>
 </role-mapper>
 <role-mapper>
  <role-name>user</role-name>
  <role-link>User</role-link>
 </role-mapper>
</liferay-portlet-app>
Explanations:- (For liferay-portlet.xml file)
- We have added 3 elements. 1)friendly-url-mapping-class 2)friendly-url-mapping and 3)friendly-url-routes
- friendly-url-mapping-class is the the class which will help us to get friendly url. This class is provided by Liferay.
- The value of friendly-url-mapping will be used in url. Its kind of key that will map the friendly url with the actual portlet url at server side.
- friendly-url-routes will be path of the xml file that we have defined. This xml file is called router.
- entry of these elements should be same order as I have defined and they must be placed just immediate after <icon> element.
Explanations:- (For friendly-url-router.xml file)
- This is router file and it defines the parameters that were there in URL if we not implemented friendlyURL.
- The first element is <pattern> and it will be used to generate the pattern of friendly URL. We have simply gave /add so it will be part of generated friendly URL.
- Rest are implicit variables which were in URL if we have not implemented friendly URL.
Next, build the portlet and refresh the page where this portlet is placed. This time you will observe the form URL in firebug console as below
http://localhost:8081/web/guest/test/-/submit-name/add?p_auth=R9q2yoCH
Cool...... !!! isn't it ? Now let me explain how its done
This url will be same as previous one till /web/guest/test
- Liferay then will add - (dash)
- Next is submit-name which is same as <friendly-url-mapping> element's value. It means whatever value we give to this element, will be appended after - (dash) in final friendly URL
- Next to it is /add which is nothing but the pattern value in router (friendly-url-router.xml) file.
- The last is p_auth parameter. Since we have not defined it in implicit variable(because its dynamic) in router xml, its showing explicitly in URL.
- In this example we have used instanceable portlet. Because of this its generating the p_p_id as friendlyurl_WAR_friendlyurlportlet_INSTANCE_dkW6
- In this p_p_id the last 4 characters are instance key and it will only be generate when we place portlet on page. So that they are dynamic
- It means If I place the portlet on page then let say the instance Id generated is pkd5 and when I remove the portlet from page and again if I place it then this time its not necessary that the same instance Id is generated.
- This create the problem as you can see that we have given p_p_id in router xml as implicit parameter.
- So the best practice is that make portlet non-instanceable (by setting instanceable element false in liferay-portlet.xml file) while generating its friendly URL.
- You also have observed that I have defined the action implicit variable, which is nothing but the corresponding action method key so this url will
I would like to further recommended to visit by blog on How to create Render and Action methods
package com.opensource.techblog.controller;

import javax.portlet.ActionRequest;
import javax.portlet.ActionResponse;
import javax.portlet.RenderRequest;
import javax.portlet.RenderResponse;

import org.springframework.stereotype.Controller;
import org.springframework.ui.Model;
import org.springframework.web.bind.annotation.RequestMapping;
import org.springframework.web.portlet.bind.annotation.ActionMapping;
import org.springframework.web.portlet.bind.annotation.RenderMapping;

import com.liferay.portal.kernel.log.Log;
import com.liferay.portal.kernel.log.LogFactoryUtil;
import com.liferay.portal.kernel.util.ParamUtil;

@Controller(value = "FriendlyUrlController")
@RequestMapping("VIEW")
public class FriendlyUrlController {

 private static Log log = LogFactoryUtil.getLog(FriendlyUrlController.class);
 /*
  * Default Render Method
  */
 @RenderMapping
 public String handleRenderRequest(RenderRequest request,RenderResponse response,Model model){

  return "view";
 }

 @ActionMapping(params = "action=addUserName")
 public void addUserName(ActionRequest request, ActionResponse response) {
  String userName=ParamUtil.get(request, "userName", "");
  log.info("userName is==>"+userName);
 }

 @RenderMapping(params ="action=viewUser")
 public String viewUser(RenderRequest request,RenderResponse response,Model model){

  return "viewUser";
 }
 @RenderMapping(params ="action=editUser")
 public String editUser(RenderRequest request,RenderResponse response,Model model){

  return "editUser";
 }


}
Explanation:-
- I have added 2 render method which will just display different JSP files. These render method will be called based on matching keys( viewUser and editUser)
- We also have to create corresponding JSP (viewUser.jsp and editUser.jsp at the same path where we have defined view.jsp (iser /WEB-INF/jsp folder)
Next, we will add entry in router xml as below snippet.
<?xml version="1.0"?>
<!DOCTYPE routes PUBLIC "-//Liferay//DTD Friendly URL Routes 6.0.0//EN" "http://www.liferay.com/dtd/liferay-friendly-url-routes_6_0_0.dtd">

<routes>
 <route>
  <pattern>/add</pattern>
  <implicit-parameter name="p_p_id">friendlyurl_WAR_friendlyurlportlet_INSTANCE_dkW6</implicit-parameter>
  <implicit-parameter name="p_p_lifecycle">1</implicit-parameter>
  <implicit-parameter name="p_p_state">normal</implicit-parameter>
  <implicit-parameter name="p_p_mode">view</implicit-parameter>
  <implicit-parameter name="action">addUserName</implicit-parameter>
 </route>
 <route>
  <pattern>/view</pattern>
  <implicit-parameter name="p_p_id">friendlyurl_WAR_friendlyurlportlet_INSTANCE_dkW6</implicit-parameter>
  <implicit-parameter name="p_p_lifecycle">0</implicit-parameter>
  <implicit-parameter name="p_p_state">normal</implicit-parameter>
  <implicit-parameter name="p_p_mode">view</implicit-parameter>
  <implicit-parameter name="action">viewUser</implicit-parameter>
 </route>
 <route>
  <pattern>/edit</pattern>
  <implicit-parameter name="p_p_id">friendlyurl_WAR_friendlyurlportlet_INSTANCE_dkW6</implicit-parameter>
  <implicit-parameter name="p_p_lifecycle">0</implicit-parameter>
  <implicit-parameter name="p_p_state">normal</implicit-parameter>
  <implicit-parameter name="p_p_mode">view</implicit-parameter>
  <implicit-parameter name="action">editUser</implicit-parameter>
 </route>
</routes>
Explanation:-
- Now we have added 2 more entries. one is for view and second is for edit pattern.
- Note that this time we have defined p_p_lifecycle=0 means its for render phase/lifercycle
- Also we have set the action parameter same as key of render methods in controller.
- This action parameter in this router xml will also be matched with the action parameter while creating render url in jsp
Next to it add two render url and its link to JSP as per below snippet.
<%@ taglib uri="http://java.sun.com/portlet_2_0" prefix="portlet" %>

<portlet:defineObjects />

<portlet:actionURL var="userNameUrl">
<portlet:param name="action" value="addUserName"></portlet:param>
</portlet:actionURL>

<portlet:renderURL var="viewUserUrl">
<portlet:param name="action" value="viewUser"></portlet:param>
</portlet:renderURL>

<portlet:renderURL var="editUserUrl">
<portlet:param name="action" value="editUser"></portlet:param>
</portlet:renderURL>

<form action="${userNameUrl}" method="post">
 Name :- <input type="text" name="userName"><br>
 <a href="${viewUserUrl}">view User</a>
 <a href="${editUserUrl}">edit User</a>
 <input type="submit">
</form>
You can observe that I have added 2 more render url with action parameters (matched with key of render method in controller and implicit variable in router xml file.
We can differentiate different friendly URL by pattern attribute in router xml file.
Now build the portlet and refresh the page. you will observe the link something like
For /view pattern the url is :- http://localhost:8081/web/guest/test/-/submit-name/view
For /edit pattern the url is :- http://localhost:8081/web/guest/test/-/submit-name/edit
And that all done. You may do some more practice to get this concept clear. Feel free to ask any question. I will try my best to answer it.
I would recommend looking at index page 'A Complete Liferay Guide' to browse all topics about liferay.
We can differentiate different friendly URL by pattern attribute in router xml file.
Now build the portlet and refresh the page. you will observe the link something like
For /view pattern the url is :- http://localhost:8081/web/guest/test/-/submit-name/view
For /edit pattern the url is :- http://localhost:8081/web/guest/test/-/submit-name/edit
And that all done. You may do some more practice to get this concept clear. Feel free to ask any question. I will try my best to answer it.
I would recommend looking at index page 'A Complete Liferay Guide' to browse all topics about liferay.


Subscribe to:
Posts
(
Atom
)
