
Monday, 16 July 2012
Create Liferay Portlet
Liferay Development
,
Liferay MVC Portlet
,
Liferay Portlet
,
MVC Portlet
,
Portlet
25 comments
:
In this acticle we will see how to create LiferayMVC portlet. Liferay MVC is framework define by Liferay to create JSR-168 / JSR-286 compatible portlets. I will use Liferay IDE to create portlet. However we can create portlet with command prompt also. We will see both method.
We first need to make eclipse ready to work with liferay.
Please refer my blog Configure Liferay with Eclipse to configure eclipse with liferay plugin.
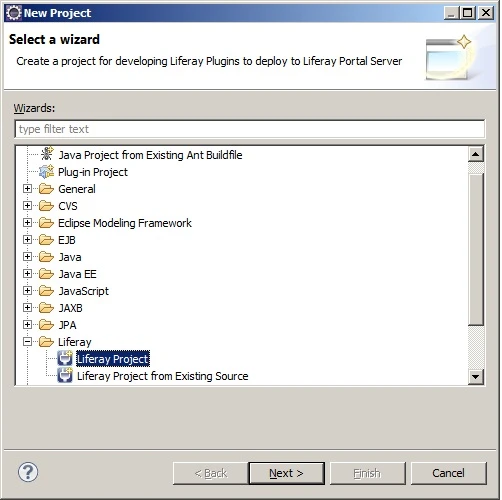
Start eclipse and click on File->New->Project and then select Liferay Project under Liferay category and click on Next button.
On the next page, give the project name as hello-word.(you can notice that display name is given by wizard automatically.You can change it).
Now make sure that in the Plugin Type section, the default Portlet is selected because we are going to create portlet project.
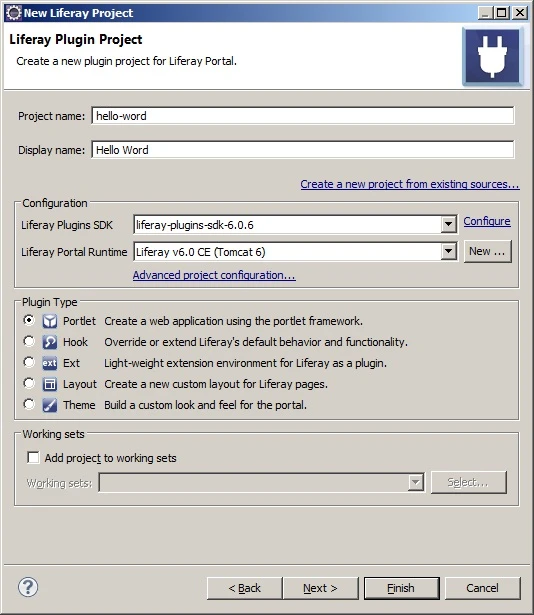
In Configuration section, you need to specify Plugin SDK and Portal Runtime (Liferay-Tomcat server). Without this, wizard will not allow to process further.
Now click on Next button. Now you can see the following screen.
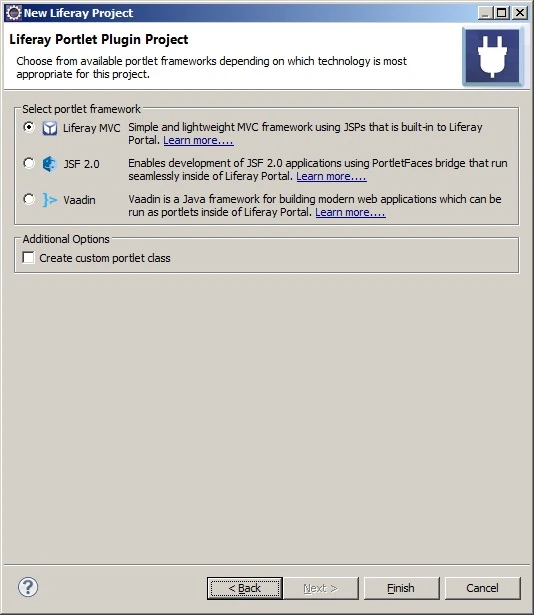
As we can create portlet on different technologies, this wizard allow us to create three different type of portlets.
Choose Liferay MVC (which is by default selected) and click on finish button. You will observe that project with name hello-word-portlet is created. Notice that, -portlet is appended to project name. The folder structure of this project will be looks like as below screenshot.
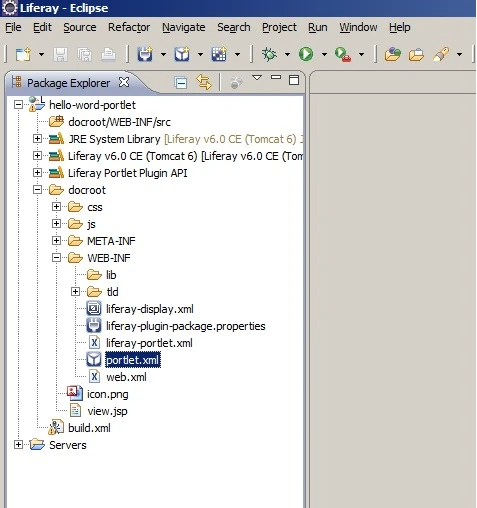
You can observe the following things
Now its time to deploy this portlet and see how its looks like. Please start the server.
Once server is up then type http://localhost:8080 to brower and sign in with
username:-[email protected]
password:-test
credentials.
On first time login it will ask for password reminder. Pls give proper password and go further.
Now we will first build and deploy the portlet.
Open Ant window if its not already opened from Window-->Show View-->Ant menu option. Find build.xml in project and drag it to Ant window as mentioned in below screenshot.
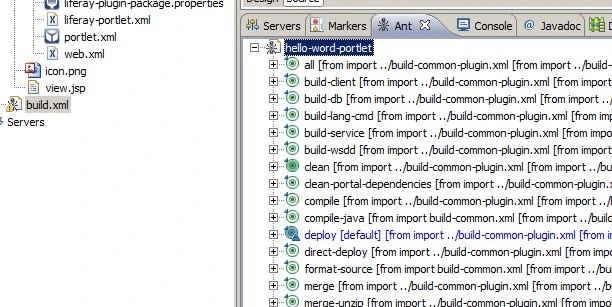
Click on + sign in hello-word-portlet entry in Ant window and double click on deploy target. System will start deploying portlet on server. Once its deployed successfully, it will show success message as below.

Now we will place the portlet on page. Pls back to the browser where are already on Welcome page after login. We will create new page called 'test' and will place hello-word-portlet on it.
To create the page, click on Add from top horizontal bar and click on Page. You will see text box just next to Welcome page asking for page name. Type test and click on right tick mark just besides it.
Now click on test page and then again click on Add from top horizontal bar and click on More... You will observe that our portlet name will be just under Sample category (which is defined in liferay-display.xml file.
Now click on Add link against Hello Word name. You will notice that, our Hello Word portlet has been placed on the page.
Here there are two Hello Word portlets you can see. One which is coming with liferay (out of the box) and second which we defined.
The one which is comes with liferay is not instantiable (with purple color icon) and the one which we have created is instantiable(with green color icon).
You can try putting multiple Hello Word portlet which we have created, but you won't able to place multiple instance of the one which comes with liferay.
The portlet which we have developed is just display one line This is the Hello Word portlet. This is because in the view.jsp file if you observe then you will find the same line.
Now you can change the content in view.jsp and re-deploy the portlet and refresh test page and see your changes.
Conclusion:-
I would recommend looking at index page 'A Complete Liferay Guide' to browse all topics about liferay.
We will create 'Hello Word' portlet that simply show welcome message.
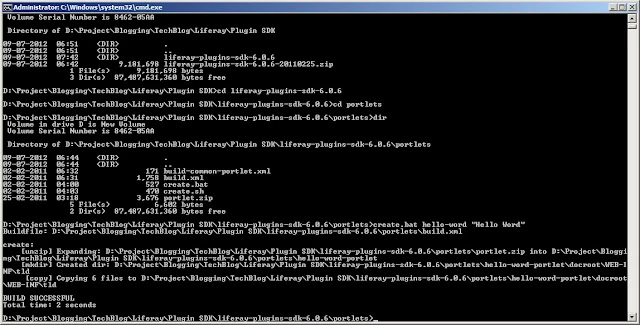
First I will show how to create portlet from command prompt.
Start command prompt and go upto {plugin-SDK}/portlets folder (This is the location where all portlets reside).
Give following command to create Hello Word portlet. The project name will be hello-word and portlet title will be “Hello Word” (Make sure not to put any space in project name, however we can put space in title).
crate.bat hell-word “Hello Word” (For Window)
./crate.sh hello-word “Hello Word” (For linux).
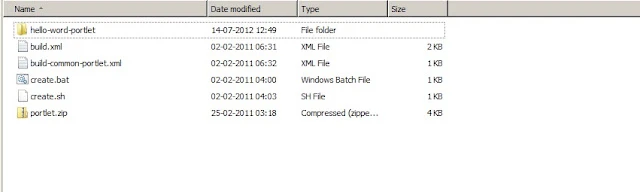
After giving this commang, BUILD SUCCESSFUL message will be shown as above. Also if you observe under {plugin-SDK}/portlets folder, a new folder hello-word-portlet will be created as below
Notice that Plugin SDK will append -portlet word after name of project
I would recommend looking at index page 'A Complete Liferay Guide' to browse all topics about liferay.
Now we will see how to create portel with the help of Liferay IDE. (Which is more convenient and easy to learn)
We first need to make eclipse ready to work with liferay.
Please refer my blog Configure Liferay with Eclipse to configure eclipse with liferay plugin.
Start eclipse and click on File->New->Project and then select Liferay Project under Liferay category and click on Next button.
On the next page, give the project name as hello-word.(you can notice that display name is given by wizard automatically.You can change it).
Now make sure that in the Plugin Type section, the default Portlet is selected because we are going to create portlet project.
In Configuration section, you need to specify Plugin SDK and Portal Runtime (Liferay-Tomcat server). Without this, wizard will not allow to process further.
Now click on Next button. Now you can see the following screen.
As we can create portlet on different technologies, this wizard allow us to create three different type of portlets.
Choose Liferay MVC (which is by default selected) and click on finish button. You will observe that project with name hello-word-portlet is created. Notice that, -portlet is appended to project name. The folder structure of this project will be looks like as below screenshot.
You can observe the following things
- The Java source is stored under docroot /WEB-INF/src folder
- Configuration files are stored under docroot/WEB-INF folder. These configuration files are comprises of standard JSR-286 portlet configuration file portlet.xml and other three liferay specific configuration files as below
- liferay-display.xml:- This file describes the category of portlet, which will be appear under Add menu. (from top bar after login as Liferay Admin).
- liferay-portlet.xml:- This file describes some additional liferay specific feature on top of JSR-286. Ex. We can declare the portlet as instantiable from this file. Instantiable means we can place more than one portlet instance on same page.
- liferay-plugin-package.properties:- We can configure dependency Jars and TLDs through this file.
Now we will see content of each file and understand each elements.
First we will see portlet.xml. The content of this file will be as below.
<portlet-app version="2.0" xmlns:xsi="http://www.w3.org/2001/XMLSchema-instance" xmlns="http://java.sun.com/xml/ns/portlet/portlet-app_2_0.xsd" xsi:schemalocation="http://java.sun.com/xml/ns/portlet/portlet-app_2_0.xsd http://java.sun.com/xml/ns/portlet/portlet-app_2_0.xsd">
<portlet>
  <portlet-name>hello-word</portlet-name>
  <display-name>Hello Word</display-name>
  <portlet-class>com.liferay.util.bridges.mvc.MVCPortlet</portlet-class>
  <init-param>
   <name>view-jsp</name>
   <value>/view.jsp</value>
  </init-param>
  <expiration-cache>0</expiration-cache>
  <supports>
   <mime-type>text/html</mime-type>
  </supports>
  <portlet-info>
   <title>Hello Word</title>
   <short-title>Hello Word</short-title>
   <keywords>Hello Word</keywords>
  </portlet-info>
  <security-role-ref>
   <role-name>administrator</role-name>
  </security-role-ref>
  <security-role-ref>
   <role-name>guest</role-name>
  </security-role-ref>
  <security-role-ref>
   <role-name>power-user</role-name>
  </security-role-ref>
  <security-role-ref>
   <role-name>user</role-name>
  </security-role-ref>
 </portlet>
</portlet-app>
- portlet-name:- Unique name of portlet across.In liferay portal its also refered as portlet-id.
- display-name:- Short name of portlet that will be used by tool. Its not required to be unique.
- portlet-class:- fully qualified portlet class name.
- init-param:- Just like servlet, we can pass init param for portlet.
- expiration-cache:- defines time in second after which portlet output expires. -1 means never expire.
- supports:- support mime type.
- portlet-info:- define portlet information.
- security-role-ref:-will define which role can access this portlet.
Below is the content of liferay-portal.xml file
<liferay-portlet-app>
 <portlet>
  <portlet-name>hello-word</portlet-name>
  <icon>/icon.png</icon>
  <instanceable>true</instanceable>
  <header-portlet-css>/css/main.css</header--portlet-css>
  <footer-portlet-javascript>/js/main.js</footer-portlet-javascript>
  <css-class-wrapper>hello-word-portlet</css-class-wrapper>
 </portlet>
 <role-mapper>
  <role-name>administrator</role-name>
  <role-link>Administrator</role-link>
 </role-mapper>
 <role-mapper>
  <role-name>guest</role-name>
  <role-link>Guest</role-link>
 </role-mapper>
 <role-mapper>
  <role-name>power-user</role-name>
  <role-link>Power User</role-link>
 </role-mapper>
 <role-mapper>
  <role-name>user</role-name>
  <role-link>User</role-link>
 </role-mapper>
</liferay-portlet-app>
- portlet-name:- unique name of portlet (this should be same as what we have defined in portal.xml file).
- icon:- path to the image of icon.
- instanceable:- defines whether multiple instance of this portlet can be placed on same page or not.
- header-portlet-css:- path of css files which will be included in <head> section of final portlet output.
- footer-portlet-javascript:- path of .js files for this portlet which will be included at the and of page before </body> tag.
Once server is up then type http://localhost:8080 to brower and sign in with
username:-[email protected]
password:-test
credentials.
On first time login it will ask for password reminder. Pls give proper password and go further.
Now we will first build and deploy the portlet.
Open Ant window if its not already opened from Window-->Show View-->Ant menu option. Find build.xml in project and drag it to Ant window as mentioned in below screenshot.
Now we will place the portlet on page. Pls back to the browser where are already on Welcome page after login. We will create new page called 'test' and will place hello-word-portlet on it.
To create the page, click on Add from top horizontal bar and click on Page. You will see text box just next to Welcome page asking for page name. Type test and click on right tick mark just besides it.
Now click on test page and then again click on Add from top horizontal bar and click on More... You will observe that our portlet name will be just under Sample category (which is defined in liferay-display.xml file.
Now click on Add link against Hello Word name. You will notice that, our Hello Word portlet has been placed on the page.
Here there are two Hello Word portlets you can see. One which is coming with liferay (out of the box) and second which we defined.
The one which is comes with liferay is not instantiable (with purple color icon) and the one which we have created is instantiable(with green color icon).
You can try putting multiple Hello Word portlet which we have created, but you won't able to place multiple instance of the one which comes with liferay.
The portlet which we have developed is just display one line This is the Hello Word portlet. This is because in the view.jsp file if you observe then you will find the same line.
Now you can change the content in view.jsp and re-deploy the portlet and refresh test page and see your changes.
Conclusion:-
- We created portlet with Liferay MVC framework.
- com.liferay.util.bridges.mvc.MVCPortlet will work as main portlet class.
- Path of jsp (view.jsp in our case) which is responsible for generating portlet content can be defined in portlet.xml file
- In real life we need more customization.
- To know how to extend LiferayMVC and provide custom functionality, refer my blog on how to write custom Liferay MVC portlet.
I would recommend looking at index page 'A Complete Liferay Guide' to browse all topics about liferay.


Saturday, 14 July 2012
Configure Liferay with Eclipse
Liferay Administration
,
Liferay configuration in Eclipse
,
Liferay IDE
,
Liferay in Eclipse
No comments
:
In this article, I will show you how to configure Liferay with Eclipse. First of all you need to have eclipse installed on your machine. You can download eclipse from following link
After this, click on 'Add' button which will open small window with title Add Repository as showin in below screenshot.
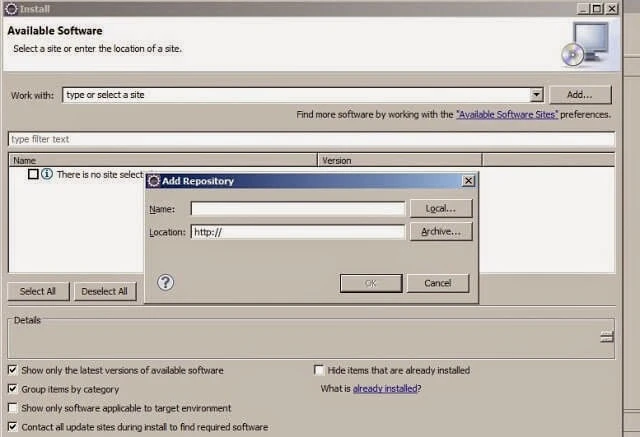
Now click on Next till it ask finish. Click finish and it will start installing the plugin.
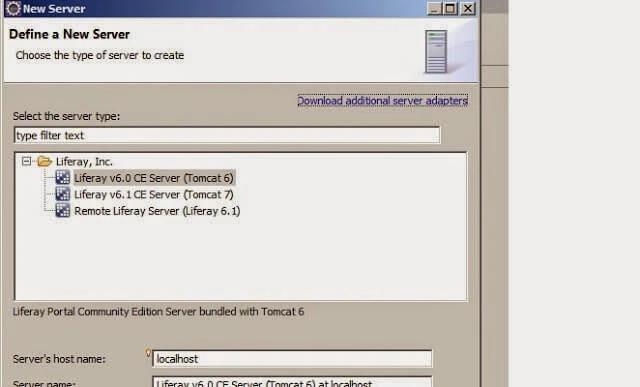
select Liferay v6.0 CE Server (Tomcat 6) and click on next button and give the path where you have installed server (tomcat liferay bundle).
click Next->Next and finish.
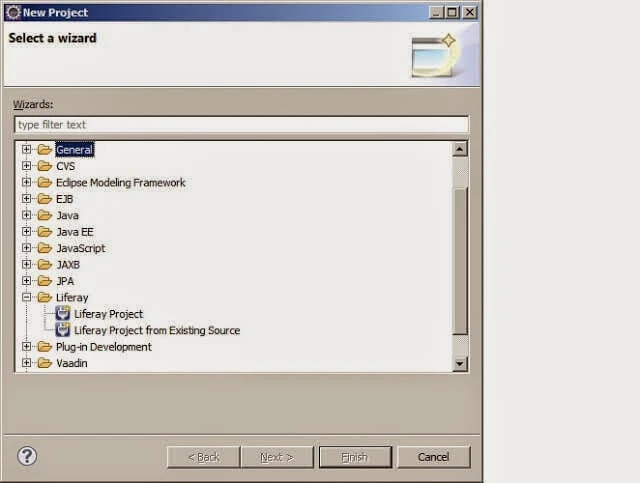
Now eclipse is ready to create Liferay Plugin Project. You can create Liferay proejct by clicking File->New->Project from top menu and select Liferay Project under Liferay category.
and its done.
I would recommend looking to look at index page 'A Complete Liferay Guide' to browse all topics about liferay.
http://www.eclipse.org/downloads/? (click on first link Eclipse IDE for Java EE Developer and download it).
After this, download eclipse plugin for liferay from following link
http://www.liferay.com/downloads/liferay-projects/liferay-ide
from Liferay IDE section, select latest version of eclipse+Liferay from Other Downloads drop down and click on download button. This will download zip file which contains eclipse plugin for liferay.
Once its done then start eclipse indigo and click on help->Install New Software menu.
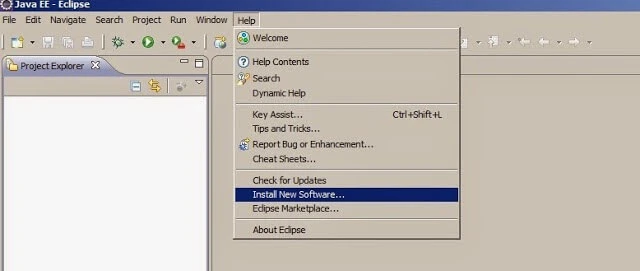
Now click on local button and give the path where you have unzip the eclipse plugin zip file. Give name as Liferay and then click on Ok button.
This will show two entries as below
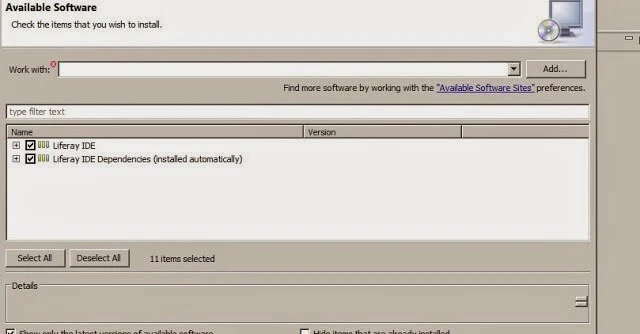
After successful installation, it will ask for restarting eclipse.
Once its restarted, you can observe liferay icon on toolbar as below.
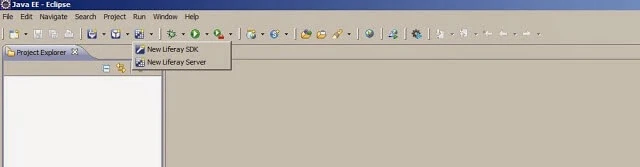
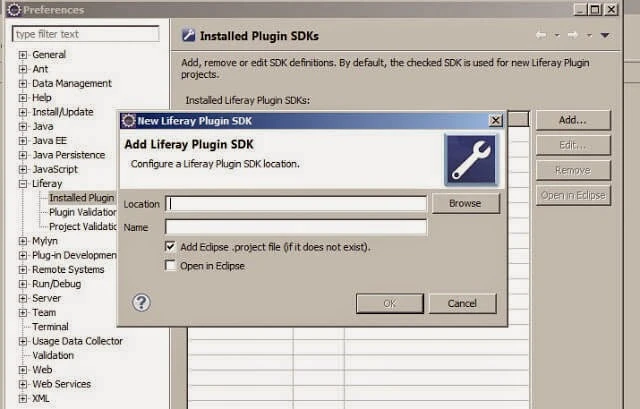
Befor starting any work, we have to configure the plugin SDK with eclipse.As showin in screenshot click on Liferay icon from toolbar and click on New Liferay SDK. It will open following screen.
Give the location where you have installed plugin sdk and click on OK button.
To crate portlet using Liferay IDE, we also need runtime server (Liferay Tomcat bundle).
Download it from following link
http://www.liferay.com/downloads/liferay-portal/available-releases (Select Bundle with Tomcat in Liferay Portal 6.0 Community Edition section.)
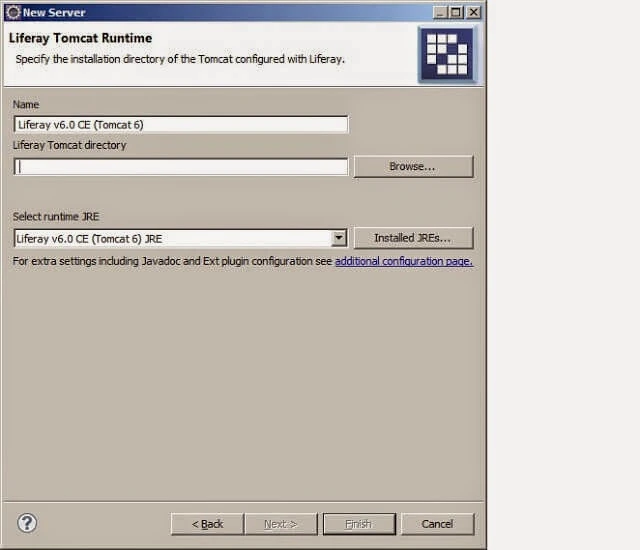
Once its done unzip the tomcat bundle and configure it by clicking liferay icon from toolbar and click on New Liferay Server (Just below New Liferay SDK option)it will open following screen.
 |
Now eclipse is ready to create Liferay Plugin Project. You can create Liferay proejct by clicking File->New->Project from top menu and select Liferay Project under Liferay category.
I would recommend looking to look at index page 'A Complete Liferay Guide' to browse all topics about liferay.
Monday, 9 July 2012
How to Setup Liferay Development environment
Liferay Administration
,
Liferay Dev Setup
,
Liferay Environment
No comments
:
I would recommend looking at index page 'A Complete Liferay Guide' to browse all topics about liferay.
There are two version of Liferay portal available- Community Edition (CE).
- Enterprise Edition (EE).
1) Setting up Server (ex. Liferay-tomcat bundle)
2) Setting up Plugin-SDK (Will be used to develop custom plugins like portlets, theme, hook, layout and Extension environment).
There are two way to do setup of liferay portal (Server)
1) With the help of WAR package
- In this type, we can download WAR file of liferay and we can install on various servers like Tomcat, Jboss etc.
2) With the help of Bundle (Bundle is the pre-installed liferay on server like tomcat).
Easiest way to jump into liferay developmen is to use liferay-tomcat bundle.
Liferay community portal(Bundle) can be downloaded from following link
http://www.liferay.com/downloads/liferay-portal/available-releases
Server Setup :-
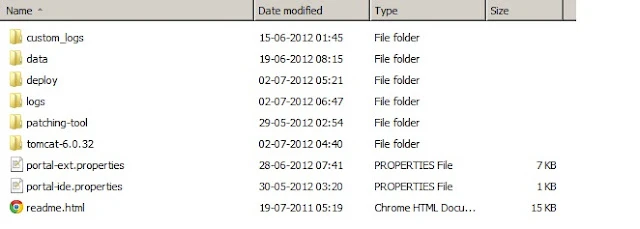
download and un-zip the tomcat bundle into your local machine's drive (ex. c:/project). After un-zip the folder name will be something like liferay-portal-6.0-XX-sp2. (This is sample format. XX will be either ce or ee).The folder structure of bundle will be as blow.
data Folder :-
Liferay-Tomcat bundle comes with embedded HSQL database. data folder shown in screenshot contains the data file of HSQL database along with other data like document library's folder to store document, lucene index folder etc.
deploy Folder:-
This folder is the place where we can put pluggin's WAR files and liferay will automatically start deploying on server.
logs Folder:-
Contains log information.
tomcat-6.0.32 (Version may be very) Folder:-
This is actual tomcat server folder.
portal-ext.properties file:-
This is properties file which provide facility to define our own custom properties. This properties can be accessible to all plugins (including portlets, theme,hook,ext and theme).
We also can override properties that is provided by liferay out of the box. (the properties file provided by liferay is portal.properties while this properties file is portal-ext.properties means this is the extension of what liferay is providing. If we don't mentioned any properties in portal-ext file then all properties defined in portal.properties will be available. We only have to define the properties which we want to override). We also can define our own custom properties in portal-ext file.
Liferay Plugin SDK Setup :-
First download plugin SDK from following url
http://www.liferay.com/downloads/liferay-portal/available-releases
Select PluginSDK and click download button from community section (select Plugin-SDK at the last in drop down)
Create folder like liferay-plugins-sdk-6.0.6 and unzip the plugin sdk zip file.
We need to create one property file with specific name. The format of name will be as below
build.<<windows-logged-in-user>>.properties
E.g. if user name is nilang.patel then property file name will be build.nilang.patel.properties.
(to get logged in user name type echo %username% in command prompt).
paste the following properties in this property file
app.server.type = tomcat
app.server.dir = D:\\Project\\Project1\\liferay-portal-6.0.6\\tomcat-6.0.32
app.server.deploy.dir = D:\\Project\\Project1\\liferay-portal-6.0.6\\tomcat-6.0.32\\webapps
app.server.lib.global.dir = D:\\Project\\Project1\\liferay-portal-6.0.6\\tomcat-6.0.32\\lib\\ext
app.server.portal.dir = D:\\Project\\Project1\\liferay-portal-6.0.6\\tomcat-6.0.32\\webapps\\ROOT
Note:-give the respective path for server here.
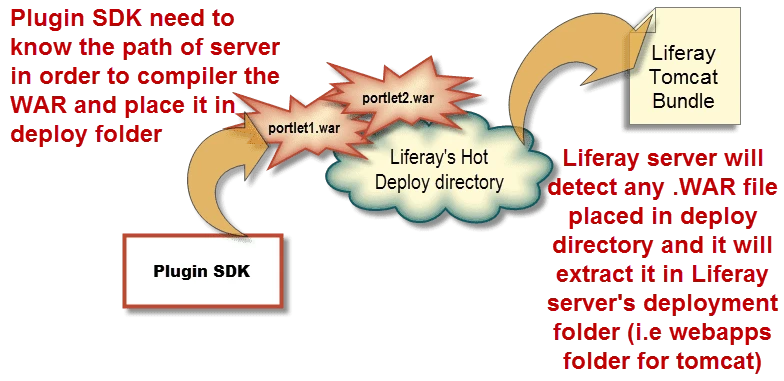
This file pointing the path of liferay server. Liferay plugins (like portlets, hooks, theme, etc) referring classes present with liferay tomcat bundle. Pointing out server path with above properties will help to compile these plugins with these API dependencies.
When we build any plugin WAR from Plugin-SDK, it will place WAR file inside deploy folder of server. The whole process will be as below.
Plugins like Portlets etc. developed with plugin SDK may only import classes from portal-service.jar and other jar in lib folder of that plugin but will not allow to access classes from portal-impl.jar file which contains implementation of core features as shown in below diagram.
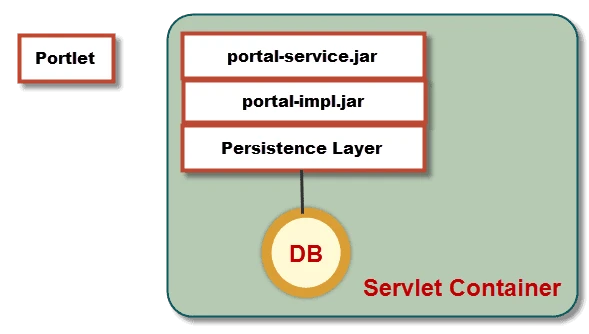
portal-service.jar file is available at tomcat/lib/ext folder while portal-impl.jar is available at tomcat/webapps/ROOT/WEB-INF/lib folder
And its done. Now you can start Liferay development.
I would recommend looking at index page 'A Complete Liferay Guide' to browse all topics about liferay.
Subscribe to:
Posts
(
Atom
)
