
Tuesday, 28 August 2012
How to set Log level in Liferay
Liferay Development
,
Log
,
Log levels
,
log4j
,
LogFactoryUtil
,
Logger
5 comments
:
In this article I will show how to set log level in liferay. In any java / J2EE project, we are dividing the whole source into various packages.
Many time we need to set log levels at package level. We can do this by defining package level log by following property in log4j.properties file
Liferay provides convenience way to define logging level at package through configuration. Means without restarting the sever, we can add/modify it.
To understand it properly, we first will create custom Liferay portlet. Please refer my previous blog Creating custom Liferay MVC portlet to create custom Liferay portlet. Give the name of portlet project as "check-log-level" ('-portlet' will be appended by wizard while creating portlet).
Also give the package name like "com.test.log.level" and class name as "CustomLogLevelTest.java".
I would recommend looking at index page 'A Complete Liferay Guide' to browse all topics about liferay.
After creating this portlet, the project structure will looks like as per below screenshot.
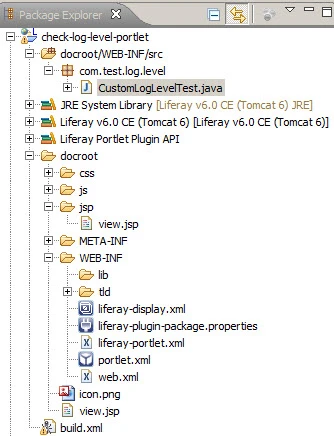
We will have default render method in this portlet where I have created on Log variable with the help of LogFactoryUtil(Liferay Utility class) as shown in below snippet.
I have created 3 logger, one of each level (info, debug and error). By default, info and error level logger will execute. Build and deploy this portlet. Create new public page named Log Test in community Nilang. Refer my previous blog Create Web Content in Liferay to know how to create community and public page.
Place this portlet on this page (Log Test) and observe the log. you will find that only info and error level logger get executed as per below screenshot.


The logger levels follow the following order.
and like that it will show masseges with all log levels below the current preset one.
And its done.
You can create more package and set different log level and verify it.
Feel free you raise any questions in comment section
I would recommend looking at index page 'A Complete Liferay Guide' to browse all topics about liferay.
Many time we need to set log levels at package level. We can do this by defining package level log by following property in log4j.properties file
log4j.logger.<your package> = DEBUG|INFO|OFF|WARN...Liferay provides convenience way to define logging level at package through configuration. Means without restarting the sever, we can add/modify it.
To understand it properly, we first will create custom Liferay portlet. Please refer my previous blog Creating custom Liferay MVC portlet to create custom Liferay portlet. Give the name of portlet project as "check-log-level" ('-portlet' will be appended by wizard while creating portlet).
Also give the package name like "com.test.log.level" and class name as "CustomLogLevelTest.java".
I would recommend looking at index page 'A Complete Liferay Guide' to browse all topics about liferay.
We will have default render method in this portlet where I have created on Log variable with the help of LogFactoryUtil(Liferay Utility class) as shown in below snippet.
package com.test.log.level;

import java.io.IOException;

import javax.portlet.PortletException;
import javax.portlet.RenderRequest;
import javax.portlet.RenderResponse;

import com.liferay.portal.kernel.log.Log;
import com.liferay.portal.kernel.log.LogFactoryUtil;
import com.liferay.util.bridges.mvc.MVCPortlet;

public class CustomLogLevelTest extends MVCPortlet{

  private final Log log = LogFactoryUtil.getLog(CustomLogLevelTest.class);
  //Default Render Method.
  public void doView(RenderRequest renderRequest,
    RenderResponse renderResponse) throws IOException, PortletException {

   log.info("This is info Logger...");
   log.debug("This is Debug Logger...");
   log.error("This is error Logger ...");
   super.doView(renderRequest, renderResponse);
  }
}
I have created 3 logger, one of each level (info, debug and error). By default, info and error level logger will execute. Build and deploy this portlet. Create new public page named Log Test in community Nilang. Refer my previous blog Create Web Content in Liferay to know how to create community and public page.
Place this portlet on this page (Log Test) and observe the log. you will find that only info and error level logger get executed as per below screenshot.
- Now we will change the logger level in control panel.
- Go to Control Panel.
- Click on Server Administration from Server section in control panel.
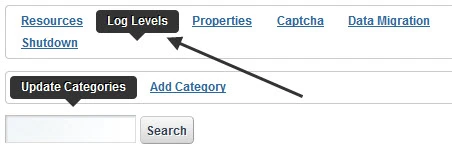
- Click on Log Levels (second link) as shown in below screen.
- You will notice that, there are various Categories and Log level defined.
- We will now add new category.
- Click on Add Category link
- Give the java package. In our case its com.test.log.level
- Set log level from drop down. We will first set INFO.
- Go back to the Nilang community and refresh the page Log Test.
- Now you will observe the following loggers in log.
You will observe that, it will show Info and error level logger (Which is similar which we have seen as default - without setting any log level). Since Error logger will have higher priority, it will always be printed If we set log level for INFO,DEBUG,WARN,ERROR,ALL
To update the log level, just click on Update Categories and type the package name () and click on Search button. It will show the entered category and log level in drop down.
The logger levels follow the following order.
- DEBUG
- INFO
- WARN
- ERROR
- FATAL
- if we set Log level to WARN then only the WARN, ERROR and FATAL level logs will be displayed.
- If we set log level to ERROR then only the ERROR and FATAL will be displed.
and like that it will show masseges with all log levels below the current preset one.
And its done.
You can create more package and set different log level and verify it.
Feel free you raise any questions in comment section


Monday, 27 August 2012
Create Web Content With Structure and Template in Liferay
Liferay Administration
,
Structure
,
Template
,
Web Content
12 comments
:
In This article, I will show you how to create web content with the help of Structure and Template.
I assume that you have basic knowledge of how to create simple web content and how to configure it into out of the box portlet - Web Content Display portlet.
If you are new to web content in liferay, I would suggest to get detail about simple web content from my previous blog - Create Web Content in Liferay
Before we start, let me explain what is structure,template and content in liferay.
Structure :- As its name, Structure defines the data structure of the web content.These data structure will contain the data types (like String, image, url, boolean etc.).
Template:- Template provide the template where the data structure will be arranged.
Content:- Its the textual content that will be fit in respective structure and structures will be arranged in template to form of complete Web Content.
Now let us do some practical work. In my previous post Create Web Content in Liferay I have created community Nilang. So I will use the same community and going to create separate Web Content (with structure and template)
First do log-in and go to Control Panel and select Nilang community from drop-down in Content section of control panel.
Click on Web Content in content section. You may observe that the web content named "Simple Web Content" that we had created in previous post will be shown.
We will divide Web Content creation activity in three steps.
1) Creating Structure :-
Click on Structure link just besides (Web Content) as per below screenshot.
.webp "Add Structure to create web content in Liferay")
Give the basic details of Structure like name and descriptions. Also make sure to tick mark the Autogenerated ID checkbox. (So that the Id of the structure will generate automatically) as per below screenshot.
+(1).webp "Creating new Structure for creating web content")
Now scroll down and you will find the section called XML Schema Definition where we can define various data type. Click on Add button and add 4 rows and give the values as per below screenshot.
.webp "Adding elements of Structure")
Note:- I have tick-mark Repeatable checkbox for Body component. This will allow to insert multiple component while creating web content. I will show this later in this blog.
Click on Save button to create Structure.
Explanation:-
I assume that you have basic knowledge of how to create simple web content and how to configure it into out of the box portlet - Web Content Display portlet.
If you are new to web content in liferay, I would suggest to get detail about simple web content from my previous blog - Create Web Content in Liferay
Before we start, let me explain what is structure,template and content in liferay.
Structure :- As its name, Structure defines the data structure of the web content.These data structure will contain the data types (like String, image, url, boolean etc.).
Template:- Template provide the template where the data structure will be arranged.
Content:- Its the textual content that will be fit in respective structure and structures will be arranged in template to form of complete Web Content.
Now let us do some practical work. In my previous post Create Web Content in Liferay I have created community Nilang. So I will use the same community and going to create separate Web Content (with structure and template)
I would recommend looking at index page 'A Complete Liferay Guide' to browse all topics about liferay.
First do log-in and go to Control Panel and select Nilang community from drop-down in Content section of control panel.
Click on Web Content in content section. You may observe that the web content named "Simple Web Content" that we had created in previous post will be shown.
We will divide Web Content creation activity in three steps.
1) Creating Structure :-
Click on Structure link just besides (Web Content) as per below screenshot.
Now scroll down and you will find the section called XML Schema Definition where we can define various data type. Click on Add button and add 4 rows and give the values as per below screenshot.
Click on Save button to create Structure.
Explanation:-
- The first component(Text box) represents the name of the element
- Second component(Drop down) represents the type of the element (like text, text box,link etc)
- Third component(Drop down) represent whether this element is searchable or not
- Fourth component(select box) represent whether this element is repeatable or not.
We had created
- Header element as Text (Label)
- Logo element as Image
- Body element as Text Area(Where we will put HTML code
- Footer element as again Text (Label)
Click on Save button. You will see the structure entry as per below screenshot.
.webp "New Liferay Structure added") Now second step
Now second step
2) Creating Template:-
Click on Template link which is just besides the Structure link. Click on Add Template button as shown in below screenshot.
.webp "Creating new Template for Web content in Liferay") Give template name and description. Also tick mark to Autogenerated ID check-box as shown in below screenshot.
Give template name and description. Also tick mark to Autogenerated ID check-box as shown in below screenshot.
.webp "Adding new Template in Liferay")
Now scroll down to see more options.
Template can be written different language like Freemarker, Velocity, XSL etc. Still we can user plain HTML, Javascript and CSS while creating Template.
First we need to attach Structure for this template. Click on Select button in Structure section as shown in below screenshot. It will list down all the structure we created for Nilang community. Choose the structure that we created just now (Web Content 1) and click on Save in pop window.
.webp "Selecting Structure while creating Template in Liferay")
Select Language Type as VM(Velocity) and click on Launch Editor button as shown in below screenshot.
.webp "Selecting template engine while creating template in Liferay") You will notice the Template Editor something like as below
You will notice the Template Editor something like as below
.webp "Template code editor")
Clear all the content and type the following code in it.
and click on Update button.
Explanation:-
Now scroll down to see more options.
Template can be written different language like Freemarker, Velocity, XSL etc. Still we can user plain HTML, Javascript and CSS while creating Template.
First we need to attach Structure for this template. Click on Select button in Structure section as shown in below screenshot. It will list down all the structure we created for Nilang community. Choose the structure that we created just now (Web Content 1) and click on Save in pop window.
Clear all the content and type the following code in it.
<style>
.center-align {
 align: center;
}
</style>
<table class="center-align">
 <tr>
  <td class="center-align"><img src="$Logo.data"></td>
  <td class="center-align"><h1>$Header.data</h1></td>
 </tr>
 <tr>
  <td class="center-align" colspan="1">$Body.data</td>
 </tr>
 <tr>
     <td class="center-align" colspan="1">
                <h3>$Footer.data</h3>
            </td>
 </tr>

</table>
and click on Update button.
Explanation:-
- We are simply created one table with row and column.
- In first row, we are displaying logo image. we are getting the its value by $Logo.data expression. In this expression, Logo is the name of the component that we defined in Structure.
- Since this is Velocity template, all the component's value will be available by its name. Component value we will give while creating Web Content.
- Similar way we are accessing other component's value (with $<<COMPONENT_NAME>>.data expression)
Note:- If we don't attach Structure with Template, then these component value won't be available.
Now our Template has been created. Next we will create Actual web content.
Click on Web Content from Content Section from control panel and then choose Web Content and click on Add Web Content as per below screenshot.
.webp "Adding new web content in Liferay")
Give the name as 'Web Content1' and click on Select button in Template section (right side just below the Structure section) as per below screenshot.
.webp "Adding new web content in Liferay")
Note:- If you are not able to see the Template (or Structure section), then you have to click on Advanced link just below the <<Back link. When these sections (Structure and Template) are opened, then the Advanced link will be converted to Basic link.
Since we already attached the Structure with Template, if we select Template, then automatically the attached Structure will be applied.
On clicking on Select button, it will show the pop up saying 'Selecting a template will change the structure,available input fields, and available templates ? Do you want to proceed ?'. Click OK button and next new browser window will be open which will list down all template available as per below screenshot.
.webp "Change Template associate with Liferay web content")
Click on Test Template1 which we had created. You will observe that, now instead of single WYSIWYG editor, the Web Content is divided in four sections.
.webp "Liferay web content with Structure and Template")
Click on Web Content from Content Section from control panel and then choose Web Content and click on Add Web Content as per below screenshot.
Note:- If you are not able to see the Template (or Structure section), then you have to click on Advanced link just below the <<Back link. When these sections (Structure and Template) are opened, then the Advanced link will be converted to Basic link.
Since we already attached the Structure with Template, if we select Template, then automatically the attached Structure will be applied.
On clicking on Select button, it will show the pop up saying 'Selecting a template will change the structure,available input fields, and available templates ? Do you want to proceed ?'. Click OK button and next new browser window will be open which will list down all template available as per below screenshot.
Click on Test Template1 which we had created. You will observe that, now instead of single WYSIWYG editor, the Web Content is divided in four sections.
- Header:- (We have given type as Text in structure. So whatever value we will give in text box, it will be shown as label while displaying this Web Content .)
- Body:- (As WYSIWYG editor, because we have given type as Text Area (HTML) in Structure. So we can type HTML code and it will render when actual Web Content get displayed).
- Logo:- (We had given type as Image in Structure, so that it will ask to upload Image which will be render while actual Web Content display)
- Footer:- (We have given type as Text in Structure. So whatever value we will give in text box, it will be shown as label while displaying this Web Content .)
- Header :- "My Own Company"
- Body:- anything you want.
- Logo:- Upload any logo size image.
- Footer:- "Copyrighted by me :)"
You can give more options while creating Web Content. For this, just click on Edit button in Structure section as shown in below screenshot.
.webp "Editing Structure elements while creating Liferay web content")
You will observe following options for each component we defined in Structure.
- Value
- Edit Option button from where you will find more options like tool tip and etc.
- Variable Name (defined in Structure)
- Close button (To remove it from Structure).
Once you done with editing, you can click on Save button from Structure section. If you cancel all your changes then simply click on Stop Editing button just besides Save button as per following screenshot.
.webp)
Note:- If you want, you can choose different Structure from Choose link.
Click on Publish button. Now its time to see our hard work done so far. To display this web content, we will create new page called Web Content 1 in Nilang community.
Now place the Web Content Display portlet and configure it to show the Web Content 1 that we just now created. To know how to configure the Web Content to Web Content Display portlet please refer my previous blog Create Web Content in Liferay
After successfully configuration, it will looks like as per below screenshot.
And all this done. Try some more complex components in Structure and do some hands on for creating Web Content with the help of Structure and Template.
I would recommend looking at index page 'A Complete Liferay Guide' to browse all topics about liferay.
I would recommend looking at index page 'A Complete Liferay Guide' to browse all topics about liferay.
Monday, 20 August 2012
Create Web Content in Liferay
CMS
,
Content
,
Liferay Administration
,
Web Content
,
Web Content Display
1 comment
:
Liferay provides CMS (Content Management System) functionality, by which we can add/update/delete various content on the fly (Without changing any code). Liferay also provides advance features like Publishing Web Content
On clicking on this web content (on any column), the header section will show the selected web content name as per below screenshot.
.webp)
Once we select the web content, just click on Save button at the end of the page. On successfully saving, it will show the success message at the top of configuration (pop up) window. After this you need to manually close it.
And its done. Our work is done. You will see our web content is being displayed by Web Content Display portlet as per below screenshot.
.webp "Web content selected is rendering in Web Content Display Portlet")
If you want, you can edit web content by just clicking on Edit icon shown at the lower left corner in above screenshot. On clicking on Edit link, it will open the web content in edit mode. Click on Return to Full Page on header section of web content or <<Back link to see all changes done.
For simplicity, I created content with just one line of text and one Image.
Try some hands-on with more rich content. In my next blog, I will show how to write more complex web content with the help of Structure and Template.
I would recommend looking at index page 'A Complete Liferay Guide' to browse all topics about liferay.
- using Workflow
- on Schedule
- With/Without Structure and Template
- on Staging/Production
Web contents are scoped by Community / Organization. So you need to first decide the Community / Organization in which you need a web content.
Community:- Community is a logical group of users, who are having common interest or skill.
Organization :- Organization is used to manage users in hierarchical manner.
Get more information about Community and Organization from http://www.liferay.com/web/jorge.ferrer/blog/-/blogs/7858337
Community:- Community is a logical group of users, who are having common interest or skill.
Organization :- Organization is used to manage users in hierarchical manner.
Get more information about Community and Organization from http://www.liferay.com/web/jorge.ferrer/blog/-/blogs/7858337
we will see how to create Simple Web content and how to access it with out of the box Web Content Display Portlet.
I will first create community named Nilang. We can create two types of pages (Public and Private) for community and on these pages, we can place various portlets (out of the box and customized).
First open control panel by clicking on Manage-->Control Panel (From top horizontal navigation bar). You must be logged in to open the control panel.
First open control panel by clicking on Manage-->Control Panel (From top horizontal navigation bar). You must be logged in to open the control panel.
Control panel is divided in four logical sections.
- Personal (You will find various tools which are user specific like personal pages, account etc)
- Content (You will find various out of the box portlets (shown as various icon) scoped by community / organization like Web Content,Blogs,Wiki,Polls etc)
- Portal (You will find various tools to manage various activities in portal instance)
- Server (You will find various tools to manage various activities in server).
Note:- Liferay provides functionality by which we can create multiple instance of portal on single liferay server.Individual instance setting can be done through Portal section and Server (on which all liferay instance are sited) setting can be done through Server section in control panel.
We will first create community with Public page.
I would recommend looking at index page 'A Complete Liferay Guide' to browse all topics about liferay.
Creating Community :-
Fact about friendly URL:-
Now click on community Nilang. After clicking on community Nilang, you will observed the title of the content section will be Nilang (The selected community) as per below screenshot.
.webp "Liferay content section in Control Panel")
Next we will perform activity to show this content on community's page. We will use Out of the Box portlet named Web Content Display Portlet to show this web content.
Click on Configuration icon at the end of the portlet window as per below screenshot.
.webp "Configuring Web content Display Portlet")
On clicking on Configuration icon, it will show configuration pop up window where all published content will be displayed as below screenshot.
.webp "Selecting web content to be displayed in Web Content Display Portlet")
I would recommend looking at index page 'A Complete Liferay Guide' to browse all topics about liferay.
Creating Community :-
- Click on Communities from portal section in control panel.
- You will find all created communities over here.
- To add new, click on Add button from right part of the page.
- Give community name as Nilang (Or whatever you want).
- Give appropriate description (like Community for Web content testing).
- Keep the type as Open (Which is by by default selected) and click on Save button without touching any other options.
You will observed a new community named Nilang is created. Now We will create a public page named "Web Content".
You will observe Action button against each community.
Click on Action button for community named Nilang and click on Manage Pages.
You will observe three links as per blow screenshot.
.webp)
- Public Pages (By default selected)
- Private Pages
- Settings.
- Pages(By default selected)
- Look and Feel
- Export / Import.
Give the name of page as "Web Content" and click on Add Page button without touching any other options.
To see the newly created page, click on tringle arrow just before the name of the community name (Nilang) as per below screenshot.
+(1).webp "Adding Liferay Page")
Click on page (Web Content) just below to Community Name (Nilang) and then from right side section click on Page link. It will show full details of this page.
Note:- You will observe Friendly URL (one of the page attribute). Its value will be something like http://localhost:8080/web/nilang/web-content.
Fact about friendly URL:-
- All public page's friendly URL will start with /web.
- All private page's friendly URL will start with /group.
- In above URL,Next to /web is /nilang. This is friendly URL of community(Nilang) and next to /nialng is /web-content which is friendly URL of this page.
- Liferay will automatically create friendly URL of page from its name (putting all alphabets in lower case and remove space with '-' (dash) character).
- Liferay also create friendly URL for community with same logic. (From communitie's name, making all alphabets in lower case and replacing all space with '-' (dash) character).
If you want you can change the friendly URL of community. Follow below steps to modify friendly URL of community.
- Click on Communities link from Portal section.
- Click on Action button and again click on Manage Pages.
- From the top three links (Public Pages(default selected link), Private Pages ,Settings), click on Settings.
- From the first link Virtual Host (By default selected), you will observe Friendly URL (/nialng) at the end of the page.
Till now we are done with the half of the activity. Next we will create web content for community Nilang.
Creating Web Content for community Nilang :-
Click on header section of content in control panel. You will observed all communities and organization available as per below screenshot.
.webp "Liferay content section in Control Panel")
Now click on community Nilang. After clicking on community Nilang, you will observed the title of the content section will be Nilang (The selected community) as per below screenshot.
Now whatever content /other thing we will create, it will be scoped by Nilang Community (means it will be only available in Nilang community).
Click on Web Content from content section in control panel and click on Add Web Content button from right side section as per below screenshot.
.webp "Adding new Web content in Liferay")
Now we can create actual web content.
Give name of the web content as 'Simple Web Content' and in the Content section, you will observe a WYSIWYG editor with plenty of controls to create web content as per below screenshot.
.webp "Adding new Web content in Liferay")
First type "This is a Sample Web Content" inside WYSIWYG editor. We will also put an image. On clicking on Image icon, pop-up window named "Image Properties" will be opened.
.webp "WYSING Editor to add content in Liferay")
.webp "Inserting Image in Liferay Web content")
Now click on Browse Server button. You will see few default created folders (This folder are part of Liferay CMS and not the OS file system folder) as per below screenshot.
.webp "Choosing image folder to add it on Liferay Web content")
Click on 18-Liferay ( the number 18 may different in your case) and again click on Web Content folder in it.
You will observe few images. Now click on portal_mashup.png.
Note:- you can also give the images that are present in your system. However, this is not a window file selector so you cannot directly point the image path on your local deives. For this, first you have to upload that file to liferay CMS.
You can point the actual image on your local drive by clicking on Choose File button and then select the file and click on Upload button as mentioned in above screenshot.
Inshort, first you have to import the images on local drive into the Liferay CMS folder and then point it into your web content.
Once the images has been choose, you can give value to other options in different tabs (like Link and Advanced) in Image Properties popup window.
For simplicity, we will not give other value and will just click on OK button.
Now image will be shown into the WYSIWYG editor. We also will do some formatting. Press Ctrl + A to select all content in WYSIWYG editor and make it center aligned. After this, it will looks like,
.webp "Image showing in WYSING editor in Liferay Web content")
Our web content is read to publish. Click on Publish button at the end of the page.
On successfully published, you will see the entry of this web content as below.
.webp "Liferay Web Content Added")
Click on Back to Liferay(from top horizontal navigation bar) will return back to guest community(Liferay community, which is default community). Now click on Go To and click on Nilang from top horizontal navigation bar. This will open public page (Web Content) which we created.
Click on Add-->More from top horizontal navigation bar.
Just type web content display and you will observe Web Content Display portlet's name under Content Management category . Click on add link againts it to place it on Web Content page as per below screenshot.
.webp "Adding Web Content Display Portlet on Liferay Page")
Once Web Content Display portlet placed on page, we need to configure it to show the web content we published.
Note:- Web Content Display portlet will display one content at a time.
Note:- Web Content Display portlet will display one content at a time.
Click on Configuration icon at the end of the portlet window as per below screenshot.
On clicking on this web content (on any column), the header section will show the selected web content name as per below screenshot.
And its done. Our work is done. You will see our web content is being displayed by Web Content Display portlet as per below screenshot.
If you want, you can edit web content by just clicking on Edit icon shown at the lower left corner in above screenshot. On clicking on Edit link, it will open the web content in edit mode. Click on Return to Full Page on header section of web content or <<Back link to see all changes done.
For simplicity, I created content with just one line of text and one Image.
Try some hands-on with more rich content. In my next blog, I will show how to write more complex web content with the help of Structure and Template.
I would recommend looking at index page 'A Complete Liferay Guide' to browse all topics about liferay.
Friday, 3 August 2012
Creating custom Liferay MVC portlet
Action
,
GenericPortlet
,
Liferay Development
,
Liferay IDE
,
Liferay MVC Portlet
,
Liferay Portlet
,
MVC Portlet
,
Portlet
,
Portlet interface
64 comments
:
In this article, we will see how to write custom portlet which extends LiferayMVC portlet.
For simplicity, we will display the string stored in the request attribute.
Note:- Download source code at the end of this blog
Before starting with this blog, please read Create Liferay Portlet , in which I have mentioned how to create Liferay MVC portlet with eclipse. Let's recall that Liferay MVC is a lightweight framework provided by liferay to create JSR-168/286 compatible portlets.
Follow all steps and create Liferay MVC portlet. Give the project name as custom-liferaymvc and wizard will append -portlet at the end. So after creating the this portlet in eclipse, it will looks like below screenshot.
We will make necessary changes in this Liferay MVC portlet to develop custom portlet.
Open portlet.xml file where the <portlet-class> entry will looks like below snippet.
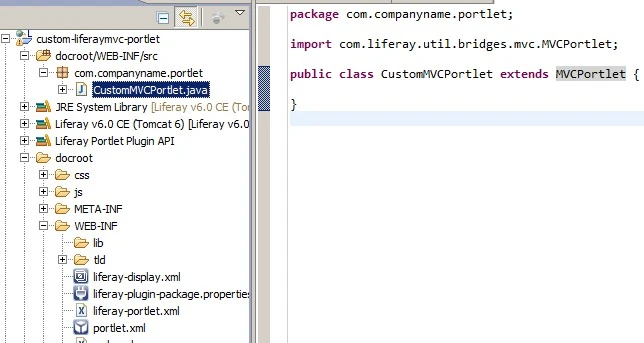
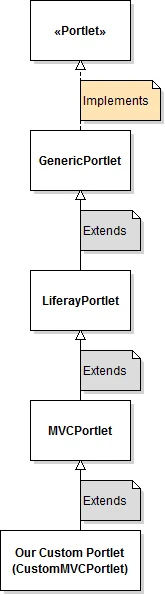
We are extending MVCPortlet provided by liferay. Class heirarchy is as per below screenshot.
Before moving further, I would like to give some brief about various characteristics of portlet.
For simplicity, we will display the string stored in the request attribute.
Note:- Download source code at the end of this blog
Before starting with this blog, please read Create Liferay Portlet , in which I have mentioned how to create Liferay MVC portlet with eclipse. Let's recall that Liferay MVC is a lightweight framework provided by liferay to create JSR-168/286 compatible portlets.
Follow all steps and create Liferay MVC portlet. Give the project name as custom-liferaymvc and wizard will append -portlet at the end. So after creating the this portlet in eclipse, it will looks like below screenshot.
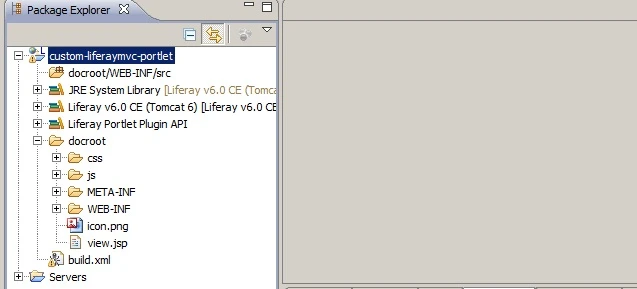 |
| Creating Liferay MVC portlet |
Open portlet.xml file where the <portlet-class> entry will looks like below snippet.
<portlet-name>custom-liferaymvc</portlet-name>
<display-name>Custom Liferaymvc</display-name>
<portlet-class>com.liferay.util.bridges.mvc.MVCPortlet</portlet-class>
We will point our custom portlet in <portlet-class> attribute. Our custom class extends LiferayMVC class. After this change the above entry will looks like below snippet.
<portlet-name>custom-liferaymvc</portlet-name>
<display-name>Custom Liferaymvc</display-name>
<portlet-class>com.companyname.portlet.CustomMVCPortlet</portlet-class>
Create the package com.companyname.portlet and java class CustomMVCPortlet in source folder.CustomMVCPortlet extends MVCPortlet class. At this moment, project structure looks like below screenshot.
We are extending MVCPortlet provided by liferay. Class heirarchy is as per below screenshot.
- Portlet interface define core abstract methods and it is on top in Portlet API stack. All portlets implements this interface directly or indirectly (By extending class that implements this interface)
- GenericPortlet implements Portlet interface and provides default functionality. GenericPortlet class and Portlet interface are part of portlet API and available in portlet.jar (at <Liferay-bundle>/tomcat/lib/ext path)
- LiferayPortlet extends GenericPortlet and provides additional methods. LiferayPortlet is available in portal-service.jar (at <Liferay-bundle>/tomcat/lib/ext path)
- MVCPortlet is defined by Liferay. It extends LiferayPortlet and provides MVC architecture. MVCPortlet is available in util-bridges.jar (at <Liferay-bundle>/tomcat/webapps/ROOT/WEB-INF/lib/ path)
- CustomMVCPortlet extends MVCPorrtlet. This is our custom portlet.
Before moving further, I would like to give some brief about various characteristics of portlet.
1) Mode :- Portlet has various modes like View,Edit and Help. Portlet renders its output inView mode.
2) Phase:- Portlet has various phases like Render phase, Action phase, Serve Resource phase, Event phase etc.
On one page, we can place more than one portlets. On refreshing the page, all portlet's render phase will be called by portal.
Render phase of the portlet is called soon after Action phase of that portlet is finished.You may wonder how we can call Render / Action phase of portlet. Well we have to create respective URLs on JSP with the help of Liferay TLD. On clicking these URLs, respective phase of the portlet will be called.
At a time, only one portlet's Action phase is called on particular page. Action phase is called before Render phase of all portlets. However which portlet's Render phase is called first is not predictable.
I would recommend looking at index page 'A Complete Liferay Guide' to browse all topics about liferay.
In Portlet Render method represents Render phase and Action method represents Action phase.
We will first create Render method that will represent Render phase of the portlet. We are overriding render method which is defined in GenericPortlet
@Override.
 public void render(RenderRequest renderRequest,
   RenderResponse renderResponse) throws IOException, PortletException {
  //Render Logic.
  super.render(renderRequest, renderResponse);
 }
don't forget to make call to super.render(request, response) at the end of this method to call render() method defined in GenericPortlet for further processing. Without calling super.render, render method will not work properly.
You can notice that, view.jsp is created at root level by default (under docroot folder). You can change its location.
portlet.xml defines page flow of portlet as init parameter. Ex. view.jsp is give as an init parameter of the portlet as below code snippet
<portlet-name>custom-liferaymvc</portlet-name>
<display-name>Custom Liferaymvc</display-name>
<portlet-class>com.companyname.portlet.CustomMVCPortlet</portlet-class>
  <init-param>
    <name>view-jsp</name>
    <value>/view.jsp</value>
  </init-param>
Once render method completes, Portlet will call jsp defined in this init parameter.If you change the location of view.jsp then you have to update the location in this init parameter.
Ex. if we place view.jsp under jsp folder (under root folder) then its relative path needs to be defined in value attribute of <init-param> (/jsp/view.jsp).
I followed above example and created jsp folder under root(docroot) folder and placed view.jsp in it. It will looks like as below screenshot.
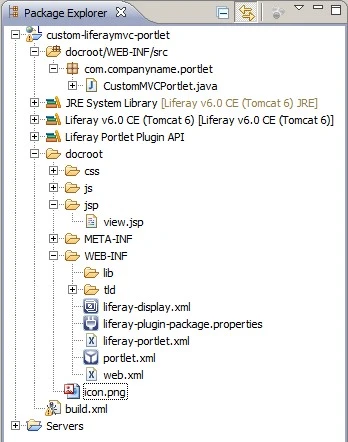
We need to update the location in portlet.xml file also. After updates, It looks like below snippet.
<portlet-name>custom-liferaymvc</portlet-name>
<display-name>Custom Liferaymvc</display-name>
<portlet-class>com.companyname.portlet.CustomMVCPortlet</portlet-class>
<init-param>
  <name>view-jsp</name>
  <value>/jsp/view.jsp</value>
</init-param>
I have just shown first few line of portlet.xml to show updated location of view.jsp in <init-param>. The rest content of portlet.xml will remain as it is.
Let's see how render method works. Open view.jsp file and remove the default text and put some custom text. For example, I have put "This is custom Liferay MVC portlet" and deploy the portlet.
Access the server with http://localhost:8080 and place this portlet on page. You can create new page.
Note:- To know how to build,deploy and place portlet on page, please refer my previous blog Create Liferay Portlet
After you deploy the portlet, you will notice that the text that you written in view.jsp is displayed.
Now I will write Action method and also will show how to call this Action method.
Add following code to CustomMVCPortlet class
@ProcessAction(name="addName")
 public void addName(ActionRequest actionRequest,
   ActionResponse actionResponse) throws IOException, PortletException, PortalException, SystemException{
  actionRequest.setAttribute("userName", "Nilang");
 }
Explanation:- - @ProcessAction annotation is used to map Action method with key. Key is defined by name attribute (Ex. name="addName" ). This key is used to create actionURL in JSP.
- Action method can be called by creating actionURL in JSP. We can have more than one Action methods in portlet.
- To call particular Action method, actionURL needs to be created in JSP with same key that we gave to Action method (in name attribute of @ProcessAction annotation).
- The name of Action method can be anything.
- Its not necessary the name of Action method and Key of @ProcessAction are same. But just for simplicity I have used the same name. (For name of Action method and Key).
- In the body of this Action method, we just set userName attribute in request scope.
- Also notice that, except setting attribute, there are not code exist in this Action method. Portal will call Render method after finishing Action method.
- So when this action method is called by actionURL from view.jsp , the flow will be like Action method --> Default Render method -->View.jsp again.
User Name is : <b> ${userName}</b>

<portlet:defineObjects/>

<portlet:actionURL name="addName" var="addNameUrl"></portlet:actionURL>

< br>

<a href="${addNameUrl}">Add Name</a>
Explanation:-
- Portlet tld (<portlet:actionURL>) is used to create actionURL.
- name attribute of actionURL should be match with the name attribute of @ProcessAction annotation (Key of the Action method).
- var attribute will be used to refer this actionURL. It is added as pageScope variable in JSP. Notice that we have used this variable in href with EL.
- You can create more than one Action url with different <portlet:actionURL> tag. The name attribute should be unique. Each actionURL defined in JSP will be tagged to unique Action method in our customMVC class by matching name attribute. (name attribute in <portlet:actionURL> and name attribute in @ProcessAction annotation in customMVC class).
- We have written the first line, which shows the userName that we are storing in request scope in Action method.

You can observe that, first time there is no userName displayed. Now click on AddName link and it will looks like below screenshot.
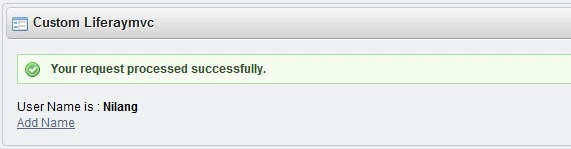
You can notice that, the User name Nilang which we set in Action method is displayed. It means whatever attribute(in request) we set in Action method, will be available in Render method and also in view.jsp file.
Also notice that the success message shown at the top saying Your request processed successfully. This message is automatically added by MVCPortlet.
Let's see advance use of Action method. In this case,we will simply replace link with textbox and submit button. So Whatever user enter the name, it will be shown back so it will be more dynamic than first approach where we are setting hardcode attribute in Action method.
Add following changes in view.jsp file
Add following changes in view.jsp file
User Name is : <b> ${userName}</b>

<portlet:defineobjects>

<portlet:actionurl name="addName" var="addNameUrl"></portlet:actionurl>

< br>

<form action="${addNameUrl}" method="post">
<input name="userName" type="text" />< br>
<input type="submit" />
</form>
Note:- Please make sure whenever you submitting with form with actionURL you need to set method as POST. Otherwise action method will not work properly.
In action method, we will read parameter from request and will set to request scope. After this change, the action method will look as below.
@ProcessAction(name="addName")
 public void addName(ActionRequest actionRequest,
   ActionResponse actionResponse) throws IOException, PortletException, PortalException, SystemException{
  String userName = ParamUtil.get(actionRequest, "userName", StringPool.BLANK);
  actionRequest.setAttribute("userName", userName);
 }
We are taking userName from request. I have used ParamUtil (utility class provided by Liferay) to get the request parameter. The last method parameter(of ParamUtil.get) is a default value in case if request parameter (mentioned in second position just after actionRequest in get method of ParamUtil) is not found.Then I simply set this variable request scope. So this becomes more dynamic then the first approach.
Now deploy the portlet and refresh the page where we placed this portlet. view.jsp will look like
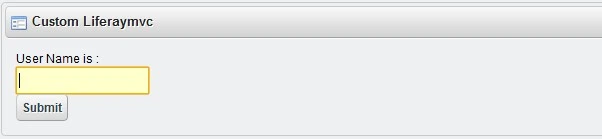
Now enter any user name say Joe Bloggs and click on Submit button. The page get refresh and view.jsp will show the entered user name as per below screenshot.
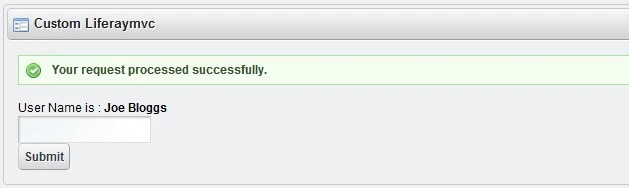
You can put more complex logic in action method. Also you can have more than one action method in controller class. To understand it properly, try some hands-on with multiple actions method calling with different actionURL from JSP.
I would recommend looking at index page 'A Complete Liferay Guide' to browse all topics about liferay.
Download Source Code
 |
| Source Code |
Subscribe to:
Posts
(
Atom
)
