
Friday, 21 September 2012
Server Side Validation in Liferay
Liferay Development
,
Liferay error Tag
,
Liferay Portlet
,
Portlet
,
Server side Validation
,
SessionErrors
,
Validation
11 comments
:
Validation is an essential part of any framework or tool. Validation can be done at client side (through JavaScript) and server side. In this article, we will see how to do server side validation for Liferay portlet.
For simplicity, I choose SpringMVC portlet to demonstrate server side validation. You can refer this blog to perform validation on Liferay MVC portlet too.
Note:- Download source code at the end of this blog
I would recommend looking at index page 'A Complete Liferay Guide' to browse all topics about liferay.
You can observe the following things
For simplicity, I choose SpringMVC portlet to demonstrate server side validation. You can refer this blog to perform validation on Liferay MVC portlet too.
Note:- Download source code at the end of this blog
I would recommend looking at index page 'A Complete Liferay Guide' to browse all topics about liferay.
Refer my previous blog on How to Create Spring MVC Portlet in Liferay to create SpringMVC portlet. Give project name as server-side-validation-test. Once it is created, it will looks like as per below screenshot.
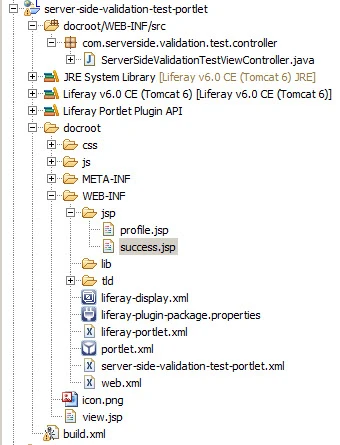
You can observe the following things
- Controller class is ServerSideValidationTestViewController which resides under com.serverside.validation.test.controller package.
- I have create two jsps. profile.jsp and success.jsp.
- In profile.jsp, we will place some fields that needs to be validated.
- Once its validated it should show success message either on same page(profile.jsp) or new jsp( success.jsp).
- In case if user inputs are not validated, then we will show error messages on profile.jsp page.
Now let us start constructing profile.jsp. Add following code in it.
Explanation:-
<%@ taglib uri="http://java.sun.com/portlet_2_0" prefix="portlet" %>
<%@ taglib uri="http://liferay.com/tld/ui" prefix="liferay-ui" %>

<portlet:defineObjects />

<portlet:actionURL var="submitProfileUrl">
 <portlet:param name="action" value="submitProfile"></portlet:param>
</portlet:actionURL>

<liferay-ui:error key="name-is-required" message="Name is Required"></liferay-ui:error>
<liferay-ui:error key="age-is-required" message="Age is Required"></liferay-ui:error>
<liferay-ui:error key="email-is-required" message="Email is Required"></liferay-ui:error>

<h1>MyProfile</h1> <Br>

 <form action="${submitProfileUrl}" method="post">
  <table>
   <tr>
    <td>Name</td>
    <td><input type="text" name="name"></td>
   </tr>
   <tr>
    <td>Age</td>
    <td><input type="text" name="age"> Years</td>
   </tr>
   <tr>
    <td>Email</td>
    <td><input type="text" name="email"></td>
   </tr>
   <tr>
    <td colspan="2" align="center">
     <input type="submit">
    </td>
   <tr>
  </table>
 </form>
Explanation:-
- First two lines are taglib entries for portlet and liferay-ui
- the next line is <portlet:defineObjects>. Because of this tag, we can access implicit objects in JSP like RenderRequest etc.
- In next line, we have created actionURL to call controller's action method on submitting form. We have passed this actionURL (represented by var variable in <portlet:actionURL> tag) to action attribute of <form>.
- Next 3 lines are liferay-ui tag which shows error message if user inputs are not validated.I will explain this later in this blog.
- At the last we have form with 3 text box (name, age and email) with submit button.
Add the code in controller so that it will looks like as per below snippet
Explanation:-
package com.serverside.validation.test.controller;

import javax.portlet.ActionRequest;
import javax.portlet.ActionResponse;
import javax.portlet.RenderRequest;
import javax.portlet.RenderResponse;

import org.springframework.stereotype.Controller;
import org.springframework.ui.Model;
import org.springframework.web.bind.annotation.RequestMapping;
import org.springframework.web.portlet.bind.annotation.ActionMapping;
import org.springframework.web.portlet.bind.annotation.RenderMapping;

import com.liferay.portal.kernel.log.Log;
import com.liferay.portal.kernel.log.LogFactoryUtil;
import com.liferay.portal.kernel.servlet.SessionErrors;
import com.liferay.portal.kernel.util.ParamUtil;

@Controller(value = "ServerSideValidationTestViewController")
@RequestMapping("VIEW")
public class ServerSideValidationTestViewController {
 private static Log log = LogFactoryUtil.getLog(ServerSideValidationTestViewController.class);
 /*
  * maps the incoming portlet request to this method
  * Since no request parameters are specified, therefore the default
  * render method will always be this method
  */
 @RenderMapping
 public String handleRenderRequest(RenderRequest request,RenderResponse response,Model model){

  return "profile";
 }

 @ActionMapping(params = "action=submitProfile")
 public void submitProfileAction(ActionRequest request, ActionResponse response) {
  String name=ParamUtil.get(request, "name", "");
  String age=ParamUtil.get(request, "age", "");
  String email=ParamUtil.get(request, "email", "");

  if(name ==null || "".equalsIgnoreCase(name)){
   SessionErrors.add(request, "name-is-required");
  }
  if(age == null || "".equalsIgnoreCase(age)){
   SessionErrors.add(request, "age-is-required");
  }
  if(email == null || "".equalsIgnoreCase(email)){
   SessionErrors.add(request, "email-is-required");
  }
 }

}
Explanation:-
- First we have defined log with the help of Liferay utility class LogFactoryUtil.
- Then we have defined default render method which simply return view (profile.jsp)
- Next to it, we have defined action method, which simply read the values that user entered as request parameter.
- Then we are validating for null or empty value. If the value is null or empty, we are calling SessionErrors.add(request,"name-is-required").
- This line of code will say that add the error with key "name-is-required" in SessionErrors object in request scope.
- To show the error message in jsp we are using liferay-ui tag and giving respective key and message. So if matching key is found then its message will be displayed otherwise no input. That is the reason on first time this jsp (profile.jsp) render, we are not getting any error message.
- This way we can set the error key in controller (Based on validation condition) and in JSP,if the matching key is found then respective error message will be displayed.
Now let us see the practical. Deploy the portlet and you will found the profile as per below screenshot.
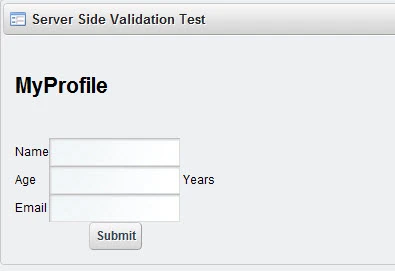
We have keep the validation for null or empty string of all three (Name, Age and Email) value. So If we left blank any of these value and click on submit, then it will show error message as per below screenshot.
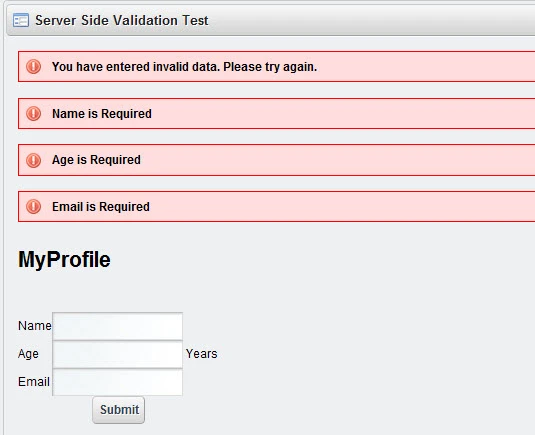
How it works:- - First I have just click on Submit button without giving any value.
- Form has been submitted to controller's action method (submitProfileAction) without any value.
- In action method we are checking if these values are blank or null then we are adding error key into SessionErrors object.
- After Action method's execution finished, it will call default render method and from default render method, profile.jsp will be rendered.
- In jsp file we have defined tag <liferay-ui:error> which will actually check whether the matched error key is present (which we have set in controller's action method in request scope) then it will show message (defined by message attribute of respective <liferay-ui:error> tag).
Now if user's inputs are validated, then we have to acknowledge that all your data are successfully saved. For that we will modify our controller's code so that it will looks like as below snippet.
I will explain the changes in code in this controller
package com.serverside.validation.test.controller;

import javax.portlet.ActionRequest;
import javax.portlet.ActionResponse;
import javax.portlet.RenderRequest;
import javax.portlet.RenderResponse;

import org.springframework.stereotype.Controller;
import org.springframework.ui.Model;
import org.springframework.web.bind.annotation.RequestMapping;
import org.springframework.web.portlet.bind.annotation.ActionMapping;
import org.springframework.web.portlet.bind.annotation.RenderMapping;

import com.liferay.portal.kernel.log.Log;
import com.liferay.portal.kernel.log.LogFactoryUtil;
import com.liferay.portal.kernel.servlet.SessionErrors;
import com.liferay.portal.kernel.servlet.SessionMessages;
import com.liferay.portal.kernel.util.ParamUtil;

@Controller(value = "ServerSideValidationTestViewController")
@RequestMapping("VIEW")
public class ServerSideValidationTestViewController {
 private static Log log = LogFactoryUtil.getLog(ServerSideValidationTestViewController.class);
 /*
  * maps the incoming portlet request to this method
  * Since no request parameters are specified, therefore the default
  * render method will always be this method
  */
 @RenderMapping
 public String handleRenderRequest(RenderRequest request,RenderResponse response,Model model){

  return "profile";
 }

 @ActionMapping(params = "action=submitProfile")
 public void submitProfileAction(ActionRequest request, ActionResponse response) {
  String name=ParamUtil.get(request, "name", "");
  String age=ParamUtil.get(request, "age", "");
  String email=ParamUtil.get(request, "email", "");

  boolean isErrorOccured=false;
  if(name ==null || "".equalsIgnoreCase(name)){
   isErrorOccured=true;
   SessionErrors.add(request, "name-is-required");
  }
  if(age == null || "".equalsIgnoreCase(age)){
   isErrorOccured=true;
   SessionErrors.add(request, "age-is-required");
  }
  if(email == null || "".equalsIgnoreCase(email)){
   isErrorOccured=true;
   SessionErrors.add(request, "email-is-required");
  }

  if(isErrorOccured==false){
   SessionMessages.add(request, "profile-saved-successfully");
   response.setRenderParameter("action", "showSuccess");
  }
 }

 @RenderMapping (params="action=showSuccess")
 public String showSuccessPage(RenderRequest request,RenderResponse response,Model model){

  return "success";
 }
}
I will explain the changes in code in this controller
Explanation:-
Show error message based on Exception :-
Some times, we may required to show error message based on some exception occurred. So Instead of error key which we are setting in action method, we will just set the type of exception in SessionErrors object. Let see it in action.
To understand it properly, we will create two custom Exception class under called Exception1.java and Exception2.java under com.serverside.validation.test.exception package. The project structure will looks like below screenshot.
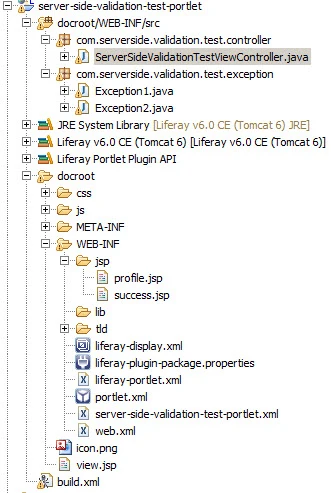
To understand it properly, I have done code changes in controller so that it will looks like below snippet.
Explanation:-
- We have create one boolean variable isErrorOccured and setting its value true in case if we found null or empty value (of name,age and email) in 3 if conditions block.
- At the end we are checking if the value of isErrorOccured is false (mean no error occurred and all user inputs are validated correctly) then we are setting success message key by SessionMessages.add(request,"profile-saved-successfully").
- It means we are storing success message key "profile-saved-successfully" in SessionMessages object in request scope
- Note that we are using SessionErrors to store error message and SessionMessages for success messages.
- After that we are calling response.setRenderParameter("action","showSuccess").
- By default, once action method execute, the default render method will be called. But if we want to call specific render method then we have to set action key of that render method through response.setRenderParameter method.
- We have created one render method with action key "showSuccess" just below the action method.
- To call this render method from action method, we are setting the value of render parameter action same as action key of render method ("showSuccess").
- And this render method will render success.jsp.
- This way, if any error occurs then the default render method will be called and if all user inputs are validated successfully then the second render method (with the action key "showSuccess") will be called.
Now add following code into success.jps file.
<%@ taglib uri="http://liferay.com/tld/ui" prefix="liferay-ui" %>

<liferay-ui:success key="profile-saved-successfully" message="Your profile saved successfully"></liferay-ui:success>
Explanation:-
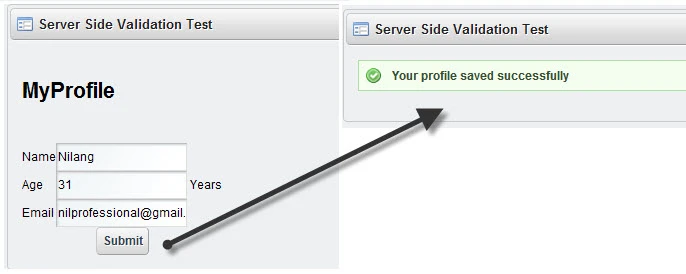
Now let us do some practical. Deploy the above code and give all values in profile page and submit success message. You will get success message as per below screenshot.- First line is the tag-library declaration for liferay-ui
- In second line we have called <liferay-ui:success> which will work similar way as <liferay-ui:error>. We are passing key and message
- If any matching success key is found in request scope then success message will be shown (defined in message attribute of <liferay-ui:success>)
Show error message based on Exception :-
Some times, we may required to show error message based on some exception occurred. So Instead of error key which we are setting in action method, we will just set the type of exception in SessionErrors object. Let see it in action.
To understand it properly, we will create two custom Exception class under called Exception1.java and Exception2.java under com.serverside.validation.test.exception package. The project structure will looks like below screenshot.
To understand it properly, I have done code changes in controller so that it will looks like below snippet.
package com.serverside.validation.test.controller;

import java.util.Random;

import javax.portlet.ActionRequest;
import javax.portlet.ActionResponse;
import javax.portlet.RenderRequest;
import javax.portlet.RenderResponse;

import org.springframework.stereotype.Controller;
import org.springframework.ui.Model;
import org.springframework.web.bind.annotation.RequestMapping;
import org.springframework.web.portlet.bind.annotation.ActionMapping;
import org.springframework.web.portlet.bind.annotation.RenderMapping;

import com.liferay.portal.kernel.log.Log;
import com.liferay.portal.kernel.log.LogFactoryUtil;
import com.liferay.portal.kernel.servlet.SessionErrors;
import com.liferay.portal.kernel.util.ParamUtil;
import com.serverside.validation.test.exception.Exception1;
import com.serverside.validation.test.exception.Exception2;

@Controller(value = "ServerSideValidationTestViewController")
@RequestMapping("VIEW")
public class ServerSideValidationTestViewController {
 private static Log log = LogFactoryUtil.getLog(ServerSideValidationTestViewController.class);
 /*
  * maps the incoming portlet request to this method
  * Since no request parameters are specified, therefore the default
  * render method will always be this method
  */
 @RenderMapping
 public String handleRenderRequest(RenderRequest request,RenderResponse response,Model model){

  return "profile";
 }

 @ActionMapping(params = "action=submitProfile")
 public void submitProfileAction(ActionRequest request, ActionResponse response) {
  String name=ParamUtil.get(request, "name", "");
  String age=ParamUtil.get(request, "age", "");
  String email=ParamUtil.get(request, "email", "");

 /* boolean isErrorOccured=false;
  if(name ==null || "".equalsIgnoreCase(name)){
   isErrorOccured=true;
   SessionErrors.add(request, "name-is-required");
  }
  if(age == null || "".equalsIgnoreCase(age)){
   isErrorOccured=true;
   SessionErrors.add(request, "age-is-required");
  }
  if(email == null || "".equalsIgnoreCase(email)){
   isErrorOccured=true;
   SessionErrors.add(request, "email-is-required");
  }

  if(isErrorOccured==false){
   SessionMessages.add(request, "profile-saved-successfully");
   response.setRenderParameter("action", "showSuccess");
  }*/

  Random randomGenerator = new Random();
  int number = randomGenerator.nextInt(10);
  try{
   if(number%2==0){
    throw new Exception1();
   }else{
    throw new Exception2();
   }
  }catch(Exception e){
   if(e instanceof Exception1){
    SessionErrors.add(request, Exception1.class.getName(), e);
   }else{
    SessionErrors.add(request, Exception2.class.getName(), e);
   }
  }
 }

 @RenderMapping (params="action=showSuccess")
 public String showSuccessPage(RenderRequest request,RenderResponse response,Model model){

  return "success";
 }
}
Explanation:-
- In action method, I have commented out the validation logic and generating one random number between 0 to 10.
- Throwing the exception (either Exception1 or Exception2 ) based on the generated value is odd or even.
- In catch block, setting the error key by calling overloaded add method. This method is taking 3 values as parameter, first is the actionRequest , second is the key (for which we are passing class name of exception) and third is the value of key as object (for which we are passing exception object).
- At the last, we are not setting any render parameter so that the default render method will be called and profile.jsp will be rendered.
I added following two line in profile.jps file
<liferay-ui:error exception="<%=Exception1.class %>" message="Exception 1 have occured"></liferay-ui:error>
<liferay-ui:error exception="<%=Exception2.class %>" message="Exception 2 have occured"></liferay-ui:error>
Here instead of key, we are passing the name of exception class (Exception1 and Exception2) in exception attribute of <liferay-ui:error> tag.
Let us see this in action. Deploy the portlet and it will show profile.jsp page. Now just click on Submit button and you will get message either for Exception1 or Exception 2 as per below screenshot.
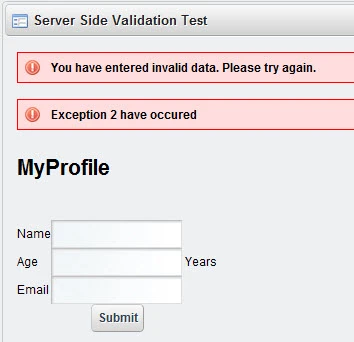
If you keep clickin Submit button, it will show message for either Exception1 or Excepiotn 2. This behavior is random as we are checking whether the random number is odd or even.
And that all done. you may do some more testing by setting some more complex validation. Its also possible to pick the error or success message from language property file instead of hard code.
I would recommend looking at index page 'A Complete Liferay Guide' to browse all topics about liferay.
Download Source

Let us see this in action. Deploy the portlet and it will show profile.jsp page. Now just click on Submit button and you will get message either for Exception1 or Exception 2 as per below screenshot.
If you keep clickin Submit button, it will show message for either Exception1 or Excepiotn 2. This behavior is random as we are checking whether the random number is odd or even.
And that all done. you may do some more testing by setting some more complex validation. Its also possible to pick the error or success message from language property file instead of hard code.
I would recommend looking at index page 'A Complete Liferay Guide' to browse all topics about liferay.
Download Source


Thursday, 6 September 2012
Create Singleton Class
Core-Java
,
Design Pattern
,
Java
6 comments
:
In this article, I will show how to write Singleton class in JAVA
Definition:- A class called Singleton class if we can create one and only one instance of that class.
Fact about Singleton class:-
Definition:- A class called Singleton class if we can create one and only one instance of that class.
Fact about Singleton class:-
- Singleton class is mainly used to control the object creation.
- If required, we can allow more object. But then it wont be called as as Singleton.
- Since there is only one object of Singleton class, any instance variable will be occurring only once just like static fields.
- Singleton will be used to maintain the access of resource creation. Ex. database connection, network sockets etc.
- Servlet in Java and HibernateSessionFactory are real example where Singleton is required.Servlet is by default implements singleton, while HibernateSessionFactory are configured to serve as Singleton.
Now let us do some practical.
To make any class Singleton, we need to make sure about following 3 things
There are two flavor of Singleton class as below
To make any class Singleton, we need to make sure about following 3 things
- Constructor of that class must be private
- Create one private static variable of type that class only.
- Create one public static method which will actually create instance of that class and assign to this static variable.
There are two flavor of Singleton class as below
- Instantly
- Lazy
both flavor will follow all 3 things which are must for Singleton class. The only difference between in them is the time when they will create the instance of class.
Instantly flavor will create the instance of class as soon as it loaded in the memory while Lazy flavor will create instance when very first request will come.
1. Instantly flavor of Singleton class
Below snippet represent Instantly flavor
Below snippet represent Instantly flavor
public class InstantlySingleTon{

 //private static instance variable
 private static InstantlySingleTon instantlySingleTon = getInstance();

 //Private constructor
 private InstantlySingleTon(){};

 //Private static method that will create instance.
 private static InstantlySingleTon getInstance(){
  return new InstantlySingleTon();
 }

 //public static method which return the already created instance
 public static InstantlySingleTon getInstantlySingleTon(){
  return instantlySingleTon;
 }
}
You can notice that ...
2. Lazy flavor of Singleton class
Below snippet represent the Lazy flavor of Singleton class
You can notice that...
- first we have created static instance variable of type same class.
- Second we created private constructor and private static method that will actually create the instance as soon as this class loads into memory. While creating the instance variable we are assigning its value through this private static method.
- That is the reason, its called Instantly flavor Singleton class.
- This flavor had tow static methods. One is private which actually create the instance while another is public which actually return the instance.
2. Lazy flavor of Singleton class
Below snippet represent the Lazy flavor of Singleton class
public class LazySingleTon{

 //private static instance variable initialize with null
 private static LazySingleTon lazySingleTon = null;

 //Private constructor
 private LazySingleTon(){};

 //public static method which return the already created instance
 public static LazySingleTon getLazySingleTon(){
  if(lazySingleTon == null){
   lazySingleTon = new LazySingleTon();
  }
  return lazySingleTon;
 }
}
You can notice that...
- First we created private static instance variable of type same class.
- But this time we are not creating the instance so setting it to null
- Next we created private constructor so nobody will create instance of this class
- At the last we created public static method which will check if the instance variable is null then it will first create it and then return it.
- This way, the public static method will only create the instance when we first time call it. Second and sub-sequence call will get same object.
- That is why we are calling it Lazy because the instance will be created on first call.
You may put some logger/SOPs in between to know how its works.
Wednesday, 5 September 2012
Render and Action methods in Spring MVC portlet in Liferay
Action
,
Liferay Development
,
Liferay Portlet
,
Liferay Spring Portlet
,
MVC Portlet
,
Portlet
,
Render
,
RenderMapping
,
Spring MVC
81 comments
:
Spring MVC Portlet in Liferay provides facility to define multiple render and multiple actions methods while in Liferay MVC portlet, we can have only one render method and multiple action methods.
In this article, we will see how to write multiple render and action methods in Spring MVC portlet created in Liferay.
This article is an addendum of my previous blog Spring MVC Portlet in Liferay So Please refer it to understand how to create Spring MVC portlet.
In last blog (Spring MVC Portlet in Liferay) we have created default render method. We will continue the same example in that blog and will see the following things.
I would recommend looking at index page 'A Complete Liferay Guide' to browse all topics about liferay.
Explanation:-
In this article, we will see how to write multiple render and action methods in Spring MVC portlet created in Liferay.
This article is an addendum of my previous blog Spring MVC Portlet in Liferay So Please refer it to understand how to create Spring MVC portlet.
In last blog (Spring MVC Portlet in Liferay) we have created default render method. We will continue the same example in that blog and will see the following things.
- Create Render method with "action" as key
- Create Action method with "action" as key with Default Render method
- Create Action method with "action" as key with Specific Render method
1.Create Render method with "action" as key
We have seen how to create default render method which will be called on page refresh. In some situation, the logic in render method become complex and needs to be divided in multiple small methods.
One of the solution is that, we can define independent chunk of code in separate method and call it in default render() method. The issue in this approach is we will end up in defining multiple if-else condition and have to set different flag value.
Spring MVC Portlet address this issue effectively by allowing us to define multiple render methods. This help us to divide render logic in multiple methods. Each render method can be called with render URL by passing different action KEY.
Let us do it practically.
One of the solution is that, we can define independent chunk of code in separate method and call it in default render() method. The issue in this approach is we will end up in defining multiple if-else condition and have to set different flag value.
Spring MVC Portlet address this issue effectively by allowing us to define multiple render methods. This help us to divide render logic in multiple methods. Each render method can be called with render URL by passing different action KEY.
Let us do it practically.
I would recommend looking at index page 'A Complete Liferay Guide' to browse all topics about liferay.
Add following code in MyFirstSpringMVCTestController class
@RenderMapping(params = "action=renderOne")
public String renderOneMethod(RenderRequest request, RenderResponse response, Model model){
  return "render1";
 }
Explanation:-
- This method having @RenderMapping annotation with params attribute.
- The value of params is action=renderOne. It means this render method will be called when we create RenderURL from JSP and pass action parameter with value renderOne
- In another word, the key of this render method(value of action) should be match with the value of action request parameter that we pass in renderURL
- This method return string "render1". It means it will render "render1.jsp". This is similar concept that we have seen for default Render method in previous blog (the returning string represent the jsp name).
- Method name can be anything you want.
Create Jsp file called render1.jsp at the same path (WEB-INF/jsp)where we have created defaultRender.jsp and place one line content like "<h1>This is Render 1 JSP</h1>"
Add following code into defaultRender.jsp file.
<%@ taglib uri="http://java.sun.com/portlet_2_0" prefix="portlet" %>

<h1>This is Default Render Jsp</h1>

<portlet:defineObjects/>

<portlet:renderURL var="renderOneMethodURL">
 <portlet:param name="action" value="renderOne"></portlet:param>
</portlet:renderURL>

<a href="${renderOneMethodURL}">Call RenderOne method</a>
Explanation:-
- First we have added portlet taglib reference
- Second line we added in previous blog to just denote that this is default render method.
- Next we have created renderURL with the help of <portlet:renderURL> tag. We have given var name so that it can be referred anywhere in the page with JSTL. We also passed portlet parameter called action and its value as "renderOne"
- If you notice, we kept the same value for action parameter as the key action for render method (in annotation). It means this renderURL will call the render method in spring controller with matching action parameter value with action key.
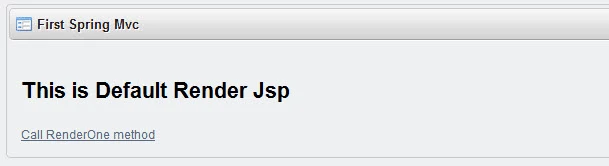
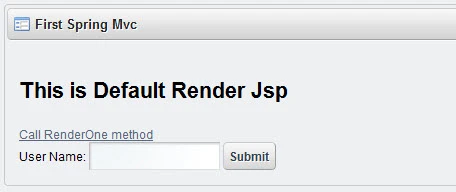
Now its time to see our work. Build and deploy the portlet. We already place the portlet on liferay page. So just refresh it to see the changes. You can notice that the defaultRender jsp get render and generate output as per below screenshot.
Now click on link Call RenderOne method and you will notice that the rende1.jsp get displayed as per below screenshot.
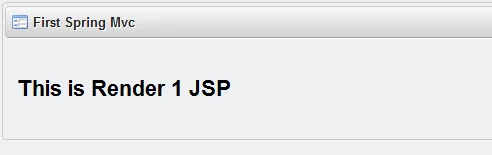
If you want, you can put logger at each method to see the flow of execution.
2.Create Action method with "action" as key with Default Render method
We can create the Action method with similar way we have created the above Render method. Add the code in defaultRender.jsp so that it will looks like below snippet.
Explanation:-
Explanation:-

Explanation:-
If you want, you can put logger at each method to see the flow of execution.
2.Create Action method with "action" as key with Default Render method
We can create the Action method with similar way we have created the above Render method. Add the code in defaultRender.jsp so that it will looks like below snippet.
<%@ taglib uri="http://java.sun.com/portlet_2_0" prefix="portlet" %>

<h1>This is Default Render Jsp</h1>

<portlet:defineObjects/>

<portlet:renderURL var="renderOneMethodURL">
 <portlet:param name="action" value="renderOne"></portlet:param>
</portlet:renderURL>

<portlet:actionURL var="actionOneMethodURL">
  <portlet:param name="action" value="actionOne"></portlet:param>
</portlet:actionURL>

<a href="${renderOneMethodURL}">Call RenderOne method</a>

<form action="${actionOneMethodURL}" method="post">
 User Name: <input type="text" name="userName">
 <input type="submit">
</form>
Explanation:-
- We have now created actionURL with variable actionOneMethodURL so that it can be refer anywhere in jsp with JSTL.
- We also have passed action parameter with value "actionOne"
- We will create the action method in controller class with action key and set its value as "actionOne" so that it can be call when we actionURL called from jsp.
- At the end we had created form and placed one input text and submit button. The action of the form will be actionURL created by <portlet:action> tag.
- Here the concept will be same as renderURL. When we hit the submit button, the respective action method will be called who's action key value is matched with the action parameter value in <portlet:action> tag.
Next, we will create action method as per below snippet in controller class.
@ActionMapping(params = "action=actionOne")
 public void actionOneMethod(ActionRequest request, ActionResponse response) {
  String userName=ParamUtil.get(request, "userName", "");
  log.info("userName is==>"+userName);
 }
Explanation:-
- We have created action method with annoation @ActionMapping and its param attribute is "action=actionOne". It means this action method have key action and its value is actionOne
- So this method will be called by actionURL who's action parameter value is "actionOne".
- Method name can be anything you want.
- In this method, I am accessing request parameter through Liferay utility class(ParamUtil).
- At the last, I am printing the request parameter through logger. You can create logger in Liferay by creating class level static variable with the help of Liferay utility class LogFactoryUtil as shown in below snippet.
private static Log log = LogFactoryUtil.getLog(MyFirstSpringMVCTestController.class);
- We have to pass class reference in which we are defining logger in getLog method
- You can notice that, we not returning anything. I mean the return type of this method is void.
- So you may wonder, after this method get executed what is the output. And the answer is it will execute default Render method.
Now its time to see this in action. Deploy the portlet and you will see the portlet get rendered as per below screenshot.
Give any value in text box, say Nilang and click on Submit button. You will notice that the same jsp (defaultRender.jsp) will be displayed. You can check the logs and confirm that control goes to action method and execute the logs and then execute the default render method. Below is the snapshot of logs.
You can put log in default render method to understand it more clear.
3.Create Action method with "action" as key with Specific Render method
We have seen that after action method get executed, control will goes to default render method. Spring MVC framework also provides a way to execute specific render method instead of default render after executing action method.
To test it, create one render method as per below snippet.
@RenderMapping(params = "action=renderAfterAction")
 public String testRenderMethod(RenderRequest request, RenderResponse response){
  log.info("In renderAfterAction method");
  return "renderAfterAction";
 }
Explanation:-
- we created render method with its key action set to renderAfterAction. Also we are returning "renderAfterAction". Means it will search for renderAfterAction.jsp file under /WEB-INF/jsp folder.
Create new jsp file renderAfterAction under /WEB-INF/jsp folder and just enter one line content in it like "<h1>This is Render After Action JSP </h1>"
Next we will do modification in our action method so that it will looks like below snippet.
Explanation:-

Its done. you can try some more Actions and Render method combination to get more dipper knowledge.
I would recommend looking at index page 'A Complete Liferay Guide' to browse all topics about liferay.
Next we will do modification in our action method so that it will looks like below snippet.
@ActionMapping(params = "action=actionOne")
 public void actionOneMethod(ActionRequest request, ActionResponse response) {
  String userName=ParamUtil.get(request, "userName", "");
  log.info("userName is==>"+userName);
  response.setRenderParameter("action", "renderAfterAction");
 }
Explanation:-
- The only change we have done is added last line code response.setRenderParameter("action", "renderAfterAction");
- This will tell controller that after executing the action method, set render parameter action to "renderAfterAction".
- It means, the action method wants to execute specific render method with value of action key set to renderAfterAction
- So after executing this action method it will execute testRenderMethod (who's value of action key is testRenderMethod)
Note:- setRenderParameter method is available only for object of type ActionResponse.
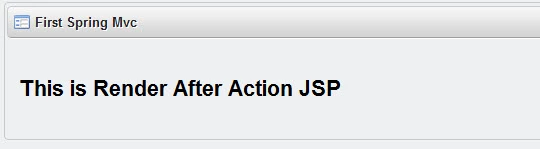
Deploy the folder and it will show defaultRender jsp. Give the name as "Nilang" and click on Submit button. You will see the render method renderAfterAction get execute as per below screen shot.
You also can notice the log to understand the flow as per below screenshot.
You can notice that after the action method get executed, control goes to renderAfterAction method.
Its done. you can try some more Actions and Render method combination to get more dipper knowledge.
I would recommend looking at index page 'A Complete Liferay Guide' to browse all topics about liferay.
Tuesday, 4 September 2012
How to install Maven in Windows machine.
Maven
,
Misc
No comments
:
In this article I will show, how to install Maven in windows machine.
Maven is the tool mainly used to build the project Java projects. You can get more information about maven from http://maven.apache.org/what-is-maven.html
JDK needs to be installed before Maven installed. Also make sure that JAVA_HOME environment variable is pointing to JDK.
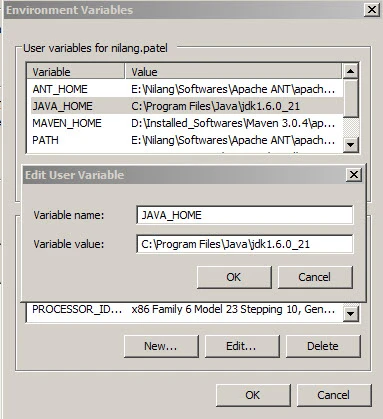
Once its done, download Maven from its official site http://maven.apache.org/download.html
download Binary Zip file and extract it on local folder (ex. c:/maven)
Set MAVEN_HOME to installed location (c:/maven in our case) same as we have done for JAVA_HOME
Now double click on PATH variable and add %MAVEN_HOME%\bin at the end. Don't forget to put semicolon (';') before putting %MAVEN_HOME%\bin
For example is PATH is set as D:\soft\SSH then first put semicolon (';') and then put %MAVEN_HOME%\bin so that it will be looks like D:\soft\SSH;%MAVEN_HOME%\bin
Once this done, just open command prompt and type mvn -version. Maven successfully get installed If you are able to get following things on command prompt.

Maven is the tool mainly used to build the project Java projects. You can get more information about maven from http://maven.apache.org/what-is-maven.html
JDK needs to be installed before Maven installed. Also make sure that JAVA_HOME environment variable is pointing to JDK.
Once its done, download Maven from its official site http://maven.apache.org/download.html
download Binary Zip file and extract it on local folder (ex. c:/maven)
Set MAVEN_HOME to installed location (c:/maven in our case) same as we have done for JAVA_HOME
Now double click on PATH variable and add %MAVEN_HOME%\bin at the end. Don't forget to put semicolon (';') before putting %MAVEN_HOME%\bin
For example is PATH is set as D:\soft\SSH then first put semicolon (';') and then put %MAVEN_HOME%\bin so that it will be looks like D:\soft\SSH;%MAVEN_HOME%\bin
Once this done, just open command prompt and type mvn -version. Maven successfully get installed If you are able to get following things on command prompt.
Monday, 3 September 2012
Spring MVC Portlet in Liferay
Lifeary MVC
,
Liferay Development
,
Liferay Portlet
,
Liferay Spring Portlet
,
MVC Portlet
,
Portlet
,
Spring MVC
,
Spring Portlet MVC
106 comments
:
Spring is a well known framework and provide lots of features and functionality. These features and functionality are organized in modular fashion. Spring MVC is part of Web module of Spring framework.
Spring also support its counter part Spring MVC for portlet. Spring Portlet MVC framework is mirror image of Web MVC framework in Spring. There are little different in Spring MVC Portlet framework.
We will first get brief introduction about Spring MVC (Web MVC) framework and then we see how to write Spring MVC Portlet in Liferay step by step.
In Spring MVC, there are 3 things. 1) M-model 2)V-view 3)C-Controller. Following is the core architecture of Spring (Web) MVC framework.
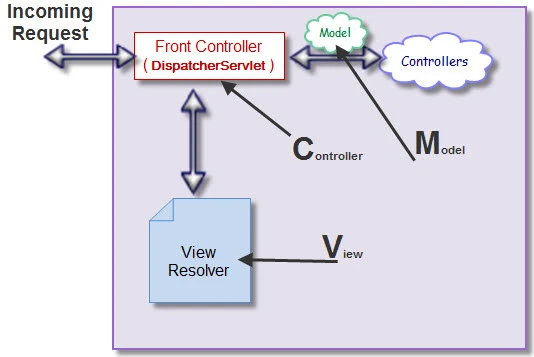
In Spring MVC Portlet framework, the Front Controller is DispatcherPortlet instead of DispatcherServlet.
I would recommend looking at index page 'A Complete Liferay Guide' to browse all topics about liferay.
Let us start developing Spring MVC portlet in liferay. Below are the steps to create Spring MVC portlet.
STEP 1 :- CREATING PORTLET PROJECT SKELETON BY CREATING LIFERAY PORTLET
First we will create the skeleton of portlet project by creating Liferay MVC portlet. Then we will do changes to migrate it into Spring MVC Portlet.
STEP 2 :- DEFINING PORTLET CLASS FOR SPRING MVC
Open portlet.xml file under WEB-INF folder. It will look like below snippet.
Now our portlet class will be DispatcherPortlet (provided by Spring Framework). replace
com.liferay.util.bridges.mvc.MVCPortlet with org.springframework.web.portlet.DispatcherPortlet so that it will look like as per below snippet
I have just shown first few lines of portlet.xml file to show the change (in <portlet-class>). Rest content of portlet.xml will remain as it is.
After doing this change,you may get error like The portlet class org.springframework.web.portlet.DispatcherPortlet was not found on the Java Build Path in portlet.xml file.
This is because the class DispatcherPortlet is not yet present in the class path. I will show how to resolve this in STEP 5.
STEP 3 :- CREATING SPRING APPLICATION CONTEXT FILE
Next is to define the Spring application context file. Any spring project must have atleast one Spring application context (xml) file where all beans are defined.
We will create one xml file just under docroot/WEB-INF folder and name it first-spring-mvc-portlet.xml. The file name is not just co-incident the same name as portlet. We must have to follow the following pattern for Spring application context file name.
<<PORTLET_NAME>>-portlet.xml
Explanation:-
Note:-
Explanation:-
I have added entry for MyFirstSpringMVCTestController as bean.
Spring also support its counter part Spring MVC for portlet. Spring Portlet MVC framework is mirror image of Web MVC framework in Spring. There are little different in Spring MVC Portlet framework.
We will first get brief introduction about Spring MVC (Web MVC) framework and then we see how to write Spring MVC Portlet in Liferay step by step.
In Spring MVC, there are 3 things. 1) M-model 2)V-view 3)C-Controller. Following is the core architecture of Spring (Web) MVC framework.
- You can see that, Front Controller works as C(Controller).
- which will take the incoming request and dispatch to related handler (Controller).
- Handler (Controller) will process the request and send back the data in form of M(Model) back to Front Controller.
- Then Front Controller will select particular view with the help of View Resolver and send response back to client.
For detail information about the Spring (WEB) MVC framework you can refer the following link.
http://static.springsource.org/spring/docs/2.0.x/reference/mvc.html
In Spring MVC Portlet framework, the Front Controller is DispatcherPortlet instead of DispatcherServlet.
I would recommend looking at index page 'A Complete Liferay Guide' to browse all topics about liferay.
Let us start developing Spring MVC portlet in liferay. Below are the steps to create Spring MVC portlet.
STEP 1 :- CREATING PORTLET PROJECT SKELETON BY CREATING LIFERAY PORTLET
First we will create the skeleton of portlet project by creating Liferay MVC portlet. Then we will do changes to migrate it into Spring MVC Portlet.
Please refer my previous blog Create Liferay Portletand create Liferay MVC portlet skeleton. Give project name as "first-spring-mvc"(and "-portlet" will be appended by wizard. so don't give it explicitly in project name).
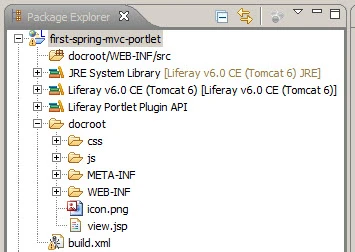
After successfully creating Spring MVC portlet, the project structure will look like as per below screenshot.
STEP 2 :- DEFINING PORTLET CLASS FOR SPRING MVC
Open portlet.xml file under WEB-INF folder. It will look like below snippet.
<portlet>
  <portlet-name>first-spring-mvc</portlet-name>
  <display-name>First Spring Mvc</display-name>
  <portlet-class>com.liferay.util.bridges.mvc.MVCPortlet</portlet-class>
  <init-param>
   <name>view-jsp</name>
   <value>/view.jsp</value>
  </init-param>
  <expiration-cache>0</expiration-cache>
  <supports>
   <mime-type>text/html</mime-type>
  </supports>
  <portlet-info>
   <title>First Spring Mvc</title>
   <short-title>First Spring Mvc</short-title>
   <keywords>First Spring Mvc</keywords>
  </portlet-info>
  <security-role-ref>
   <role-name>administrator</role-name>
  </security-role-ref>
  <security-role-ref>
   <role-name>guest</role-name>
  </security-role-ref>
  <security-role-ref>
   <role-name>power-user</role-name>
  </security-role-ref>
  <security-role-ref>
   <role-name>user</role-name>
  </security-role-ref>
 </portlet>
Now our portlet class will be DispatcherPortlet (provided by Spring Framework). replace
com.liferay.util.bridges.mvc.MVCPortlet with org.springframework.web.portlet.DispatcherPortlet so that it will look like as per below snippet
<portlet-name>first-spring-mvc</portlet-name>
  <display-name>First Spring Mvc</display-name>
  <portlet-class>org.springframework.web.portlet.DispatcherPortlet</portlet-class>
I have just shown first few lines of portlet.xml file to show the change (in <portlet-class>). Rest content of portlet.xml will remain as it is.
After doing this change,you may get error like The portlet class org.springframework.web.portlet.DispatcherPortlet was not found on the Java Build Path in portlet.xml file.
This is because the class DispatcherPortlet is not yet present in the class path. I will show how to resolve this in STEP 5.
STEP 3 :- CREATING SPRING APPLICATION CONTEXT FILE
Next is to define the Spring application context file. Any spring project must have atleast one Spring application context (xml) file where all beans are defined.
We will create one xml file just under docroot/WEB-INF folder and name it first-spring-mvc-portlet.xml. The file name is not just co-incident the same name as portlet. We must have to follow the following pattern for Spring application context file name.
<<PORTLET_NAME>>-portlet.xml
- Where PORTLET_NAME is the value of <portlet-name> element in portlet.xml file.
- Make sure that all character should be in lower case in application context file name.
- For Example, if value of <portlet-name> in portlet.xml file is SampleInput then the Spring application context file must be sampleinput-portlet.xml
Add the following content in it.
<?xml version="1.0" encoding="UTF-8"?>
<beans xmlns="http://www.springframework.org/schema/beans"
 xmlns:xsi="http://www.w3.org/2001/XMLSchema-instance" xmlns:p="http://www.springframework.org/schema/p"
 xmlns:context="http://www.springframework.org/schema/context"
 xmlns:aop="http://www.springframework.org/schema/aop"
 xsi:schemaLocation="
        http://www.springframework.org/schema/beans
        http://www.springframework.org/schema/beans/spring-beans-3.0.xsd
        http://www.springframework.org/schema/context
        http://www.springframework.org/schema/context/spring-context-3.0.xsd
        http://www.springframework.org/schema/aop
  http://www.springframework.org/schema/aop/spring-aop-2.5.xsd">
 <context:annotation-config />
 <bean
  class="org.springframework.web.portlet.mvc.annotation.DefaultAnnotationHandlerMapping" />
</beans>
Explanation:-
- It defines parent element <beans>
- We have defined two elements <context:annotation-config> and <bean class="org.springframework.web.portlet.mvc.annotation.DefaultAnnotationHandlerMapping" />. This both entries are required to execute annotation that we will use in controller class in STEP 9 in this blog.
STEP 4 :- POINTING SPRING APPLICATION CONTEXT FILE TO PORTLET CLASS.
We had defined DisptacherPortlet class as portlet class in portlet.xml file. Its our central(Front) controller. We have to tell it where we have defined our application context file.
We will point it through init param in portlet.xml file. param name will be "contextConfigLocation" and its value will the location of spring application context file.
After adding this, the portlet.xml file will look like below snippet (I am only showing the code which I have changed)
After adding this, the portlet.xml file will look like below snippet (I am only showing the code which I have changed)
<portlet-name>first-spring-mvc</portlet-name>
<display-name>First Spring Mvc</display-name>
<portlet-class>org.springframework.web.portlet.DispatcherPortlet</portlet-class>
 <init-param>
  <name>contextConfigLocation</name>
  <value>/WEB-INF/first-spring-mvc-portlet.xml</value>
 </init-param>
 <init-param>
  <name>view-jsp</name>
  <value>/view.jsp</value>
 </init-param>
Note:-
- You are free to define Spring application context file in any folder under WEB-INF folder. You have to just mentioned the location accordingly in <value> element under <init-param> element in portlet.xml file.
- For example if you created folder name context just under WEB-INF and placed spring application context file in it then you have to give the path as /WEB-INF/context/first-spring-mvc-portlet.xml in <value> element under <init-param>
STEP 5 :- PUTTING SPRING JARS INTO CLASS PATH.
Next step is to put Spring dependencies (JARs) into class path. For this you NO need to search JARs explicitly. Just follow below steps to add these dependencies.
open file liferay-plugin-package.properties resides just under /WEB-INF folder. It should looks like below snippet.
Now while you have opened it(liferay-plugin-package.properties file ) just open Properties tab as shown in below screenshot.
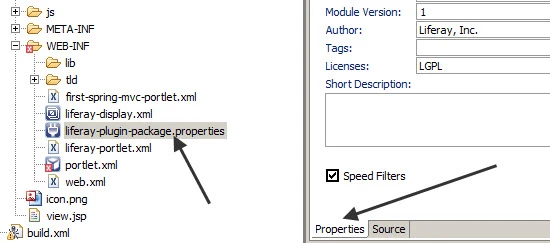
In Properties tab you will notice Portal Dependency Jars and Portal Dependency Tlds section at right side. On clicking on Add button from Portal Dependency Jars, small window will be opened from where we can select the JAR files as per below screenshot.
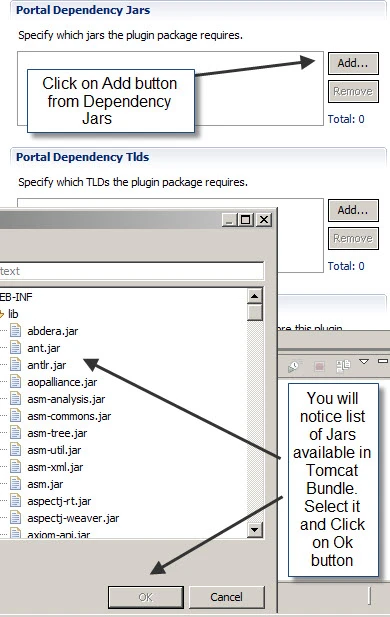
select on following JARs and click on OK button.
spring-web-servlet.jar
spring-web-portlet.jar
spring-web.jar
spring-transaction.jar
spring-jdbc.jar
spring-expression.jar
spring-core.jar
spring-context.jar
spring-beans.jar
spring-asm.jar
spring-aop.jar
commons-beanutils.jar
commons-collections.jar
commons-fileupload.jar
commons-io.jar
commons-lang.jar
jstl-api.jar
spring-context-support.jar
jstl-impl.jar
Note:- jstl-api.jar and jstl-impl.jar is not required for spring MVC portlet. But I have just added if we need to use JSTL tag.
The similar way you can also add TLDs.
After adding these JARs, just open the Source tab of liferay-plugin-package.properties file. It will be look like below screenshot.
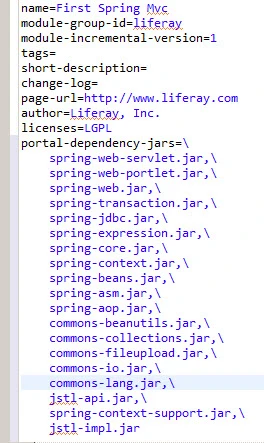 You will notice that, new property portal-dependency-jars added and its value is comma separated JARs that we added through Properties tab.
Once you become expert, you can add/remove Jars files directly through Source tab.
Till now, we only prepared list of JARs required in classpath. Still these JARs are not present in classpath. We need to build and deploy the portlet so that these JARs are made available in classpath.
To know how this works, first open the Liferay Portlet Plugin API just under the project before deploying portlet. It will looks like below screenshot.
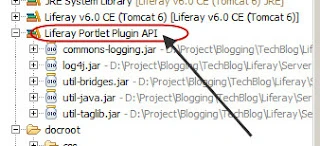
You can notice that just few JARs are present under it.
Now Just build and deploy the portlet. You can just drag build.xml file to Ant window, expand it and double click on 'deploy' target. You can refer my previous blog Create Liferay Portlet to know how to build and deploy portlet.
Once the portlet is deployed,refresh the project and open the Liferay Portlet Plugin API library again. You will observe that all the Jars that we added in liferay-plugin-package.properties file are added here as shown in below screenshot.
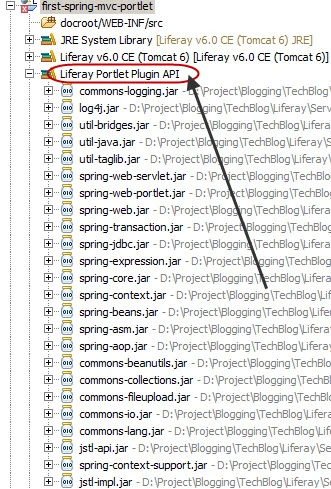
This way, whatever JARs are required, just put in liferay-plugin-package.properties file and deploy the portlet. They will be automatically be placed in class path. If you not find any JAR in this list then you have to explicitly add into lib folder.
You can observe that the error in portlet.xml file came in STEP 2 will be removed. If you still able to see the same error then just do clean and build the project from Eclipse-->Project menu.
STEP 6 :- PUTTING ViewRenderServlet ENTRY IN web.xml FILE.
This is very small but very important steps. Since SpringMVC also support all its functionality in portlet context with the help of this servet. Define this Servlet entry as per below snippet.
These are hard-core setting so just put this entry in web.xml as it is.
STEP 7 :- CONFIGURING VIEW
SpringMVC framework support many view technologies (like JSP, Freemarker,Velocity,PDF etc). For simplicity, We will use the jsp.
In Spring framework, DispatcherPortlet will take the help of ViewResolver to choose the view( JSP in our case).
So we need to configure view (through View Resolver) in Spring application context file (first-spring-mvc-portlet.xml ). Add following entry in first-spring-mvc-portlet.xml file
Explanation:-
Now we will create JSP. Create folder jsp under /WEB-INF folder and create one jsp file called defaultRender.jsp and simple write one line in it like "<h1>This is Default Render Jsp</h1>"
STEP 9 :- CREATE REQUEST HANDLER (CONTOLER)
If you observe the very first image in this blog, I have mentioned controller (right side). These controllers will do the actual job. The Front Controller (DispatcherPortlet) will only delegate the request to appropriate request handler (Controller).
So our next step is to write request handler. We will call it Controller,so don't confuse this Controller with the Front Controller (DispatchPortlet).
First create pacakge com.myowncompany.test.springmvc.controller and class MyFirstSpringMVCTestController in it. You are free to choose any package and class name you want. I had put "Controller" at the end of class name to just denote that this is my controller, however its not required but a good practice.
I also give name "controller" to package so that its clearly understand that this is the package where all my controller are reside. Again its not required.
Portlet will have View, Edit and Help mode. In Spring MVC Portlet framework, we can have separate Controller (Request Handler) for each these mode.
We have to explicitly tell DispatcherPortlet that which mode will be supported by Controller. We will do this by giving annotation to MyFirstSpringMVCTestController so that it will looks like below snippet.
Explanation:-
Add following method in MyFirstSpringMVCTestController class
Explanation:-
Next step is to put Spring dependencies (JARs) into class path. For this you NO need to search JARs explicitly. Just follow below steps to add these dependencies.
open file liferay-plugin-package.properties resides just under /WEB-INF folder. It should looks like below snippet.
name=First Spring Mvc
module-group-id=liferay
module-incremental-version=1
tags=
short-description=
change-log=
page-url=http://www.liferay.com
author=Liferay, Inc.
licenses=LGPL
Now while you have opened it(liferay-plugin-package.properties file ) just open Properties tab as shown in below screenshot.
In Properties tab you will notice Portal Dependency Jars and Portal Dependency Tlds section at right side. On clicking on Add button from Portal Dependency Jars, small window will be opened from where we can select the JAR files as per below screenshot.
select on following JARs and click on OK button.
spring-web-servlet.jar
spring-web-portlet.jar
spring-web.jar
spring-transaction.jar
spring-jdbc.jar
spring-expression.jar
spring-core.jar
spring-context.jar
spring-beans.jar
spring-asm.jar
spring-aop.jar
commons-beanutils.jar
commons-collections.jar
commons-fileupload.jar
commons-io.jar
commons-lang.jar
jstl-api.jar
spring-context-support.jar
jstl-impl.jar
Note:- jstl-api.jar and jstl-impl.jar is not required for spring MVC portlet. But I have just added if we need to use JSTL tag.
The similar way you can also add TLDs.
After adding these JARs, just open the Source tab of liferay-plugin-package.properties file. It will be look like below screenshot.
Once you become expert, you can add/remove Jars files directly through Source tab.
Till now, we only prepared list of JARs required in classpath. Still these JARs are not present in classpath. We need to build and deploy the portlet so that these JARs are made available in classpath.
To know how this works, first open the Liferay Portlet Plugin API just under the project before deploying portlet. It will looks like below screenshot.
You can notice that just few JARs are present under it.
Now Just build and deploy the portlet. You can just drag build.xml file to Ant window, expand it and double click on 'deploy' target. You can refer my previous blog Create Liferay Portlet to know how to build and deploy portlet.
Once the portlet is deployed,refresh the project and open the Liferay Portlet Plugin API library again. You will observe that all the Jars that we added in liferay-plugin-package.properties file are added here as shown in below screenshot.
This way, whatever JARs are required, just put in liferay-plugin-package.properties file and deploy the portlet. They will be automatically be placed in class path. If you not find any JAR in this list then you have to explicitly add into lib folder.
You can observe that the error in portlet.xml file came in STEP 2 will be removed. If you still able to see the same error then just do clean and build the project from Eclipse-->Project menu.
STEP 6 :- PUTTING ViewRenderServlet ENTRY IN web.xml FILE.
This is very small but very important steps. Since SpringMVC also support all its functionality in portlet context with the help of this servet. Define this Servlet entry as per below snippet.
<servlet>
  <servlet-name>view-servlet</servlet-name>
  <servlet-class>org.springframework.web.servlet.ViewRendererServlet</servlet-class>
  <load-on-startup>1</load-on-startup>
</servlet>
<servlet-mapping>
  <servlet-name>view-servlet</servlet-name>
  <url-pattern>/WEB-INF/servlet/view</url-pattern>
</servlet-mapping>
These are hard-core setting so just put this entry in web.xml as it is.
STEP 7 :- CONFIGURING VIEW
SpringMVC framework support many view technologies (like JSP, Freemarker,Velocity,PDF etc). For simplicity, We will use the jsp.
In Spring framework, DispatcherPortlet will take the help of ViewResolver to choose the view( JSP in our case).
So we need to configure view (through View Resolver) in Spring application context file (first-spring-mvc-portlet.xml ). Add following entry in first-spring-mvc-portlet.xml file
<bean id="jspViewResolver"
  class="org.springframework.web.servlet.view.InternalResourceViewResolver">
 <property name="viewClass"
   value="org.springframework.web.servlet.view.InternalResourceView" />
 <property name="prefix" value="/WEB-INF/jsp/" />
 <property name="suffix" value=".jsp" />
 <property name="order" value="1" />
</bean>
Explanation:-
- We had defined ViewResolver as bean in application context file
- In prefix property we have to give the folder path where we kept all JSP files.
- in suffix property we have to give as ".jsp".
- For example, suppose we created jsp folder directly under /WEB-INF, then the prefix will be "/WEB-INF/jsp/" and suffix will be ".jsp".
- I will show how this works in STEP 9.
- The Order property is not required if we only have one View Resolver. If we define more than one View Resolver (ex. one is for JSP, another is for Freemarker etc.) then we have to give the order value so that DispatcherPortlet will scan in that order to find the view.
Now we will create JSP. Create folder jsp under /WEB-INF folder and create one jsp file called defaultRender.jsp and simple write one line in it like "<h1>This is Default Render Jsp</h1>"
STEP 9 :- CREATE REQUEST HANDLER (CONTOLER)
If you observe the very first image in this blog, I have mentioned controller (right side). These controllers will do the actual job. The Front Controller (DispatcherPortlet) will only delegate the request to appropriate request handler (Controller).
So our next step is to write request handler. We will call it Controller,so don't confuse this Controller with the Front Controller (DispatchPortlet).
First create pacakge com.myowncompany.test.springmvc.controller and class MyFirstSpringMVCTestController in it. You are free to choose any package and class name you want. I had put "Controller" at the end of class name to just denote that this is my controller, however its not required but a good practice.
I also give name "controller" to package so that its clearly understand that this is the package where all my controller are reside. Again its not required.
Portlet will have View, Edit and Help mode. In Spring MVC Portlet framework, we can have separate Controller (Request Handler) for each these mode.
We have to explicitly tell DispatcherPortlet that which mode will be supported by Controller. We will do this by giving annotation to MyFirstSpringMVCTestController so that it will looks like below snippet.
package com.myowncompany.test.springmvc.controller;

import javax.portlet.RenderRequest;
import javax.portlet.RenderResponse;

import org.springframework.stereotype.Controller;
import org.springframework.ui.Model;
import org.springframework.web.bind.annotation.RequestMapping;
import org.springframework.web.portlet.bind.annotation.RenderMapping;

@Controller(value = "MyFirstSpringMVCTestController")
@RequestMapping("VIEW")
public class MyFirstSpringMVCTestController {


}
Explanation:-
- First we had given annotation @Controller which will used to denote that this is our controller. Value will be same as class name
- Second annotation is @RequestMapping("VIEW") which tell to DispatcherPortlet that this controller will support VIEW mode.
- One controller can support only one portlet mode at a time. So in case if we require EDIT mode, then we have to write separate Controller.
Add following method in MyFirstSpringMVCTestController class
@RenderMapping
 public String handleRenderRequest(RenderRequest request,RenderResponse response,Model model){

  return "defaultRender";
 }
Explanation:-
- first we have defined @RenderMapping annotation to this method. This annotation tell that this is default render method. It means whenever we place this portlet, it will render this method. You also can write another render method with "action" as key and its value. When we create RenderURL and passing value which match the "action" value of render method, then it will be called. I will show how to write another render method with "action" as key in next blog.
- The method name is handleRenderRequest. You are free to give any name.
- Its first parameter is RenderRequest and second parameter is RenderResponse. third parameter is object of type Model. We can set attribute in this Model object and can access it in JSP. We will see it in next blog.
- For simplicity there is no any other code and this method is returning just one String "defaultRender". We have to return the name of the JSP at the end of this render method.
- In STEP 7 we have defined prefix as /WEB-INF/jsp/ and suffix as ".jsp" in View Resolver. So in this case it will pre-pand "/WEB-INF/jsp/" to defaulRender and append ".jsp". So the final string will be /WEB-INF/jsp/defaultRender.jsp.
- This way DispatcherPortlet will find the jsp path and render it.
The last step is to define Controller in Spring application context file. Open the spring application context file first-spring-mvc-portlet.xml and put the entry for MyFirstSpringMVCTestController class. It will look like as per below snippet.
<?xml version="1.0" encoding="UTF-8"?>
<beans xmlns="http://www.springframework.org/schema/beans"
 xmlns:xsi="http://www.w3.org/2001/XMLSchema-instance" xmlns:p="http://www.springframework.org/schema/p"
 xmlns:context="http://www.springframework.org/schema/context"
 xmlns:util="http://www.springframework.org/schema/util"
 xsi:schemaLocation="http://www.springframework.org/schema/beans
        http://www.springframework.org/schema/beans/spring-beans-3.0.xsd
        http://www.springframework.org/schema/context
        http://www.springframework.org/schema/context/spring-context-3.0.xsd
        http://www.springframework.org/schema/util
        http://www.springframework.org/schema/util/spring-util-3.0.xsd">

 <context:annotation-config />
 <bean
  class="org.springframework.web.portlet.mvc.annotation.DefaultAnnotationHandlerMapping" />

 <bean class="com.myowncompany.test.springmvc.controller.MyFirstSpringMVCTestController" />

 <bean id="jspViewResolver"
  class="org.springframework.web.servlet.view.InternalResourceViewResolver">
  <property name="viewClass"
   value="org.springframework.web.servlet.view.InternalResourceView" />
  <property name="prefix" value="/WEB-INF/jsp/" />
  <property name="suffix" value=".jsp" />
  <property name="order" value="1" />
 </bean>
</beans>
Explanation:-
I have added entry for MyFirstSpringMVCTestController as bean.
And its done. You can now build and deploy this portlet. Place it on Liferay page and you will notice that whatever we have written in defaultRender jsp page will display.
So far I have used just one method (default render) render method. We can add more that one render method ( which will be differentiate by value of "action" key).
We also can add more than one Action method and Resource Method.
Action method will be called when we create url by <portlet:actionURL> and resource method can be called when we create url by <portlet:resourceURL> from JSP.
I have written separate blog Render and Action methods in Spring MVC portlet into explain how these methods (Render and Action) will work in Spring MVC Portlet framework.
You can refer current blog to create TEMPLATE for Spring MVC Portlet project.
To know more about Render and Action method in Spring MVC portlet, please refer this blog
I would recommend looking at index page 'A Complete Liferay Guide' to browse all topics about liferay.
Download Source

So far I have used just one method (default render) render method. We can add more that one render method ( which will be differentiate by value of "action" key).
We also can add more than one Action method and Resource Method.
Action method will be called when we create url by <portlet:actionURL> and resource method can be called when we create url by <portlet:resourceURL> from JSP.
I have written separate blog Render and Action methods in Spring MVC portlet into explain how these methods (Render and Action) will work in Spring MVC Portlet framework.
You can refer current blog to create TEMPLATE for Spring MVC Portlet project.
To know more about Render and Action method in Spring MVC portlet, please refer this blog
I would recommend looking at index page 'A Complete Liferay Guide' to browse all topics about liferay.
Download Source
Subscribe to:
Posts
(
Atom
)
