
Saturday, 27 September 2014
Users, Site, Organization and User Group in Liferay and its association
Liferay Administration
,
Organization
,
Permission
,
Role
,
Site
,
User
,
User Group
2 comments
:
Liferay provides many artifacts which are useful to build and organize portal. Like any other application, one of the artifacts is Users in liferay. Apart from Users, there are other artifacts like
I would recommend looking at index page 'A Complete Liferay Guide' to browse all topics about liferay.
- Site (Liferay 6.1 on wards. Till 6.0 it was know as Community)
- Organization
- Role - Permission
- User Group
Based on above artifacts, there are many possible association available in Liferay like
- Liferay Portal has Users
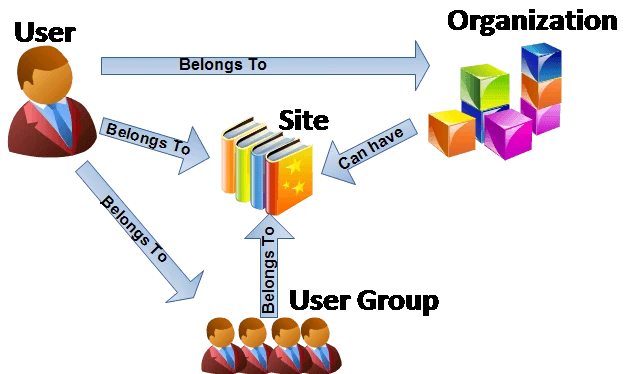
- User can be part of Organization
- User can be part of Site
- Organization is used to aggregate users in hierarchical manner.
- Users with common interest can form a Site. Its some what similar to face book group where people will common interest can collaborate.
- Organizations can have Site but Site can't have Organization
- User can have
- Site Specific Roles.
- Organization Roles.
- Regular (Portal level) Roles.
- Each Role in Liferay is having set of Permissions.
- User Groups is collections of Users
- User Groups can be associated to Site
- User can be associated to Site, Organization and User Group
Relation between User, Organization, Site and User Group can be explained by below screen shot.
- User can have role. Roles are further scoped by Organization, Sites or Regular (Portal Level)
- Ex. User A can have Administrator role for Site-a but for Site-b he is just normal user.
- Each Role is group of Permissions.
- For each Site, there will be one role called Site Administrator which has full access for that site(Super User). Similar is applicable for Organization.
- Apart from Site and Organization Administrator, there is one more role called Site Owner and Organization Owner which is similar to Site / Organization Administrator.
- The only different between them is Site / Organization Owner can make other user Administrator for that Site / Organization while simple Administrator can't do it.
To understand above association in depth, do some hands on by
- Creating Site / Organization
- Creating User and associate them with Site / Organization
- Creating User Group and assign some User to it.
- To associate Site to Organization, Select the check box called 'Create Site' from 'Organization Site' section at right side links in Organization Edit Screen. This check box is available while creating Organization first time.
Feel free to ask Question / give feedback.
I would recommend looking at index page 'A Complete Liferay Guide' to browse all topics about liferay.


How to Import / Configure Liferay Source in Eclipse
Import Liferay Source
,
Liferay Development
,
Liferay in Eclipse
,
Liferay Source
No comments
:
In this article, we will see how to import Liferay source in Eclipse (or Liferay Developer Studio). Configuring Liferay source in Eclipse can be used When
First you have to download Liferay source of latest version from Liferay Web site.
- You need to refer Liferay class
- You are writing Liferay hook plugin and you want to override existing JSP.
- You want to debug existing Liferay classes in debug mode to understand the flow.
- You wan to see out of the box properties defined in portal.properties file
So let us see how to do it.
First you have to download Liferay source of latest version from Liferay Web site.
Once this is done, you can unzip it at some place (e.g. c:/dev).
Once its unzip, follow below steps to configure Liferay source into eclipse.
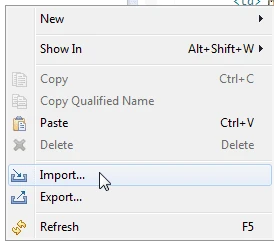
STEP 1. Right click at package / project explorer and choose Import.
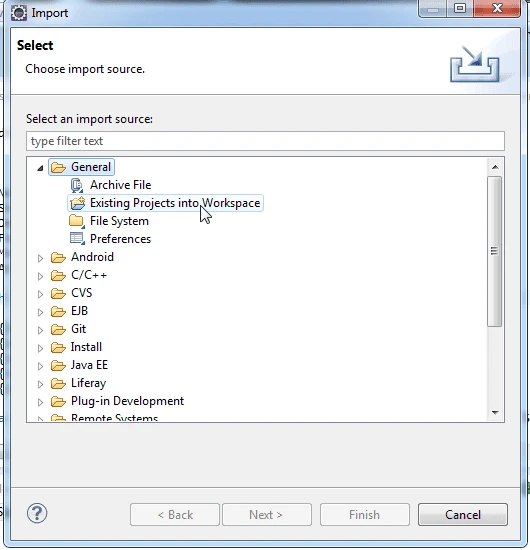
STEP 2. Click on Existing Projects into Workspace.
STEP 3. Point the directory where you unzip liferay source from Browse button.
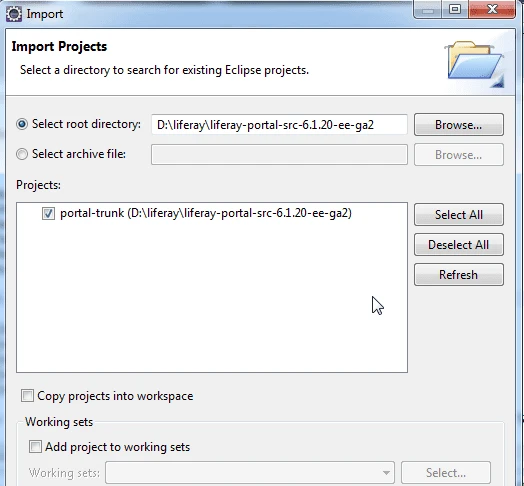
STEP 4. Once its imported, it will be available in project / package explorer in eclipse.
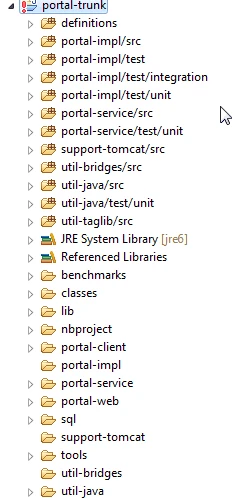
and its done. Its good practice to configure Liferay source when you do development so that whenever you need to refer any out of the box code, it will be handy.
Feel free to ask questions / Suggestions
I would recommend looking at index page 'A Complete Liferay Guide' to browse all topics about liferay.
Once its unzip, follow below steps to configure Liferay source into eclipse.
STEP 1. Right click at package / project explorer and choose Import.
STEP 3. Point the directory where you unzip liferay source from Browse button.
STEP 4. Once its imported, it will be available in project / package explorer in eclipse.
and its done. Its good practice to configure Liferay source when you do development so that whenever you need to refer any out of the box code, it will be handy.
Feel free to ask questions / Suggestions
I would recommend looking at index page 'A Complete Liferay Guide' to browse all topics about liferay.
Friday, 26 September 2014
Portal Properties and Portal-ext Properties in Liferay
Configuration
,
Liferay Development
,
Liferay Portlet
,
Portal-ext
,
portal.properties
,
Portlet
,
Properties
,
PropsUtil
No comments
:
Liferay provides many properties which can be used to set up & configure Liferay portal.
When we configure liferay server first time, it will create portal-setup-wizard.properties file under <<Liferay-tomcat-bundle>> folder as per below screenshot.
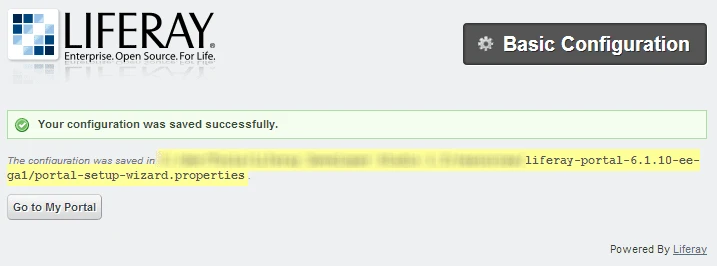
This file contains following configuration information.
Liferay defines few more properties in portal.properties file. This file is located at <<Liferay-tomcat-bundle>>/tomcat-7.0.25/webapps/ROOT/WEB-INF/lib/portal-impl.jar. We can override these property(defined in portal.properties) from portal-ext.properties file.
portal-ext.properties file can be created manually and can be placed at following places
Location-1 : <<Liferay-Tomcat-Bundle>>/ folder
Location-2 : <<Liferay-tomcat-bundle>>/tomcat-7.0.25/webapps/ROOT/WEB-INF/classes.
I would recommend looking at index page 'A Complete Liferay Guide' to browse all topics about liferay.
When Liferay server starts, it reads the portal.properties file first, then portal-ext.properties defined at location-1 above, then portal-ext.properties defined at location-2 above and finally portal-setup-wizard.properties file.
This means,
Let’s see this in action.
Follow blog to configure Liferay source in eclipse / Liferay Developer Studio.
Once Liferay source is imported, press Ctrl+Shift+R and type portal.properties file as per below screenshot.
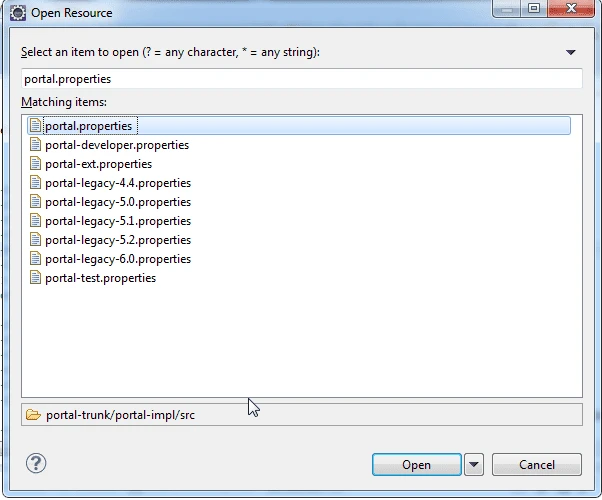
click on Open button and search for company.default.name property. It has following value
company.default.name=Liferay
we will override this property from portal-ext.properties file. Create portal-ext.properties at <<Liferay-Tomcat-Bundle>> folder as per below screenshot.
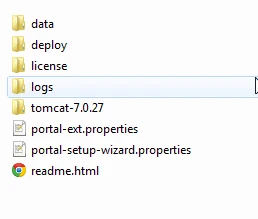 Add following content to it.
company.default.web.id=abc.com
test.property=Abc Corporation
Here we are overriding existing property company.default.web.id and added new (custom)property test.property with value Abc Corporation.
Create one more fie with same name (portal-ext.properties) at <<Liferay-Tomcat-Bundle>>/tomcat-7.0.27/webapps/ROOT/WEB-INF/classes path and add following content to it.
company.default.web.id=pqr.com
test.property=Pqr Ltd
portal-ext.properties file placed at <<Liferay-Tomcat-Bundle>>/tomcat-7.0.27/webapps/ROOT/WEB-INF/classes will be read last and hence it overrides all properties defined in portal.properties and portal-ext.propeties (defined at <<Liferay-Tomcat-Bundle>> folder).
We will read these properties from Portlet. Follow my previous blog to create Liferay MVC portlet. Give its name as 'portal-properties-check' and '-portlet' will be appended by Liferay at the end.
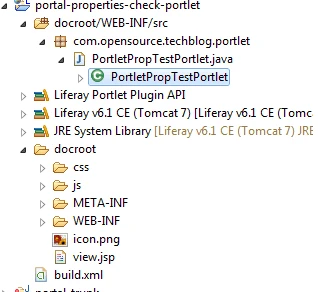
I gave Portlet class as 'com.opensource.techblog.portlet.PortletPropTestPortlet'. It will look like as per below screenshot
Add following content to portlet class
Explanation:-
Explanation:-


I would recommend looking at index page 'A Complete Liferay Guide' to browse all topics about liferay.
When we configure liferay server first time, it will create portal-setup-wizard.properties file under <<Liferay-tomcat-bundle>> folder as per below screenshot.
This file contains following configuration information.
admin.email.from.name=Test Test
default.admin.first.name=Test
default.admin.last.name=Test
liferay.home=C:/Liferay Developer Studio 1.5/resources/liferay-portal-6.1.10-ee-ga1
[email protected]
company.default.name=Liferay
[email protected]
company.default.locale=en_US
setup.wizard.enabled=false
default.admin.screen.name=test
Liferay defines few more properties in portal.properties file. This file is located at <<Liferay-tomcat-bundle>>/tomcat-7.0.25/webapps/ROOT/WEB-INF/lib/portal-impl.jar. We can override these property(defined in portal.properties) from portal-ext.properties file.
portal-ext.properties file can be created manually and can be placed at following places
Location-2 : <<Liferay-tomcat-bundle>>/tomcat-7.0.25/webapps/ROOT/WEB-INF/classes.
I would recommend looking at index page 'A Complete Liferay Guide' to browse all topics about liferay.
When Liferay server starts, it reads the portal.properties file first, then portal-ext.properties defined at location-1 above, then portal-ext.properties defined at location-2 above and finally portal-setup-wizard.properties file.
This means,
- Any properties defined in portal.properties file, can be overridden in portal-ext.properties defined at location-1.
- Any properties defined in portal-ext.properties file at location-1, can be overridden in portal-ext.properties defined at location-2.
Let’s see this in action.
Follow blog to configure Liferay source in eclipse / Liferay Developer Studio.
Once Liferay source is imported, press Ctrl+Shift+R and type portal.properties file as per below screenshot.
click on Open button and search for company.default.name property. It has following value
company.default.name=Liferay
we will override this property from portal-ext.properties file. Create portal-ext.properties at <<Liferay-Tomcat-Bundle>> folder as per below screenshot.
company.default.web.id=abc.com
test.property=Abc Corporation
Here we are overriding existing property company.default.web.id and added new (custom)property test.property with value Abc Corporation.
Create one more fie with same name (portal-ext.properties) at <<Liferay-Tomcat-Bundle>>/tomcat-7.0.27/webapps/ROOT/WEB-INF/classes path and add following content to it.
company.default.web.id=pqr.com
test.property=Pqr Ltd
portal-ext.properties file placed at <<Liferay-Tomcat-Bundle>>/tomcat-7.0.27/webapps/ROOT/WEB-INF/classes will be read last and hence it overrides all properties defined in portal.properties and portal-ext.propeties (defined at <<Liferay-Tomcat-Bundle>> folder).
We will read these properties from Portlet. Follow my previous blog to create Liferay MVC portlet. Give its name as 'portal-properties-check' and '-portlet' will be appended by Liferay at the end.
I gave Portlet class as 'com.opensource.techblog.portlet.PortletPropTestPortlet'. It will look like as per below screenshot
Add following content to portlet class
@Override
 public void render(RenderRequest request, RenderResponse response)
   throws PortletException, IOException {
  String newProp = PropsUtil.get("test.property");
  String existingProp = PropsUtil.get("company.default.web.id");

  request.setAttribute("newProp", newProp);
  request.setAttribute("existingProp", existingProp);
  super.render(request, response);
 }
Explanation:-
- We have override render method which will be called when this portlet get rendered on liferay page.
- In this method, we are reading properties defined in portal.porperties (or portal-ext.properties) by util class called PropsUtil.get() method. We are passing Key of property. This method will return value (in form of 'String' if present) or null if property is not defined.
- We are setting properties value in request attribute which will access it in view.jsp
<%@ taglib uri="http://java.sun.com/portlet_2_0" prefix="portlet" %>

<portlet:defineObjects />

Existing Properties is <b>${existingProp}</b><br>
New Properties is <b>${newProp}</b>
Explanation:-
- In view.jsp file, we are showing the value of properties by EL.
Note:- We must have to restart the server to reflect any changes done in portal-ext.properties file.
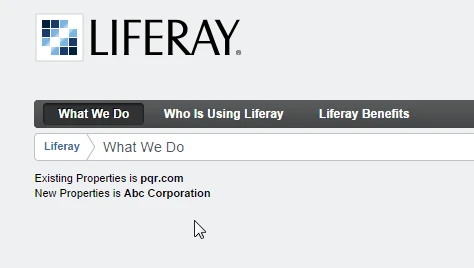
Since we have placed portal-ext.properties file first time, restart the server (if it's already running). Once server is restarted, then deploy the portlet and place it on some liferay page. You will see following out put.
As you can see the values of above properties are coming from portal-ext.properties defined at <<Liferay-Tomcat-Bundle>>/tomcat-7.0.27/webapps/ROOT/WEB-INF/classes location. It overrides properties defined in portal.properties and portal-ext.properties (defined at <<Liferay-Tomcat-Bundle>> folder) file.
Now, remove 'test.property=Pqr Ltd' property from portal-ext.properties file located at <<Liferay-Tomcat-Bundle>>/tomcat-7.0.27/webapps/ROOT/WEB-INF/classes path and restart the server. This time you will see following out put.
Note that, value of 'company.default.web.id' property is still coming from portal-ext.properties file defined at <<Liferay-Tomcat-Bundle>>/tomcat-7.0.27/webapps/ROOT/WEB-INF/classes but the value of 'test.property' is coming from portal-ext.properties at <<Liferay-Tomcat-Bundle>> location, since we have deleted it from portal-ext.properties file located at <<Liferay-Tomcat-Bundle>>/tomcat-7.0.27/webapps/ROOT/WEB-INF/classes.
This means, portal-ext.properties file located at <<Liferay-Tomcat-Bundle>>/tomcat-7.0.27/webapps/ROOT/WEB-INF/classes always read last and override all properties from portal.properties and portal-ext.properties defined at <<Liferay-Tomcat-Bundle>> folder.
Play with some other properties by overriding and displaying it from portlet.
You can find more properties defined in portal.properties from Liferay site.
Download Source
I would recommend looking at index page 'A Complete Liferay Guide' to browse all topics about liferay.
Subscribe to:
Posts
(
Atom
)
